EasyManua.ls Logo

UBERHAUS DESIGN 80475008 - User Manual

Default Icon
3 pages
Print Icon
To Next Page IconTo Next Page
Loading...
1
1
2
2
Avant de commencer
B
efore you begin
Liste de pieces
Fermez la soupape
.
.
.
.
Cover tiles on the wall and make sure the distance between the pipe center
to the finished wall is between 35-50mm. Attention: leave enough space
on both sides of the thermostatic valve to make sure the caps on both sides
can be removed for future maintenance.
Poser les carreaux de céramique sur le mur. Le centre du tuyau devrait être
à 35-55mm de la surface du mur fini. Attention: laisser un esapce suffisant
des deux côtés de la soupape thermostatique afin de pouvoir retirer les
capouchons pour un entretien ultérieur.
Boucher la sortie et ouvrir l’eau. Vérifier la présence de fuites en vérifiant
la pression de l'eau durant deux heures.
Connect inlet and outlet pipes. Attention: before this step, clean pipes to
get rid of mud, sand or other debris that could block the pipes. The
thermostatic cartridge where COLD and HOT are printed is for water inlet
with hot water on the left and cold water on the right. The rest is for outlets.
Any other connections may cause shower malfunction or accidents.
Put connectors on the valve outlets. Wrap Teflon tape around the threads.
Use self-tapping screws to fix the valve body onto the wall, 900-1000mm
off the floor.
3
Plug water outlets and turn on water supply. Make sure there is no leakage
occurrence by checking pressure for two hours.
Connecter les tuyaux d’entrée et de sortie d’eau. Attention : ouvrir d’abord
l’eau pour évacuer de la boue et d’autres débris à l’intérieur des tuyaux.
Le corps de valve thermostatique dont l’extrémité imprimée de marques
COLD(FROID) et HOT(CHAUD) représente l'entrée d’entrée d’eau, avec
l'eau chaude à gauche et l'eau froide à droite. Le reste des extrémités
est pour la sortie d’eau. Bien installer ces raccords pour éviter un mauvais
fonctionnement de la douche ou un risque d'accident.
Installer les raccords sur les sorties d'eau. Enrouler les connecteurs avec
du ruban Téflon. Utiliser des vis autotaraudeuses pour fixer le corps de
valve au mur, à une hauteur de 900-1000 mm du sol.
3
Description
Collet de bec
Joint torique
Adaptateur
Filtre
Cartoucher
Escutcheon
Anneau décoratif
Flexible hose
Adaptateur
No
80475008
Inverseur
Cheville d'ancrage
Écrou
Shower head Pomme de douche
Bras
Collet d,arrêt
Diverter
Question and Answer IconNeed help?

Do you have a question about the UBERHAUS DESIGN 80475008 and is the answer not in the manual?

Overview

This document outlines the installation, usage, and maintenance of an Uberhaus Design bathtub shower faucet with a thermostatic cartridge, model 80475008.

Function Description

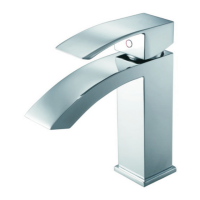
The Uberhaus Design bathtub shower faucet is a plumbing fixture designed for both bathtubs and showers, featuring a thermostatic cartridge for precise temperature control. It allows users to control water flow and temperature for both the main spout and a handheld shower, as well as a fixed shower head. The thermostatic cartridge ensures a consistent water temperature, preventing sudden changes in hot or cold water supply. The system includes a diverter to switch water flow between the spout, handheld shower, and overhead shower.

Important Technical Specifications

The faucet system includes a variety of components, each with specific technical details. The main valve body (FH 8302-01C) houses the thermostatic cartridge (FH HW-V), which is critical for temperature regulation. The system uses M24 aerators (FH TQ-07C) for the spout and includes flexible hoses (FH 8832) for connections. The installation requires drilling a Ø8 hole for mounting the shower rail, with the valve body fixed onto the wall at a height of 900-1000mm from the floor. Pipe connections for the inlet and outlet are crucial, with specific instructions for hot water on the left and cold water on the right, as indicated by "COLD" and "HOT" markings on the thermostatic cartridge. The distance between the pipe center to the finished wall should be between 35-50mm. The system also includes check valves (FH NZ15-NP and FH NZ14-NP) to prevent backflow and ensure proper water flow direction. The shower head (FH S11G) and handheld shower (FH 516A) are designed for efficient water delivery. Various screws (M6, M5, M4) and nuts are used for secure assembly.

Usage Features

The faucet offers intuitive control over water flow and temperature. The handle allows users to adjust the water temperature, while the diverter (FH TE01A) switches water flow between the main spout, handheld shower, and overhead shower. The thermostatic cartridge maintains a constant water temperature, enhancing comfort and safety during use. The handheld shower provides flexibility for targeted rinsing, while the overhead shower offers a broader spray. The sliding rail set (FH 9516-05) allows for height adjustment of the handheld shower, catering to different user preferences. The system is designed for ease of use, with clearly marked components for installation and maintenance.

Maintenance Features

Regular maintenance is essential to ensure optimal performance and longevity of the faucet. The manual highlights key maintenance features, particularly concerning water flow issues and imprecise temperature control, which are often caused by hard water blocking filter nets.

Cleaning Filter Nets:

  • Main Valve Filter Nets: If water flow is reduced or temperature control is imprecise, the filter nets on both sides of the valve body and the thermostatic cartridge may be blocked. To clean these, first turn off the main water supply. Then, remove the handle by taking off the rubber sleeve and using pliers. The escutcheon can then be removed, and the end caps unscrewed with a coin to access the small filter nets. These nets should be cleaned with a brush and vinegar, rinsed, and reassembled.
  • Thermostatic Cartridge Filter Net: If water flow remains low and temperature control imprecise after cleaning the main valve filter nets, the thermostatic cartridge's filter net needs cleaning. This involves unscrewing the setscrew, removing the handle body, handle, stop collar, and packing nut. The thermostatic cartridge can then be removed to access its filter net. After cleaning, all parts must be reinstalled, ensuring that the slot on the thermostatic cartridge, the slot mark on the packing nut, the stop collar, and the 38°C mark are aligned. The slot mark on the packing nut should be kept upwards.

Leakage Checks:

  • During installation, it is crucial to plug water outlets and turn on the water supply to check for leaks under pressure for two hours.
  • After installation, slowly open hot and cold water supplies to verify no leaks. If a leak occurs, shut off the water supply and tighten connectors by a quarter turn using the appropriate tool, then retest.

Air Evacuation:

  • After installation or maintenance, turn on both hot and cold water for at least one minute to evacuate any trapped air in the pipes before turning off the water.

General Maintenance:

  • The design allows for easy removal of caps on both sides of the thermostatic valve for future maintenance, provided sufficient space is left during tile installation.
  • The product comes with a limited lifetime warranty against manufacturing faults for domestic use, with replacement cartridges provided free of charge for leaks or drips under normal installation, use, and service conditions. Proof of purchase is required for warranty claims. Normal wear and tear, improper use, neglect, or costs related to labor, injuries, or consequential damages are not covered.

The Uberhaus Design faucet is designed for durability and user-friendly maintenance, ensuring a reliable and comfortable showering experience.

UBERHAUS DESIGN 80475008 Specifications

General IconGeneral
BrandUBERHAUS DESIGN
Model80475008
CategoryPlumbing Product
LanguageEnglish

Related product manuals