Do you have a question about the Uberhaus SWING BED L-GZ347PST-WTN and is the answer not in the manual?
| Brand | Uberhaus |
|---|---|
| Model | SWING BED L-GZ347PST-WTN |
| Category | Outdoor Furnishing |
| Language | English |
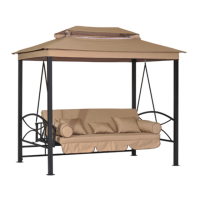
Connects middle beam (F) to short beam (D) using bolts (AA) and nuts (CC).
Inserts long beams (C) and short beams (D) into the top holds of posts (E1-E4).
Secures side rails (H) to posts (E1-E4) using bolts (BB).
Attaches back rail (G) to posts (E1, E4) with bolts (BB).
Inserts beams for the big roof (B) into the top connection (A).
Spreads the small canopy (R) and the large canopy (S).
Fastens roof beams (B) to posts (E1-E4) with bolts (EE) and nuts (GG).
Connects front supporter (I) to left/right arms (M1, M2) using bolts (FF).
Connects back supporter (J) to left/right arms (M1, M2) using bolts (FF).
Secures seat frame (K) and back frame (L) with bolts (DD) and nuts (CC).
Attaches seat frame (K) to arms (M1, M2) with bolts (DD), washer (NN), and nuts (CC).
Fastens back frame (L) with bolts (PP) if used as a bed.
Connects seat frame adjusting bar (N) to back frame (L) with bolts (MM) and nuts (GG).
Places the adjustable support (N) onto the back supporter (J).
Attaches one side of the suspender (O) to the hooks of arms (M1, M2).
Attaches suspender (O) to beam (F) and secures hook (Q) with bib (X).
Arranges cushions (W), bolster (T), and pillows (U, V) on the seat and back.
Fully extends the large canopy (S) over the frame.
Fastens main posts (E1-E4) to the structure using nails (II).
Secures latch (P) to side rail (H) with bolts (HH).
Advise on temporary nature, disassembly, and dry storage after use.
Specify that assembly must be performed by two or more adults.
Caution against leaving the swing bed erected in high wind conditions.