EasyManua.ls Logo

UltraPro 54850 - User Manual

UltraPro 54850
2 pages
Print Icon
To Next Page IconTo Next Page
Loading...
READ IT OR WATCH IT
Read instructions or watch easy-to-follow video.
Scan QR code or visit https://byjasco.com/54850i
54850
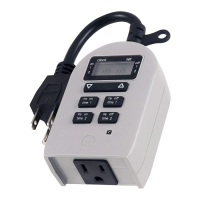
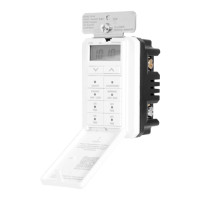
OUTDOOR SIMPLE-SET PLUG-IN
GROUNDED OUTLET TIMER
IF MOUNTING OUTDOORS
1. Mount the timer on a wall near a GFCI receptacle using a screw or nail. Install timer
as far above ground level as possible with receptacle facing downward. Do not
install where timer can be immersed or where water will splash or drip onto
receptacle. Screw or nail head must extend at least 3/16in. from the wall (nail or
screw not included).
2. Hang the timer from the hole at the top of the unit.
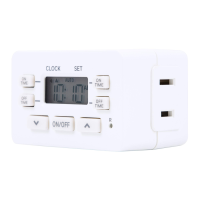
SETUP
1. If numbers are dicult to read or not visible
on-screen, plug timer into an outlet and let timer
charge for 1 hour. Once charged, press the reset
( ) button in the lower right corner using a
toothpick or pencil.
2. Use up ( ) and down ( ) arrows to set
current time. Take note of the AM/PM setting.
Note: When daylight saving time occurs use the
up ( ) and down ( ) arrows to adjust the
time by 1 hour.
PROGRAMMING OPTIONS
DEFAULT TIMER
There are two ON/OFF times available
with preset default times. To activate
default times, simply press ON TIME or
OFF TIME button so the arrow ( ) next
to the setting is visible on the display. To
deactivate the default timer, press and
release the button. The arrow next to the
setting will disappear.
CUSTOMIZED TIMER
On time: Press and release either ON TIME button to
enter custom setting mode. The default on time
flashes. Use arrow buttons ( ) to set the desired
on time. Press the ON TIME button or wait 5 seconds
to set. If no button is pressed within 5 seconds, the
default timer will be set and the display will return to
clock mode. If you set the on time earlier than the
current time, it will not turn on until the next day at
the scheduled time.
Note: Mode indicator ( ) will move under SET while
programming, then back to CLOCK if it times out or
after on time is set.
O time: Press and release either OFF TIME button to
enter custom setting mode. The default o time
flashes. Use arrow buttons ( ) to set the desired
o time. If no button is pressed within 5 seconds, the
default timer will be set and the display will return to
clock mode. Press the OFF TIME button or wait 5
seconds to set.
Note: When an on time or o time is set, the active
program indicator ( or ) will appear on the screen
beside the setting. Programs may run individually or
simultaneously.
Supplier Declaration of Conformity | Model #: 54850 | Jasco Products Co.,
10 E. Memorial Rd., Oklahoma City, OK 73114, www.byjasco.com
This device complies with Part 15 of the FCC and Industry Canada license-exempt RSS
standards. Operation is subject to the following two conditions: (1) this device may not
cause harmful interference, and (2) this device must accept any interference received,
including interference that may cause undesired operation.
FCC NOTE: The manufacturer is not responsible for any radio or TV interference
caused by unauthorized modifications to this equipment. Such modifications could
void the users authority to operate the equipment.
NOTE: This equipment has been tested and found to comply with the limits for a Class
B digital device, pursuant to Part 15 of the FCC Rules. These limits are designed to
provide reasonable protection against harmful interference in a residential installation.
This equipment generates, uses and can radiate radio frequency energy, and if not
installed and used in accordance with the instructions, may cause harmful interference
to radio communications. However, there is no guarantee interference will not occur
in a particular installation. If this equipment does cause harmful interference to radio
or television reception, which can be determined by turning the equipment off and
on, the user is encouraged to try to correct the interference by one or more of the
following measures:
Reorient or relocate the receiving antenna.
Increase the separation between the equipment and receiver.
Connect the equipment into an outlet on a circuit different from which the receiver
is connected.
Consult the dealer or an experienced radio/TV technician for help.
CAN ICES-3(B)/NMB-3(B)
125VAC, 50/60Hz
10A 1250W general/resistive
5A 625W tungsten
1/4HP motor type 3R
Works with dimmable LED and CFL bulbs
FCC/IC - EN
SPECIFICATIONS
RESET
BUTTON
AM
CLOCK
SET
ON
OFF
1
1
2
2
ON
TIME 1
OFF
TIME 1
ON
TIME 2
OFF
TIME 2
R
AM
CLOCK
SET
ON
OFF
1
1
2
2
ON
TIME 1
OFF
TIME 1
ON
TIME 2
OFF
TIME 2
R
RISK OF ELECTRICAL SHOCK
PLUG DIRECTLY INTO A
GFCI PROTECTED OUTLET
UNPLUG TIMER BEFORE
CLEANING
FULLY INSERT PLUG
KEEP AWAY FROM
CHILDREN
NOT FOR WATER
IMMERSION
SUITABLE FOR INDOOR
AND OUTDOOR LOCATIONS,
STORE INDOORS WHILE
NOT IN USE
RISK OF FIRE
DO NOT USE TO CONTROL
APPLIANCES THAT CONTAIN
HEATING ELEMENTS
(COOKING APPLIANCES,
HEATERS, IRONS, ETC.)
DO NOT EXCEED
ELECTRICAL RATINGS
DO NOT USE IF DEVICE OR
CORD IS DAMAGED
DO NOT USE WITH AN
EXTENSION CORD
WARNING
AM
CLOCK
SET
ON
OFF
1
1
2
2
ON
TIME 1
OFF
TIME 1
ON
TIME 2
OFF
TIME 2
R
MADE IN CHINA/HECHO EN CHINA
Distributed by Jasco Products Company LLC, 10 E. Memorial Rd., Oklahoma City, OK 73114.
This Jasco product comes with a 2-year limited warranty. Visit www.byjasco.com for
warranty details.
Questions? Contact our U.S.-based Consumer Care at 1-800-654-8483 between
7AM-8PM M-F, Central Time.
©JASCO 2020 | 54850 | 09/08/20 v1
AM
CLOCK
SET
ON
OFF
1
1
2
2
ON
TIME 1
OFF
TIME 1
ON
TIME 2
OFF
TIME 2
R
12:00AM
6:00AM
5:00PM
ON TIME 1
ON TIME 1
OFF TIME 1
OFF TIME 2
6:00PM
AM
CLOCK
SET
ON
OFF
1
1
2
2
ON
TIME 1
OFF
TIME 1
ON
TIME 2
OFF
TIME 2
R
AM
CLOCK
SET
ON
OFF
1
1
2
2
ON
TIME 1
OFF
TIME 1
ON
TIME 2
OFF
TIME 2
R
AM
CLOCK
SET
ON
OFF
1
1
2
2
ON
TIME 1
OFF
TIME 1
ON
TIME 2
OFF
TIME 2
R
MTS 53003
Question and Answer IconNeed help?

Do you have a question about the UltraPro 54850 and is the answer not in the manual?

Overview

The UltraPro 54850 Outdoor Simple-Set Plug-In Grounded Outlet Timer is a versatile device designed to automate the power supply to outdoor appliances. It features a grounded outlet and is suitable for both indoor and outdoor use, though it should be stored indoors when not in use. The timer allows users to set specific ON/OFF times for connected devices, offering convenience and energy savings.

Function Description:

The primary function of this device is to control the power flow to a connected appliance by turning it ON and OFF at programmed times. It offers both preset default times and customizable programming options. The timer is designed for simple setup and operation, making it user-friendly for various applications. It is particularly useful for outdoor lighting, decorative displays, or other electrical devices that benefit from automated scheduling. The timer is equipped with a display that shows the current time, program settings, and indicators for active programs. A reset button is available to clear settings if needed.

Important Technical Specifications:

  • Voltage: 125VAC, 50/60Hz
  • General/Resistive Load: 10A, 1250W
  • Tungsten Load: 5A, 625W
  • Motor Type: 1/4HP, Type 3R
  • Compatibility: Works with dimmable LED and CFL bulbs.
  • Mounting: Designed to be mounted on a wall near a GFCI receptacle for outdoor use.
  • Operating Environment: Suitable for indoor and outdoor locations, but not for water immersion.

Usage Features:

Mounting Outdoors:

  1. Placement: Mount the timer on a wall near a GFCI receptacle using a screw or nail. It should be installed as far above ground level as possible, with the receptacle facing downward.
  2. Avoid Immersion: Do not install the timer where it can be immersed in water or where water will splash or drip onto the receptacle.
  3. Screw/Nail Extension: The screw or nail head must extend at least 3/16 inch from the wall.
  4. Hanging: Hang the timer from the hole at the top of the unit.

Setup:

  1. Initial Charge/Reset: If the display is difficult to read or not visible, plug the timer into an outlet and allow it to charge for 1 hour. After charging, press the reset (R) button in the lower right corner using a toothpick or pencil to clear any previous settings.
  2. Set Current Time: Use the up (▲) and down (▼) arrows to set the current time, paying attention to the AM/PM setting.
  3. Daylight Saving Time: To adjust for daylight saving time, use the up (▲) and down (▼) arrows to change the time by 1 hour.

Programming Options:

Default Timer:

The timer offers two preset ON/OFF times.

  • Activation: To activate a default timer, press either the ON TIME or OFF TIME button until a checkmark (✔) appears next to the setting on the display.
  • Deactivation: To deactivate a default timer, press and release the corresponding button again, and the checkmark will disappear.
  • Default ON TIME 1: 5:00 PM
  • Default OFF TIME 1: 12:00 AM
  • Default ON TIME 2: 6:00 PM
  • Default OFF TIME 2: 6:00 AM

Customized Timer:

  • Setting ON Time:
    1. Press and release either ON TIME button to enter custom setting mode. The default ON time will flash on the display.
    2. Use the up (▲) and down (▼) arrows to set the desired ON time.
    3. Press the ON TIME button again or wait 5 seconds to set the time. If no button is pressed within 5 seconds, the default timer will be set, and the display will return to clock mode.
    4. If the ON time is set earlier than the current time, the timer will not turn on until the next day at the scheduled time.
    5. Mode Indicator: The mode indicator (▲) will move under "SET" while programming, then return to "CLOCK" if it times out or after the ON time is set.
  • Setting OFF Time:
    1. Press and release either OFF TIME button to enter custom setting mode. The default OFF time will flash on the display.
    2. Use the up (▲) and down (▼) arrows to set the desired OFF time.
    3. Press the OFF TIME button again or wait 5 seconds to set the time. If no button is pressed within 5 seconds, the default timer will be set, and the display will return to clock mode.
    4. Active Program Indicator: When an ON time or OFF time is set, the active program indicator ( or ) will appear on the screen beside the setting. Programs can run individually or simultaneously.

Maintenance Features:

Safety Warnings:

  • Electrical Shock Risk:
    • Plug directly into a GFCI protected outlet.
    • Unplug the timer before cleaning.
    • Fully insert the plug into the outlet.
    • Keep away from children.
    • Not for water immersion.
    • Suitable for indoor and outdoor locations, but store indoors while not in use.
  • Fire Risk:
    • Do not use to control appliances that contain heating elements (e.g., cooking appliances, heaters, irons).
    • Do not exceed electrical ratings.
    • Do not use if the device or cord is damaged.
    • Do not use with an extension cord.

FCC/IC Compliance:

The device complies with Part 15 of the FCC and Industry Canada license-exempt RSS standards, ensuring it meets regulatory requirements for electromagnetic compatibility. Users are advised that any unauthorized modifications to the equipment could void their authority to operate it. If interference occurs, users are encouraged to reorient the receiving antenna, increase separation between equipment and receiver, connect the equipment to a different circuit, or consult a dealer/technician.

Warranty and Support:

The product comes with a 2-year limited warranty. For warranty details or questions, users can visit www.byjasco.com or contact U.S.-based Consumer Care at 1-800-654-8483 between 7 AM-8 PM M-F, Central Time.

UltraPro 54850 Specifications

General IconGeneral
BrandUltraPro
Model54850
CategoryTimer
LanguageEnglish

Related product manuals