Programmable Thermostat
Owners Manual
Model: PS3110 Series
Congratulaons!
Your new thermostat will provide years of reliable service.
By saving energy, your thermostat will pay for itself during
its rst season of use. Thank you for buying our product!
Please read this manual for complete instrucons on
installing and operang your thermostat. If you require
further assistance, please feel free to contact us.
IMPORTANT INFORMATION
1. This thermostat is designed to work on the following
systems:
• Gas – Standing Pilot • Oil – Fired Furnace
• Gas – Electronic Ignion • Single Stage Heat Pumps –
with no auxiliary heat
• Gas – Fired Boilers • Electric Air Condioning
• Gas – Millivolt Systems • Electric Furnace
• Oil – Fired Boilers
This thermostat will NOT control mul-stage heat pumps
or 110/220V baseboard electric heang systems.
2. Temperature Range
This thermostat can be programmed between 45°F and 95°F
(7°C and 35°C). However, it will display room temperatures
from 30°F to 99°F (0°C and 37°C). HI will be displayed if
the temperature is higher than 99°F (37°C), and LO will be
displayed if the temperature is lower than 30°F (0°C).
This thermostat will automacally shut down in Heat
mode if the temperature rises above 95°F (35°C), and will
automacally shut down in Cool mode if the temperature
drops below 45°F (7°C).
3. Compressor Protecon
Aer shung o the cooling system, this thermostat has
a 4 minute delay before it can be restarted. This feature
will prevent damage to your compressor caused by rapid
cycling. It does not prevent a rapid compressor restart due
to short power outages.
4. Baery Warning
Two fresh AA alkaline baeries should provide over one
year of service. When the baeries need to be replaced.
The low baery indicator will ash on the display. When
you see this message, install new alkaline baeries. You
have approximately 1 minute to change the baeries and
keep the thermostat’s clock and program sengs. Once
the baeries have become too low to ensure proper
operaon, your system will be turned o, and the display
will be cleared except for ashing Low Baery Indicator on
the LCD display.
CAUTION: When only the Low Baery icon
ashes on the display, the thermostat is shut
down, and your system will no longer operate.
In this condion, there is no temperature control.
NOTE: The backlight will not funcon when the thermostat
is in low baery condion.
NOTE: If you plan to be away from the premises over 30
days, we recommend that you replace the old baeries
with new alkaline baeries prior to leaving.
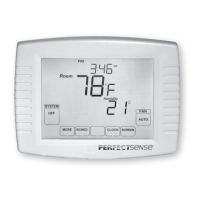
FEATURES
Structure of thermostat and explanaon of the keypads
Up and Down Key. Used for
changing the Temperature
setting. Also used for increasing
and decreasing selections in the
Time, Program, and Span
functions.
LCD Display Shows
Time, Day, Temperature,
and other feature
information as required.
Battery Compartment
Front access allows
easy insertion of two
AA 1.5v batteries.
Front Door Battery cover Open with one nger from side lips.
Fan Switch used for Automatic
or Continuous fan operation.
Front Door. To open or close
the door by pressing it softly.
Hold/Return Key. Used for setting a
permanent (vacation)hold, and for returning
to the normal display from Day & Time setting,
Programming or Span setting modes.
Filter Key. Resets
lter change
counter to zero
entering and modifying
Programs. Use with the Up
and Down keys to set
times and temperatures.
Press when in Clock setting
mode toselect between 12
and 24 hour clock modes.
System Switch
Selector switch for
Heat, Cool and O..
Day/Time Key
Used for entering
the Clock setting
mode. Use with the
Up and Down keys
to set the time and day.
Backlight Key
OPERATION
Seng Day and Time
• The LCD will show this informaon
when baeries are rst installed.
The temperature will update aer a
few seconds.
• During me and day seng mode, the
temperature and program displays will go blank.
Refer to the Steps below.
STEP 1:
• Press to enter me and day seng
mode. The current hour and the AM/
PM indicator will be ashing.
• Press up or down to change the hour
to the current hour.
Note the AM/PM indicator, as the display will change at
12AM and 12PM.
STEP 2:
• Press again to change from hour
seng to minute seng. The current
minute will be ashing.
• Press up or down to change the
minute to the current minute.
STEP 3:
• Press again to change from minute
seng to day seng. The current day
will be ashing.
• Press up or down to change the day
to the current day.
STEP 4:
• Press again to change back to the
normal display.
NOTE: You may press at any me during day
and me seng to return to the normal display.
12Hr. / 24 Hr. Time Format
Your thermostat is set from the factory in normal 12
(AM/PM) me format. To change to 24 hour (military) me,
press during me and day seng mode to toggle
between the 12 hour and 24 hour formats. The AM / PM
indicator will not be displayed in 24 hour mode. Both the
current me and all programs will automacally change to
the selected format.
PROGRAMMING
The following me and temperature sengs are
pre-programmed into the thermostat:
Temperature in F° (C°)
Program Number Time Heat Cool
1 6:00 am 68°F(20°C) 78°F(26°C)
2 8:00 am 60°F(16°C) 85°F(29°C)
3 4:00 pm 68°F(20°C) 78°F(26°C)
4 10:00 pm 60°F(16°C) 82°F(28°C)
• All 7 days of the week have the same default programs.
Personal Program Schedule
• You can revise the factory programs to match your
own schedule. Use this Personal Program Schedule to
determine which mes and temperature sengs match
your comfort and energy saving requirements. Use a
pencil so you can revise your records each me you
change your program sengs.
Heang
Day Program 1 Program 2 Program 3 Program 4
Monday –
Friday
Time
Temp
Time
Temp
Time
Temp
Time
Temp
Saturday –
Sunday
Time
Temp
Time
Temp
Time
Temp
Time
Temp
Cooling
Day Program 1 Program 2 Program 3 Program 4
Monday –
Friday
Time
Temp
Time
Temp
Time
Temp
Time
Temp
Saturday –
Sunday
Time
Temp
Time
Temp
Time
Temp
Time
Temp
Revising Programs
• Familiarize yourself with manually changing programs,
so that you can easily modify the programs as your
comfort needs change. Follow the steps below to
change the program mes and temperature.
NOTE:
1) The program me can be set in 10-minute increments.
2) The program temperature can be set in increments of
1°F (1°C).
3) Aer 15 seconds without a key press, the thermostat
will return to normal display mode.
4) When seng the program me, note the AM / PM
indicator.
STEP 1:
• Slide the System Switch to the HEAT
or COOL posion to program the
corresponding system.
NOTE: If the System Switch is in the OFF posion, the last
posion used will be programmed.
STEP 2:
• Press to enter program mode. HEAT
or COOL will be displayed on the LCD.
STEP 3:
• The program hour and AM or PM indicator will
ash. Press to change the hour.
STEP 4:
• Press again to change to the minute
posion. The current minute will ash.
• Press to change the minute.
STEP 5:
• Press again to change to the program
temperature. The current program
will ash.
• Press to change the temperature.
STEP 6:
• Press again to move to the next program number.
• Repeat Step 3 through 5 to change the remaining
weekday and weekend programs. (There are a
total of 8 programs.)
• Aer cycling through all 8 programs, press
again to return the display to normal.
• Press at any me to exit the program mode.
Reviewing Programs
To review your program sengs, press
repeatedly to
cycle through the programs. You also can make changes at
any me.
System Selector Switch
The System Selector switch on the front of the thermostat
determines the operang mode of the thermostat. You may
select COOL, OFF, or HEAT.
NOTE: Anyme you install or remove the thermostat from
the wallplate, slide the System Selector to the OFF posion
to prevent rapid system On-O.
Fan Switch
The fan switch should normally be set in the AUTO
posion. The fan will be turned on during normal
operaon of your system. In a normal gas or oil
furnace, the fan will be turned on by your furnace aer its
warm-up delay. For electric heat, air condioning, and heat
pump operaon, the fan will turn on with the system.
To run the fan connuously, slide the Fan switch to the ON
posion.
Temporary Manual Override
To temporarily change the current set
temperature without aecng your program:
• Press and hold for about 1 second to
enter Manual Override mode. When
display ashes, you can release the key.
• Press again to change to your desired set
temperature. Hold the key for 2 seconds to
fast-advance set temperature.
• Press to return to normal mode, or wait 5 seconds for it
to return automacally.
• The current program number will ash to signify the
temporary override.
• At the next program change me, the temporary
override is canceled, and the next program temperature
becomes the setpoint temperature.
• Press, then press again. This will
return the set temperature to the
current program set temperature.
Permanent Override or a Designated Day Override
To hold your manual override for
vacaon or unl a designated day.
• Press to make the current program
temperature the HOLD temperature. HOLD
will be displayed on the LCD, and the program
number will disappear.
• Follow the Temporary Manual
Override instrucons above to
change the Permanent Manual
Override temperature.
• You can conrm the held set temperature by pressing for
less than 1 second.