This document is a user manual for Upper Bounce Enclosure Sets and Enclosure Nets, designed to fit most trampoline models. It provides comprehensive instructions for assembly, installation, care, maintenance, and safe use of these trampoline parts.
Function Description:
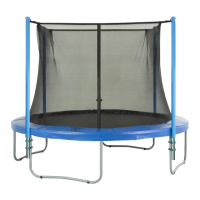
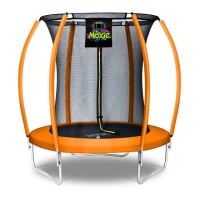
The Upper Bounce Enclosure Set and Enclosure Net are designed to enhance the safety of trampolines by providing a protective barrier around the jumping area. The enclosure net prevents users from falling off the trampoline, ensuring a safer bouncing experience. The manual distinguishes between different types of enclosure sets and nets based on their installation method:
- Inside Type Enclosure Sets (Models beginning with UBES): These enclosures are designed to be installed inside the trampoline frame, typically attaching to poles that are secured to the trampoline legs.
- Outside Type Enclosure Sets (Models beginning with UBESOS): These enclosures are installed on the outside of the trampoline frame, with the net sleeves fitting over the enclosure poles.
- Enclosure Nets Only (Models beginning with UBNET): These are replacement nets for existing enclosure pole systems.
The manual emphasizes that the enclosure net is a safety feature intended to prevent accidental falls and should not be intentionally jumped into, as this could damage the net or cause the trampoline to topple.
Important Technical Specifications:
The manual provides guidance on selecting the correct enclosure set or net based on trampoline dimensions and pole configurations:
- Frame Size: Users are instructed to measure the trampoline frame from one outside edge vertically and horizontally to the other outside edge to determine the correct frame size (e.g., 14FT).
- Pole Amount: The number of enclosure poles required depends on the number of "W" shaped legs on the trampoline. For example, 6 "W" shaped legs require 6 poles, while 4 legs can accommodate either 4 poles (one per second leg) or 8 poles (two per leg).
- Pole Connector Diameter: The pole connecting tool (clamp) must match the diameter of the trampoline leg. Connectors are available for 1-inch and 1.5-inch pole diameters. Optional U-shaped connectors (Model UBHWD-UB-12 for sets of 12, and UBHWD-UB-16 for sets of 15) are also mentioned.
- Net Height: A height chart is provided for different types of nets to ensure compatibility with existing poles or arches:
- 7.5 ft and 8 ft trampolines: 65" net height
- 10 ft trampolines: 64" net height
- 12 ft and larger trampolines: 71" net height
Usage Features:
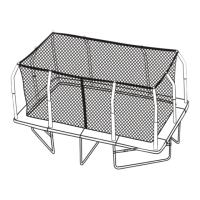
The manual details the assembly and installation process, which varies depending on the type of enclosure:
-
Pole Installation:
- Requires two adults for assembly.
- Involves attaching 8-shaped pole clamps to the trampoline legs, with the smaller hole clasping the trampoline pole and the larger hole clasping the trampoline leg.
- Poles are inserted into the clamps, ensuring the black rubber cap faces down.
- A critical step is aligning a mark on the lower pole with the trampoline frame, or attaching it 18 inches below the frame if no mark is present.
- Each pole uses two clamps: one 2 inches below the frame and another 2 inches above the end of the lower pole.
- Screws are used to tighten the clamps securely.
- Upper poles are then inserted into the lower poles.
- Pole caps (E1 for inside type, E2 for outside type) are inserted after all poles are connected.
-
Net Installation (Inside Type Models):
- Pole Straps: If using an enclosure set, straps are hooked onto "C" type pole caps or wrapped around plain pole caps. If the trampoline has arches, straps are connected to the arches and tightened.
- Middle Straps: Connect to the center of each pole or arch pole.
- Bottom Straps: Connect clips to every few jumping mat V-rings from under the safety pad.
-
Net Installation (Outside Type Models):
- Insert Net to Poles: The net sleeves are inserted onto the poles, starting by sliding the sleeve onto the pole until it reaches 2 feet, and repeating for all poles.
- The sleeves are then pulled down gradually until they reach the bottom of the enclosure frame.
- Connect Bottom Straps: Clips are attached to every few jumping mat V-rings from under the safety pad, from the outside.
-
Net Installation (Arch Type Models):
- Insert Net to Arches: Disconnect the top arches, slide the top arch part into the net sleeve, and then click the arch parts back together tightly.
- Bottom Straps: Connect clips to every few jumping mat V-rings from under the safety pad.
-
Net Installation (Flex On Top Models):
- Insert Fiberglass Rods: Fiberglass rods are threaded through the sleeves at the upper edge of the safety net.
- Connect Rods: Rods are connected using T-pole caps or nuts with an adjustable wrench.
- Raise Net and Connect to Poles: The net is raised, and the rods are connected to the poles using T-connectors or by clicking the rod into the pole cap.
- Connect Bottom Clips: Bottom clips are hooked to every few V-rings.
Maintenance Features:
The manual includes "Enclosure Net Safety Checks" to ensure ongoing safety and proper function:
- Pole Stability: Hold onto the pole net jacket and shake to check if all enclosure poles are sturdy.
- Net Integrity: Check the enclosure net and pole jacket for any tearing in stitching or material.
- Zipper Functionality: Verify that the enclosure net zipper and entrance hooks function properly.
- Hook Attachment: Ensure all safety enclosure hooks are attached to the triangle ring under the trampoline.
- Pre-Jumping Check: Before jumping, confirm that the safety enclosure net zipper is 100% closed and all three entrance hooks are re-hooked.
The manual also provides customer service contact information (phone and email) for any questions or concerns regarding the product. It encourages users to provide feedback via their website.