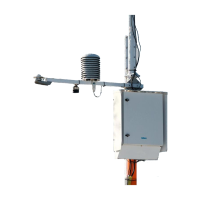
Figure 9 Pyranometer CMP6, Arrow Points to Drying Cartridge
Calibrate CMP every 2 years and change the silica gel desiccant. When changing the
desiccant in the drying cartridge (indicated with an arrow in the preceding figure), perform
the following checks:
• Make sure the surfaces of the pyranometer and the drying cartridge that touch the
rubber O-ring are clean. Corrosion, dirt, and water can damage the sensor.
• The rubber O-ring is coated with silicon grease to improve the seal. If the rubber O-ring
looks dry, apply grease or Vaseline to it.
O-ring type: 24 × 3.0 NBR (nitrite rubber).
• Check that the drying cartridge is tightly threaded into the sensor body.
5.12.1
Adding CMP3, CMP6, or CMP10 to System
Before configuring the new sensor, complete the mechanical installation.
1. In AWS Client, select Settings > Parameters > Static.
2. In the CFG parameter set, select CMP6.
3. To enable the sensor, type 1 in the Value
field, and select Save.
4. To activate the new configuration, reset the QML data logger. Select Maintenance >
Reset > Immediate.
5. Calibrate the sensor.
a. In AWS Client, select Settings > Calibration.
b. Select Solar Radiation.
c. Select Manual Calibration and type the sensitivity factor (V/Wm
-2
) from the sensor
label in the
field.
The usage of the Sensitivity parameter depends on the sensor. It
aects the gain of
the measurement or the sensitivity of the radiation sensor.
d. To calibrate the sensor, select Calibrate,
e. To end the manual calibration, select Stop.
AWS310-SITE Configuration and Maintenance Manual M211828EN-C
110
 Loading...