Chapter 2 ___________________________________________________________ Product Overview
VAISALA ________________________________________________________________________ 19
1209-013
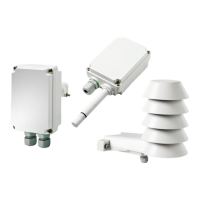
Figure 5 Transmitter Parts – Inside (Digital Output Models)
Opening for cable (wiring from top)
Opening for cable (wiring from behind)
Label for RS-485 baud rate DIP switch settings
Orientation arrow – should point up after the mounting base has
been installed.
Place for zip tie (for cable strain relief)
DIP switches for common configuration options; see section DIP
Switches of Analog Output Models on page 22.
RS-485 termination jumper (connects a 120 Ω resistor).
Rotary switch for relay setpoint (only for models with relay);
see section Relay Configuration in DIP Mode on page 23.
HTM10 module with HUMICAP
®
sensor.
 Loading...