Do you have a question about the Vava VA-CD008 and is the answer not in the manual?
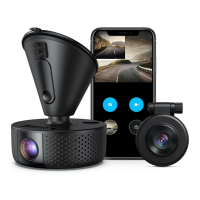
Visual representation of the VAVA car dash cam components and their labels.
List of all items included in the VAVA car dash cam box.
Detailed technical data and features of the VAVA car dash cam.
Step-by-step instructions for mounting and connecting the DVR in a vehicle.
How the DVR automatically records when the car engine starts and stops.
Instructions for manually starting or stopping video recording.
Procedure for taking still photos using the DVR.
How the DVR automatically records upon detecting motion.
Explanation of the built-in collision sensor and emergency recording.
Guide to setting the correct date and time on the DVR.
How to connect the DVR to a PC for viewing recorded files.
Controls for powering the DVR on/off and adjusting screen backlight.
Navigation and selection of menu settings and options.
Used for confirmation, taking snapshots, and initiating emergency recording.
Controls for starting/stopping video recording and fast forwarding playback.
Controls for snapshot mode, mode switching, and audio function.
Instructions for restarting the DVR if it becomes unresponsive.
| Loop Recording | Yes |
|---|---|
| G-Sensor | Yes |
| Night Vision | Yes |
| Wi-Fi | Yes |
| Sensor (Front) | Sony IMX323 |
| Sensor (Rear) | GC2053 |
| Parking Mode | Yes |
| Video Resolution (Rear) | 1920x1080 (1080p) |
| Field of View (Front) | 170 degrees |
| Field of View (Rear) | 140 degrees |
| Storage | MicroSD card (up to 128GB) |
| Chipset | Novatek |
| Operating Temperature | -10°C to 60°C (14°F to 140°F) |
| Video Resolution (Front) | 1920x1080 (1080p) |