EasyManua.ls Logo

VEVOR KF-60C-1 - User Manual

VEVOR KF-60C-1
18 pages
Print Icon
To Next Page IconTo Next Page
Loading...
AGRICULTURE SPRAYER
KF-60C-1
USER MANUAL
We continue to be committed to provide you tools with competitive price. "Save
Half", "Half Price" or any other similar expressions used by us only represents
an estimate of savings you might benefit from buying certain tools with us
compared to the major top brands and doses not necessarily mean to cover all
categories of tools offered by us. You are kindly reminded to verify carefully
when you are placing an order with us if you are actually saving half in
comparison with the top major brands.
Question and Answer IconNeed help?

Do you have a question about the VEVOR KF-60C-1 and is the answer not in the manual?

Summary

Safety Instructions

General Safety Precautions

Safety measures for personnel during sprayer operation and user qualifications.

Model and Parameters

Structure Diagram

Components

Assembly and Use

Introduction and Application of Nozzle

Cleaning, Care and Storage Rules

Cleaning and Maintenance

Procedures for thoroughly cleaning the sprayer after use to prevent chemical residue damage.

Storage Guidelines

Instructions for storing the sprayer in a safe, dry, cool place, including battery care.

Overview

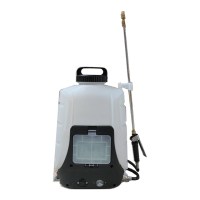
This document describes the VEVOR KF-60C-1 Agriculture Sprayer, a portable device designed for spraying various liquids in agricultural settings.

Function Description

The VEVOR KF-60C-1 Agriculture Sprayer is primarily used for applying pesticides and other liquid solutions in agriculture. It is a wheeled unit, making it easy to transport across different terrains. The sprayer features a water tank, a pump, a tube reel with a hose, and a spray bar with various nozzles for different spray patterns and applications. It is battery-operated, providing portability and ease of use without the need for a constant power connection during operation. The device includes a pressure regulating knob to adjust the spray intensity and a voltmeter to monitor battery status.

Important Technical Specifications

  • Model: KF-60C-1
  • Capacity: 15 Gallons (60L)
  • Pump Type: Membrane mini-pump
  • Pressure: 0-90psi
  • Max. Performance: (4.1±0.3) L/min
  • Charger Input: 100-240V ~ 50/60Hz 0.5A
  • Charger Output: DC12.0V, 1.6A
  • Battery: Lead acid battery (DC12V, 12Ah)

Usage Features

Safety Instructions:

  • Always wear appropriate protective clothing, masks, glasses, hats, and gloves to prevent pesticide penetration. Avoid working naked.
  • Never spray toxic solutions on people or animals.
  • Prohibited for use by individuals with mental illness, serious diseases, those under the influence of alcohol, or those without operational knowledge. Individuals who are fatigued, haven't rested well, or are lactating women should not operate the machine.
  • Operators must wash all body parts and clean clothing after use.
  • Follow pesticide manufacturer's safety instructions when handling pesticides.
  • Do not leave the machine unattended; turn off power when not in use.
  • Do not disassemble or modify the machine.
  • Spray pesticides in front of the wind direction and avoid prolonged operation in high temperatures.
  • Charge the battery for 8-12 hours before first use and each subsequent use. Keep the charging base dry.
  • Avoid running the pump without water to prevent diaphragm damage.
  • Before use, test with clean water to check for leaks and atomization effect. Only proceed with liquid medicine if normal.
  • Always add liquid medicine through the filter screen to prevent impurities from affecting machine operation.
  • Immediately dry any spilled liquid medicine to prevent corrosion of electrical components and wire connectors.
  • Do not use non-water bath powder as it can precipitate and clog the filter and pipeline. Chemical liquids and special working fluids are prohibited unless specified.
  • After spraying, turn off the power or regulating switch before releasing the injection switch.

Assembly and Operation:

  1. Initial Setup: Remove brackets and water tank from the frame.
  2. Front Wheels: Pass the axle through the shaft sleeve, add a gasket, a front wheel, two shims, another front wheel, and another shim. Secure with R-shaped pins.
  3. Rear Wheels: Install the two universal wheels into the rear wheel holes and fix with M6 bolts.
  4. Reinstall Tank: Reinstall the water tank and brackets.
  5. Support Frame: Fix the support frame (N) with M8x35 bolts (F+G).
  6. Fixed Base & Tube Reel: Fix the fixed base with M8x40 bolts (F+P) and install the tube reel.
  7. Crank Handle: Install the crank handle on the tube reel (near the front wheel side) and fix screws on the shaft.
  8. Hose Connection: Connect hose (M) to the tube reel (J) water inlet, adjust length, and fix with bolts. Connect the other end of the hose to the bucket (right side of the power switch).
  9. Spray Components: Install the handle, spray bar, and appropriate nozzle. Ensure a sealing ring is added at the water outlet connection and tighten to prevent leaks.
  10. Pressure Knob: Install the pressure regulating knob by pressing it in.
  11. Handrail: Install the handrail.
  12. Fill Tank: After assembly, fill the tank with the solution and cover it. Add a sealing ring and tighten to prevent leakage.
  13. Power On: Turn on the switch ("1" for on, "0" for off).
  14. Voltmeter:
    • Yellow Light "L": Battery insufficient, needs charging.
    • Green Light "N": Sufficient power, normal use.
    • Red Light "H": Abnormal, stop use and troubleshoot.
  15. Pressure Regulation:
    • Clockwise rotation increases pressure.
    • Counter-clockwise rotation decreases pressure or stops flow.
    • Press and hold the handle to spray; release to stop.
    • For long spraying periods, the handle can be fixed on its ring.
  16. Charging: Red indicator on charger means charging; green light means fully charged. Turn off power when charging.

Nozzle Types and Applications:

  • KF-01D (Single-head copper nozzle): Small spray amount, linear spray (15-20ft), for telescopic spray bar.
  • KF-26E (Single-head plastic nozzle): Small spray amount, linear spray (15-20ft).
  • KF-04D (Three-end copper nozzle): Large spray amount, concentrated range.
  • KF-86E (Three-end plastic nozzle): Large spray amount, long range.
  • KF-104E (Windproof nozzle): Equipped with a protective cover to reduce wind impact on spray.
  • KF-06E (F-type double nozzle): Medium spray effect.
  • KF-56E (Y-type double nozzle): Medium spray effect.
  • KF-23E (Fan-shaped nozzle): 90°~110° plane fan-shaped spray, mostly used for controlled range applications like weeding.
  • Note on pressure knob: For KF-01D, KF-26E, and KF-23E, the pressure knob must be adjusted to avoid intermittent pump operation. It's normal if the indicator light doesn't flash or the pump works continuously.

Troubleshooting:

  • Motor not starting: Check power connection, battery (charge if dead), and power switch.
  • Abnormal motor noise: Check and tighten water pump fixing screws.
  • Water leakage: Check and tighten water inlet/outlet pipes; open base to check internal pipes.
  • Spray bar shake: Reduce pressure or replace nozzle.
  • Poor atomization: Replace worn/blocked nozzle, install accessories correctly, clean filter screen, tighten/replace connecting pipe, charge battery. If water pump blocked, remove nozzle and spray clean water for 5-10 minutes. If output doesn't increase, replace pump.
  • No water discharge/unstable pressure: Clean clogged nozzle, dismantle pump cover to remove foreign matters.
  • Water pump not working: Check wiring; if damaged, contact merchant for replacement.
  • Unable to charge: Reconnect disconnected charger cable.
  • Battery broken (charger green, no spray): Open battery cover, replace battery (black wire to "-", red wire to "+"). Take a photo before removal.
  • Charger broken (charger no light, no spray after 10 min charge): Contact merchant for a new charger.

Maintenance Features

Cleaning and Care:

  • After each use, completely remove the working solution from the tank.
  • Rinse the tank, hose, pump, and spray tube with clean water.
  • Spray clean water for 3 minutes to eliminate chemical residues and prevent reactions with future chemicals.
  • Residues can cause corrosion and damage to nozzles, filters, and seals.

Storage Rules:

  • Store the sprayer in a dry, cool, and child-safe place.
  • Do not store near open flames.
  • Before winter storage, wash and dry the pump and other parts to prevent damage. Clean machine surfaces, filter screen, and nozzle, then air dry. Do not expose to direct sunlight.
  • Fully charge the battery before storage.
  • During storage, charge the battery regularly with an adapter (at least once every 2 months).
  • Keep the adapter in a dry place.

VEVOR KF-60C-1 Specifications

General IconGeneral
BrandVEVOR
ModelKF-60C-1
CategoryPaint Sprayer
LanguageEnglish

Related product manuals