Do you have a question about the VEVOR LSMNSP-515 and is the answer not in the manual?
Read all safety warnings, instructions, and specifications. Failure to follow may result in injury.
Details include model, maximum payload, voltage, power, speed, and sound power level.
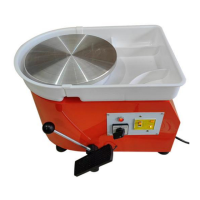
Identifies key parts like the water basin, turntable, equipment body, speed control, and power plug.
Protects clothing from getting dirty during operation.
Includes tools for clay cutting, shaping, smoothing, and finishing pottery.
Used for texture decoration, bonding, and clay modeling.
Interchangeable turntables of different sizes for varied work diameters.
Step-by-step instructions for preparing clay, connecting power, controlling rotation, and adjusting speed.
Guidance on molding, drying, repairing, painting, and preparing the finished product.
Addresses issues like clay fracture, spiral shape, uneven stress, and centering problems.
Solutions for uneven thickness, mold collapse, and bottom breaks.
Diagnoses common problems like machine not working, shaking, or turntable issues.
Guidelines for cleaning the turntable, checking parts, and periodic running.
This document outlines the operation and maintenance of a pottery wheel machine, designed for ceramic drawing and shaping. It provides comprehensive instructions for users, from initial setup to advanced molding techniques and troubleshooting.
The pottery wheel machine is primarily used for ceramic drawing and shaping. It features a rotating turntable where clay is centered and molded into various forms. The device allows for precise control over rotation speed and direction, enabling users to create a wide range of pottery pieces. It is equipped with a removable water basin to manage excess water and clay during the creative process. The machine is designed for household use and is suitable for both beginners and experienced potters, with specific guidance for children using the appliance under adult supervision.
Setup and Initial Operation: Before starting, users should ensure the equipment is placed on a cool, ventilated, dry, dust-proof, and level surface. Proper wiring and installation according to electricity safety standards are crucial. The water basin must be installed correctly before plugging in the power. Users should take a proper amount of clay, knead it into a cone shape, fix it at the center of the rotary table, and press it down, wetting their hands for better handling.
Direction and Speed Control: The machine offers both forward (clockwise) and reverse (counterclockwise) rotation directions, which can be selected based on the user's needs. It is critical not to change the rotation direction while the motor is running; the motor must completely stop before switching directions. A knob allows for adjusting the speed, with clockwise rotation increasing speed and reverse rotation decreasing it.
Molding and Shaping: The manual details an 8-piece tool set and a plastic printing 8-piece set, each with specific functions to assist in the pottery process:
Turntable Replacement: The machine comes with two aluminum turntables of different diameters (Φ65mm and Φ100mm). The choice of turntable directly influences the maximum diameter of the pottery piece that can be created. Users can easily replace the turntable by loosening a bolt with a wrench.
Post-Molding Steps: After molding, the surface of the piece can be quickly dried with a hot air gun (1-3 minutes). Further clay-mold repairs can be done with the tools. Creative painting and coloring can be applied according to individual preferences. Once the work is completed, the machine should be stopped in reverse order. The finished molding can be removed using a scraper or clay cutting line and then placed in a cool place for a period before firing.
Skills Guidances: The manual provides a troubleshooting section for common issues encountered during pottery making:
Cleaning: After each use, it is essential to clean the clay from the surface of the turntable and wipe away any water stains. Direct rinsing with a lot of water should be avoided to prevent water immersion in the motor, switch, bearing, and other critical parts, which could lead to failure. A towel or sponge is recommended for cleaning the machine body.
Regular Checks: Users should regularly check the parts for looseness. If any fasteners are loose, they should be tightened. If the issue persists or is complex, professional assistance should be sought for debugging.
Storage and Infrequent Use: If the machine is used sparingly, it should be run at least once a month to maintain its functionality and prevent issues from prolonged inactivity.
Troubleshooting for Machine Issues:
Safety Precautions: The manual emphasizes reading all safety warnings and instructions to prevent electric shock, fire, or serious injury. It highlights the importance of following recommendations for alternating current, household use, and general safety. When repairing or replacing parts, the switch must be cut off, and the power supply unplugged. Children aged 8 and above can use the appliance under supervision, understanding the hazards involved. Cleaning and user maintenance should not be performed by children without supervision.
| Model | LSMNSP-515 |
|---|---|
| Rated Power | 350 W |
| Rotation Direction | Clockwise/Counterclockwise |
| Turntable Material | Aluminum Alloy |
| Foot Pedal | Yes |
| Voltage | 110V |
| Material | Aluminum |
| Speed | 0-300 RPM |