This document is a user manual for a VEVOR Yurt Tent, available in several models: ZJTM1009, ZJTM1149, ZJTM1215, ZJTM1303, and ZJTM1304. The manual provides specifications, warnings, precautions, care instructions, and assembly instructions for the tent.
Function Description:
The VEVOR Yurt Tent is designed as a temporary outdoor shelter, suitable for camping and other outdoor activities. It provides a covered space for sleeping, relaxing, and storing gear. The tent is not a free-standing structure and requires proper anchoring. It features a bell-shaped design with a central pole and an A-frame door pole, offering a spacious interior. Vents and screens are integrated into the tent body to ensure ventilation.
Important Technical Specifications:
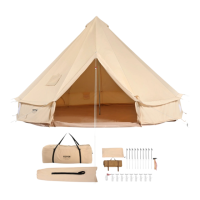
The Yurt Tent is available in five different models, each with varying dimensions:
-
Model ZJTM1009:
- Diameter: 3m
- Height: 2m
- Height of Door: 1.5m
- Height of fence: 0.6m
- Color: Beige
- Parts List: Bell tent (1), Center pole (1), A-frame door pole (1), Stake A (10), Stake B (10), Hammer (1), Guy rope (10), Rain cap (1)
-
Model ZJTM1149:
- Diameter: 4m
- Height: 2.5m
- Height of Door: 1.5m
- Height of fence: 0.6m
- Color: Beige
- Parts List: Bell tent (1), Center pole (1), A-frame door pole (1), Stake A (12), Stake B (12), Hammer (1), Guy rope (12), Rain cap (1)
-
Model ZJTM1215:
- Diameter: 5m
- Height: 3m
- Height of Door: 1.7m
- Height of fence: 0.6m
- Color: Beige
- Parts List: Bell tent (1), Center pole (1), A-frame door pole (1), Stake A (12), Stake B (12), Hammer (1), Guy rope (12), Rain cap (1)
-
Model ZJTM1303:
- Diameter: 6m
- Height: 3.5m
- Height of Door: 1.7m
- Height of fence: 0.6m
- Color: Beige
- Parts List: Bell tent (1), Center pole (1), A-frame door pole (1), Stake A (14), Stake B (14), Hammer (1), Guy rope (14), Rain cap (1)
-
Model ZJTM1304:
- Diameter: 7m
- Height: 3.5m
- Height of Door: 1.9m
- Height of fence: 0.7m
- Color: Beige
- Parts List: Bell tent (1), Center pole (1), A-frame door pole (1), Stake A (16), Stake B (16), Hammer (1), Guy rope (16), Rain cap (1)
Usage Features:
The tent is designed for temporary use and does not meet structural codes. Installation requires at least two people.
- Site Selection: Choose a level site clear of rocks, branches, and other sharp objects. Ensure no underground utilities are present. Avoid setting up the tent under trees or tall buildings to prevent hazards from falling objects.
- Ventilation: Proper ventilation is crucial, especially if using a heater inside. The tent includes vents and screens to help prevent carbon monoxide buildup.
- Anchoring: The tent is not free-standing and must be properly anchored using stakes and guy ropes. Stakes should be driven into the ground at a 45°-60° angle for maximum bearing capacity. The longest guy rope (with a different colored buckle) is used to secure the tent door.
- Safety Precautions:
- Keep children supervised in and around the tent.
- Do not use candles, matches, or open flames inside or near the tent.
- Avoid cooking inside the tent; if necessary, do not leave cooking unattended. Grills and cooking appliances should be at least 1 meter away from the tent canvas.
- Never use open fires or glowing charcoal inside or near the tent due to rapid fire spread and carbon monoxide risk.
- Ensure all flexible tubes and gas burner couplings are checked for leaks.
- Build campfires downwind and several meters away, extinguishing them completely before leaving or sleeping.
- Exercise extreme caution with fuel-powered lanterns or heaters; use battery-operated lanterns whenever possible. Do not refuel lamps, heaters, or stoves inside the tent. Turn off all lanterns before sleeping.
- Do not smoke or store flammable liquids inside the tent. Installation of log burners or heating equipment is at your own risk.
- Keep all flame and heat sources away from the tent fabric to prevent accidental burning.
- Keep children, the elderly, and others away during installation to prevent injuries from falling metal frames.
Maintenance Features:
- Cleaning: Clean debris from the canvas and ensure it is dry before storing. Use normal detergent and water for cleaning if the tent is dirty.
- Storage: Store the metal frame and canvas separately in the carry bag to prevent mildew or damage.
- Parts Check: Refer to the parts list to carefully check all received items. Do not discard packaging until all parts and hardware are verified. Contact VEVOR if any parts are missing, broken, or if there are installation problems.
Assembly Instructions (General Steps):
- Fix the tent body: Lay the tent on the ground, keeping the floor taut. Stake down 10 tent corners with Stake B. Do not stake too much at this stage for later adjustment. Stakes should be at a 45°-60° angle.
- Prop up the tent: Assemble the center pole through the built-in metal buckle. One person places the center pole on the middle point of the floor to prop up the tent.
- Install door pole: A partner inserts the A-frame door pole through the ring at the top of the door, then inserts the feet of the door pole into the pockets on the underside of the door. Attach the rain cap to the top of the A-frame door pole. Adjust Stake B if needed.
- Finish the tent assembly: Fix the remaining guy ropes with Stake A around the tent and straighten them. Pull guy ropes along the direction of each seam on the tent roof for visual effect and stability. Adjust tent stakes if needed. Use the longest guy rope (with a different colored buckle) to secure the tent door.