EasyManua.ls Logo

Villager VBV 230 E - User Manual

Villager VBV 230 E
160 pages
Go to English
Print Icon
To Next Page IconTo Next Page
Loading...
1
Villager
VBV 230 E (SI)
PUHALNIK / SESALNIK
Villager VBV 230 E
ORIGINALNA NAVODILA ZA UPORABO
Question and Answer IconNeed help?

Do you have a question about the Villager VBV 230 E and is the answer not in the manual?

Overview

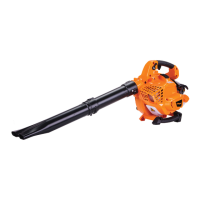
The Villager VBV 230 E is a blower/vacuum designed for outdoor use. It is powered by a 2-stroke engine and is intended for adult use only.

Function Description

The device can operate as both a blower and a vacuum. In blower mode, it is used to clear debris by directing a powerful stream of air. In vacuum mode, it collects leaves and other light debris into a mulch collection bag, which can then be emptied. The unit is designed to be used with a fuel/oil mixture for 2-stroke engines.

Important Technical Specifications

  • Engine Type: 2-stroke engine
  • Capacity: 22.5 cm³
  • Power: 0.7 kW / 8000 min⁻¹
  • Fuel Mixture: Petrol: 2-stroke oil at a ratio of 40:1
  • Operator Ear Noise Pressure Level (LpA): 93.9 dB(A) with a measurement uncertainty of 3 dB(A)
  • Measured Acoustic Power Level: 102.7 dB(A) with a measurement uncertainty of 3 dB(A)
  • Guaranteed Acoustic Power Level: 106 dB(A)
  • Vibration Level (Upper Handle): 7.7 m/s²
  • Vibration Level (Lower Handle): 8.7 m/s² with a measurement uncertainty of 1.5 m/s²
  • Weight (Blower): 4.1 kg
  • Weight (Vacuum): 5 kg
  • Air Flow (Blowing): 85 m/s
  • Air Flow (Aspirating): 7.8 m³/min
  • Collection Capacity: 50 liters

Usage Features

Safety Precautions:

  • Always inspect the unit before use, ensuring all parts are present, secure, and undamaged.
  • Check for fuel leaks and ensure all fasteners are in place.
  • Clear the work area of debris, hard, or sharp objects (glass, wire, etc.) before starting.
  • Maintain a minimum distance of 15 meters from children, bystanders, and pets. Bystanders should wear eye protection.
  • Operate the unit only in well-ventilated outdoor areas, never indoors, due to the risk of fatal exhaust fumes.
  • Use the unit only in daylight or good artificial light.
  • Avoid accidental starting; be in a stable position when pulling the starter rope.
  • Hold the unit firmly with both hands on the handles.
  • Keep hands, face, and feet away from all moving parts.
  • Do not touch the engine or muffler as they become extremely hot during operation and remain hot for some time after shutdown.
  • Do not operate the engine faster than the speed required for blowing or vacuuming.
  • Never insert hands or fingers into the vacuum or exhaust openings.
  • The machine must not be used by anyone under the age of 16.

Assembly:

  • Blower Assembly: Close the air vent, push the straight nozzle pipe over the discharge port and locking pin, aligning the arrowheads. Rotate clockwise to lock and tighten the screw. Attach the blower nozzle pipe to the straight nozzle pipe, aligning the "THIS SIDE UP" marking upwards, rotate clockwise to lock, and tighten the screw.
  • Vacuum Assembly: Loosen the cage screw and pull down the cage. Install vacuum attachments by aligning grooves with pegs, rotating clockwise to secure, and tightening screws. Rotate the connector pipe clockwise to lock, aligning arrowheads, and tighten the screw. Insert the connector pipe into the vacuum bag's side opening, secure with the Velcro strap, and adjust the shoulder strap.

Starting Instructions:

  1. Fill the fuel tank with the correct petrol/oil mixture (40:1).
  2. Turn the ON/OFF switch to the "ON" position.
  3. For cold engine start only: Pull the choke to the fully extended (closed) position.
  4. Press and release the primer bulb 7-10 times until it is full of fuel.
  5. Place the unit firmly on the ground or a sturdy surface, ensuring bystanders are at least 15m away. Do not start near open flames or smoke.
  6. Grasp the starter rope handle with one hand and press the engine cover with the other. Pull the starter rope slowly until resistance is felt, then pull briskly upwards. The unit should start within 5 pulls. Once warm, it should start on the first pull. If not, re-prime the bulb and check the choke lever position.
  7. Squeeze the throttle control slightly for 15-30 seconds to warm up the engine. In cold weather, warm up for 30-60 seconds.

Stopping Instructions:

  1. Release the throttle control and allow the engine to idle and cool down.
  2. If equipped with a spring-loaded ON/OFF switch, press and hold "O" until the unit stops. Otherwise, push the switch to the "OFF" position.
  3. If the engine continues to run in the "OFF" position, stop it by pulling the choke to the fully closed position or opening the cage.

Blower Mode Operation:

  1. Start the unit.
  2. Direct the nozzle in the desired blowing direction.
  3. Pull the throttle control.
  4. Set the throttle lock to the desired speed. To adjust, release the throttle lock, adjust speed, and re-lock.

Vacuum Mode Operation:

  1. Ensure all vacuum attachments are properly installed and the mulch collection bag is not twisted.
  2. Start the unit.
  3. Place the collection bag strap over your left shoulder and adjust as needed.
  4. Pull the trigger to start the vacuum.
  5. Set the throttle lock to the desired speed.
  6. Empty the bag by removing it and opening the zipper.
  7. Note: Do not operate the unit with the cage side up or the handle side down. If the collecting pipe is jammed with leaves, reduce engine speed and clean the pipe immediately to prevent damage.

Maintenance Features

General Maintenance:

  • Never perform maintenance or repairs while the unit is running. Always work on a cool unit and disconnect the spark plug wire to prevent accidental starting.
  • Use only original equipment manufacturer replacement parts.
  • Keep the unit clean of vegetation and other materials.
  • Replace faulty mufflers and spark arrestors to reduce fire hazards. Keep the engine and muffler free from grass, leaves, grease, or carbon buildup.

Maintenance Schedule:

  • Daily:
    • Remove dirt and debris from the exterior.
    • Inspect engine, tank, and hoses for leaks.
    • Inspect and clean engine cooling fins.
    • Inspect the entire machine for damage, loose, or missing components.
  • Every 5 hours: Clean and re-oil the air filter.
  • Every 10/15 hours: Check spark plug condition and gap.
  • Every 50 hours:
    • Inspect the entire machine and tubes for damage.
    • Check spark plug condition and gap.
    • Check the fuel filter.
  • Periodically: Clean the spark arrestor screen.

Specific Maintenance Procedures:

  • Air Filter Check: More frequent in dusty conditions. Remove accumulated dust by tapping or washing with a suitable solvent. Remove the filter cover by pressing the inside part.
  • Spark Plug Check: Remove the spark plug using a wrench. Clean and adjust the gap to 0.6-0.7 mm. Replace if damaged or worn. Install finger-tight, then tighten with a wrench to 16.7-18.6 Nm. Ensure no dirt enters the cylinder bore.
  • Fuel Filter Check: The fuel tank has a filter at the end of the fuel pipe. Check periodically for dust and replace if dirty. Clean the fuel tank by rinsing with petrol if dirty.
  • Lubrication: Remove the spark plug, add approximately 7ml of oil to the cylinder, and pull the starter 2-3 times to distribute the oil before reinstalling the spark plug.
  • Cleaning: Clean the exterior with a small, soft brush. Avoid aggressive cleaners. Empty the vacuum bag, turn it inside out, shake off debris, and hand wash annually with soapy water.
  • Storage: Allow the engine to cool. Store in a dry, locked, well-ventilated area, out of reach of children. Never store with fuel in the tank.
  • Long-Term Storage (Winter): Drain all fuel from the tank (do not store mixed fuel for more than 60 days). Run the engine until it stalls to clear the carburetor. Allow to cool. Clean and inspect for damaged or loose parts, repair as needed.
  • Transporting: Allow the engine to cool. Secure the unit. Tighten the fuel cap.

Villager VBV 230 E Specifications

General IconGeneral
BrandVillager
ModelVBV 230 E
CategoryBlower
LanguageEnglish