Do you have a question about the Vimtag B1-C Series and is the answer not in the manual?
Captures videos.
Infrared light adjustment.
Provides additional light in low-light conditions.
Connects the camera to Wi-Fi.
Green light flashes indicate positive connectivity.
Green light flashes indicate successful Wi-Fi connection.
External power supply connection.
External Ethernet supply connection.
Long-press to restore factory settings.
Download, install, register, and configure Wi-Fi.
Add camera via QR code or ID account.
Connect using an Ethernet cable for a wired network.
Connect camera to Wi-Fi via smartphone configuration.
Register a new account or sign in to an existing one.
Add your cloud camera to your account.
Receive motion detection alerts.
Modify user credentials and check software version.
Access recorded footage and alarm messages.
Features like two-way audio, voice, and taking photos.
Adjust resolution, screen parameters, and device settings.
Check video/alarm messages on camera and Micro SD card.
Check recorded videos stored on your phone.
View camera's software version and ID number.
Configure network storage and Micro SD card support.
Set up the camera Wi-Fi connection.
Set recording schedules and motion detection alarms.
The Vimtag B1-C Series Smart Cloud Camera is a sophisticated surveillance device designed for comprehensive monitoring and ease of use. It offers a range of features for capturing video, connecting to networks, and managing recordings and alerts, making it suitable for various security needs.
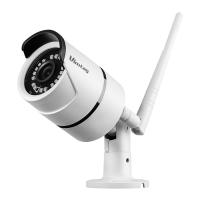
At its core, the Vimtag B1-C Series camera is built to capture videos, providing visual surveillance of your chosen area. It integrates an infrared light adjustment system, which works in conjunction with IR LEDs to ensure clear visibility even in low-light conditions. This means the camera can provide continuous monitoring, adapting to changes in ambient light to maintain image quality.
Network connectivity is a key aspect of this smart camera. It supports both wired Ethernet and wireless Wi-Fi connections. The camera is equipped with a Wi-Fi antenna to facilitate wireless communication, allowing it to connect to your home or office network. For wired connections, an Ethernet port is provided. Status lights for both Wi-Fi and wired networks offer immediate visual feedback on the connection status, indicating successful connectivity or ongoing processes.
Powering the device is straightforward, requiring an external power supply. Additionally, it supports an external Ethernet supply for wired network connections. A crucial maintenance feature is the reset button. When the device is operating normally, a long press of this button will restore the camera to its factory settings, which can be useful for troubleshooting or reconfiguring the device.
The camera's functionality is extended through the accompanying "Vimtag" mobile application, available on both iOS and Android platforms. This app serves as the central hub for controlling and managing the camera. Users can register an account, connect the camera to their network (either via Wi-Fi or Ethernet), and access a variety of features.
Connecting the camera to the app involves a simple process. After powering on the camera and logging into the app, users can add the device by scanning a QR code located on the camera or by manually entering its ID. The app then guides the user through selecting either a Wi-Fi or Ethernet connection method. For Wi-Fi setup, the smartphone must be connected to the same Wi-Fi network that the camera will use, as the camera leverages the smartphone's network connection for initial setup.
Once connected, the app provides a "Device List" interface where multiple cameras can be managed simultaneously. This interface also allows users to add new devices and check "alarm messages."
The Vimtag B1-C Series camera offers a rich set of usage features, primarily accessed through the Vimtag mobile application.
Users can view live video feeds from the camera directly through the app. The interface allows for horizontal and vertical rotation control, enabling users to adjust the camera's perspective remotely. Beyond live viewing, the app supports "video photo" functionality, allowing users to capture real-time photos while viewing the video feed.
A significant feature is the two-way audio communication. Users can speak through the app, and their voice will be transmitted through the camera's speaker, while also listening to audio from the camera's microphone. This enables interactive communication with individuals near the camera.
The app provides options to select different video resolutions (e.g., Auto, 720P, 360P, 180P, 90P). This allows users to adjust the video quality based on their network conditions, optimizing for either higher detail or smoother streaming.
The camera supports both local and cloud storage options. It can record videos to a Micro SD card (supporting up to 64 GB). The app allows users to view recorded videos and alarm messages stored on the Micro SD card by accessing the "device" section. Additionally, users can take "local videos" directly from the monitoring screen, which are then saved to their phone. The camera can also be integrated with Cloud Box for storage, offering a flexible storage solution.
Motion detection is a key security feature. Users can set motion detection alarms through the app. When motion is detected, the camera can trigger an alarm, and users will receive "alarm messages" on their phone. The camera is capable of recording only the alarm messages, providing a focused log of security events.
The app offers extensive device settings to personalize the camera's operation. Users can check camera details, including software version and ID number. They can change their admin and guest passwords for enhanced security. Network settings allow for configuring the camera's Wi-Fi connection. Other settings include On-Screen Display (OSD) options, SD card management, and system settings.
Users can set a specific recording schedule, defining the start and end times for continuous recording. This allows for automated surveillance during particular periods.
Beyond basic motion detection, users can fine-tune the motion detection alarm settings, ensuring that notifications are relevant and timely.
The Vimtag B1-C Series camera incorporates several features that contribute to its maintenance and long-term usability.
As mentioned, the physical reset button allows users to restore the camera to factory settings. This is invaluable for troubleshooting issues, clearing configurations, or preparing the device for a new user or location.
While not explicitly detailed in the provided snippets, smart cloud cameras typically receive firmware updates to improve performance, add new features, and address security vulnerabilities. The "System settings" within the app would likely be the interface for managing such updates, ensuring the camera remains up-to-date.
The ability to change admin and guest passwords through the app is a crucial security maintenance feature. Regular password changes help protect the camera from unauthorized access.
The app allows users to reconfigure the camera's network settings, such as changing Wi-Fi networks or switching between wired and wireless connections. This flexibility is important if network infrastructure changes or if the camera is moved to a different location.
The camera's support for Micro SD cards up to 64 GB means users can manage local storage effectively. The app's "SD card" settings likely provide options for formatting the card, checking storage status, and managing recorded files, which are essential for maintaining recording capacity.
The status lights for Wi-Fi and wired networks provide immediate visual cues for connectivity issues, aiding in quick diagnosis. The "alarm messages" feature helps users stay informed about security events, allowing them to take timely action.
The "About" section in the app, which displays the camera's software version and ID number, can be useful for customer support interactions or for verifying the device's specifications during troubleshooting.
In summary, the Vimtag B1-C Series Smart Cloud Camera is designed to be a user-friendly yet powerful surveillance tool, offering robust video capture, flexible network connectivity, comprehensive app-based control, and essential maintenance features to ensure reliable and secure operation.
| Storage | MicroSD card (up to 128GB) |
|---|---|
| Video Compression | H.264 |
| Power Supply | DC 5V/1A |
| Resolution | 1920x1080 (Full HD) |
| Audio | Built-in microphone |
| Connectivity | Wi-Fi |
| Sensor | CMOS |
| Operating Temperature | -10°C to 50°C |
| Features | Motion detection, Cloud storage |