EasyManua.ls Logo

VIVOHOME VH961 - User Manual

Default Icon
24 pages
Print Icon
To Next Page IconTo Next Page
Loading...
VANITY SET WITH
STORAGE CABINET
Assembly Instructions
V-2
Question and Answer IconNeed help?

Do you have a question about the VIVOHOME VH961 and is the answer not in the manual?

Summary

Safety and General Information

Safety Precautions

Highlights attention, warning, and note sections regarding product safety and handling.

Parts List Identification (1-10)

Parts List Identification (11-20)

Parts List Identification (21-23) & Hardware (A-L)

Hardware (M-Q), Tools & Usage

Hardware, Tools, and Screw Covers

Lists remaining hardware (M-Q) and assembly tools, noting included screw covers.

Cam Lock and Quickfit Usage Guide

Explains the correct method for using cam locks and quickfits during assembly.

Assembly Steps: Cabinet Base and Legs

Step 1: Assemble Cabinet Legs

Attaches footpads to part J to create four cabinet legs.

Step 2: Attach Legs to Base Panel

Secures four cabinet legs (Part J) to the base panel (Board 8) using screws (Part E).

Assembly Steps: Cabinet Sliding Rails

Step 3: Prepare Sliding Rails

Divides sliding rail parts (C) into C1 (double) and C2 (single) configurations.

Step 4: Attach Rails to Side Panels

Fixes sliding rails (C1) to cabinet side panels (Boards 9 and 10) using screws (Part E).

Assembly Steps: Cabinet Structure

Step 5: Connect Top Panel

Connects the top panel (Board 11) to the side panels (Boards 9 and 10) using hardware (A and B).

Step 6: Connect Base Panel

Connects the base panel (Board 8) to the side panels (Boards 9 and 10) using hardware (A and B).

Assembly Steps: Cabinet Back and Shelf

Step 7: Install Back Panel

Slides the back panel (Board 22) into the grooves of the cabinet structure.

Step 8: Attach Shelf

Connects a shelf panel (Board 7) to the cabinet side panels (Boards 9 and 10) using hardware.

Assembly Steps: Internal Supports and Drawer Slides

Step 9: Secure Internal Supports

Inserts and secures internal support parts (K) between cabinet panels.

Step 10: Attach Drawer Slides to Panels

Fixes drawer slides (C2) to the drawer base panels (13, 14, 18, 19) using screws (Part E).

Assembly Steps: Drawer Box Construction

Step 11: Assemble Drawer Sides

Connects drawer side panels (15, 20) to drawer base panels (13, 14, 18, 19) using screws (Part F).

Step 12: Install Drawer Back Panels

Slides drawer back panels (16, 21) into the assembled drawer sides.

Assembly Steps: Drawer Completion

Step 13: Attach Drawer Slides and Covers

Connects drawer panels (12, 17) with slides (A, B) and applies screw covers.

Step 14: Attach Drawer Handles

Fixes drawer handles (Part D) to the completed drawer panels.

Assembly Steps: Drawer Insertion & Vanity Top Prep

Step 15: Insert Drawers into Cabinet

Slides the completed drawers into the main cabinet structure.

Step 16: Attach Sliding Rails to Vanity Top

Secures sliding rails (C1) to the vanity top panels (Boards 4 and 5).

Assembly Steps: Vanity Top Sides

Step 17: Attach Sliding Rails to Vanity Sides

Fixes sliding rails (C1) to the side panels (Board 6) of the vanity top.

Step 18: Connect Vanity Top Structure

Connects the vanity top structure (Board 3) to its sides (Boards 4, 5, 6) using hardware.

Assembly Steps: Vanity Top and Side Connections

Step 19: Connect Main Vanity Structure

Connects Board 2 to the assembled vanity structure using hardware.

Step 20: Prepare Top Surface Panel

Assembles hardware (Part A) onto the top surface panel (Board 1).

Assembly Steps: Cabinet Securing & Stool Legs

Step 21: Secure Cabinet Structure

Inserts hardware (Part A) and secures the cabinet structure using fasteners (Part B).

Step 22: Prepare Stool Legs

Assembles footpads onto the stool legs (Part G) to create four total legs.

Assembly Methods & Vanity Legs

Assembly Method Overview

Presents two distinct assembly methods for the dressing table configuration.

Step 23: Attach Vanity Legs (Method 1)

Fixes vanity legs (Part G) to the main board (Board 2) using screws (Part E) for one assembly method.

Assembly Steps: Method 1 Completion

Step 24: Position Vanity Top on Cabinet

Flips the vanity top and places it onto the assembled cabinet structure.

Step 25: Insert Completed Drawers

Slides the completed drawers into the vanity drawers.

Assembly Steps: Vanity Legs (Method 2) & Mirror Base

Step 26: Attach Vanity Legs (Method 2)

Secures vanity legs (Part G) to the main board (Board 2) for the second assembly method.

Step 27: Assemble Mirror Frame Base

Connects the base of the mirror frame (Part L) using fasteners (Part N).

Assembly Steps: Mirror & Stool Assembly

Step 28: Mount Mirror & Connect Power

Fixes the mirror onto its frame and connects the power cord.

Step 29: Assemble Stool Legs

Attaches stool legs (Part H) to the stool seat (Board 23) using screws (Part E).

Assembly Steps: Anti-Tip Securing

Step 30: Install Wall Mount Bracket

Fixes the wall mounting bracket (Part Q1) to the wall.

Step 31: Attach Cabinet Bracket

Attaches the cabinet bracket (Part Q2) and connects it to the wall bracket for securing.

Final Assembly and Features

Step 32: Assembly Completion

Confirms the completion of the assembly process.

LED Mirror Light Operation

Explains how to turn on, adjust, and change lighting modes for the LED mirror.

Important Notes and Support

Product Improvement Policy

States VIVOHOME's right to modify product information without prior notification.

Customer Support Information

Provides guidance on contacting customer service for assembly questions or concerns.

Overview

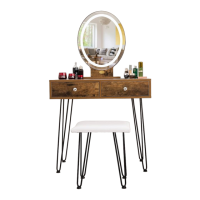
This document outlines the assembly instructions for a vanity set with a storage cabinet, designed for home use. The product is identified as "VANITY SET WITH STORAGE CABINET" from VIVOHOME.

Function Description:

The vanity set serves as a personal grooming station, featuring a tabletop, drawers, and a mirror with integrated LED lighting. It includes a separate storage cabinet and a stool, providing comprehensive storage and seating solutions for a user's beauty routine. The design allows for two different assembly configurations for the dressing table, offering flexibility in setup.

Important Technical Specifications:

The manual provides a detailed parts list with diagrams, including dimensions for various components and hardware. Key components include:

  • Boards: Ranging from small support pieces (e.g., 10.5"x6.5" for item M) to larger structural boards (e.g., 23.6" for item G, 15.8" for item H).
  • Hardware:
    • Screws: M61.0 in. (LW) M625mm (A), M3.50.5 in. (LW) M3.512mm (E), M30.6 in. (LW) M314mm (K), 0.21.6 in. (LW) 540mm (F).
    • Cam Locks and Quickfits: These are crucial for connecting panels securely. The quickfit should be tightened until flush, and the cam lock inserted before the quickfit, then turned clockwise to tighten.
    • Sliding Rails: Parts C1 (double sliding rails) and C2 (single sliding rail) are used for drawer mechanisms.
    • Footpads/Legs: Parts J (cabinet legs), G (table legs), and H (stool legs) are provided for stability.
    • Mirror: An LED mirror with touch control for lighting adjustments.
    • Anti-tip accessories: Included for safety to secure the unit to a wall.

Usage Features:

  • LED Mirror Light: The mirror features a touch-sensitive button to turn the light on/off and adjust settings. It offers three lighting options: cold light, natural light, and warm light. A long press on the button allows for brightness adjustment, catering to different user needs and lighting preferences.
  • Flexible Assembly: The dressing table component offers two distinct assembly methods, allowing users to choose a configuration that best suits their space and aesthetic preferences. One configuration integrates the storage cabinet directly with the table, while the other keeps them separate.
  • Storage: The vanity set includes multiple drawers and a separate storage cabinet, providing ample space for organizing cosmetics, jewelry, and other personal items.
  • Stool: A matching stool is included, designed with four legs for stability.
  • Anti-Tip Safety: The product includes anti-tip accessories that should be secured to the wall to prevent accidental tipping, ensuring user safety and preventing property damage.

Maintenance Features:

  • General Care: The manual advises against long-term exposure to humid environments to prevent mildew and recommends keeping the product away from fire sources, high temperatures, and direct sunlight. Hot objects should not be placed directly on the surface.
  • Cleaning: The product should be kept away from sharp, pointed objects and corrosive substances to prevent damage.
  • Hardware Tightening: If table legs become loose during use, the screws should be tightened as soon as possible to maintain stability.
  • Assembly Precautions: Users are instructed to assemble the item on a spacious surface to avoid product damage and not to place unwrapped products directly on the ground. Children are not allowed to assemble the product, and all small parts should be kept out of their reach. Children are also forbidden from climbing or playing on the product due to the risk of serious bodily injuries.
  • Defective/Missing Parts: In case of defective or missing parts upon unpacking, users are advised to cease assembly immediately and contact customer service.
  • Product Longevity: Adhering to the assembly and usage guidelines provided in the manual is crucial for the product's longevity and safe operation.

VIVOHOME VH961 Specifications

General IconGeneral
BrandVIVOHOME
ModelVH961
CategoryIndoor Furnishing
LanguageEnglish

Related product manuals