Do you have a question about the Waterford 60cm Dual Fuel and is the answer not in the manual?
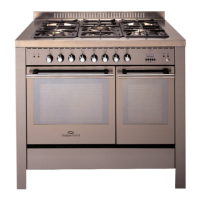
| Fuel Type | Dual Fuel |
|---|---|
| Width | 60 cm |
| Number of Ovens | 1 |
| Number of Gas Burners | 4 |
| Grill | Yes |
| Clock | Yes |
| Timer | Yes |
| Energy Rating | A |
Keep children away from the hot oven door glass to prevent burns.
Operate the oven empty for 30 minutes to remove production residues.
Always turn off the mains gas tap after use and check the hose.
Ensure flame caps are correctly positioned to avoid burner damage.
These decorative covers do not affect appliance operation.
Use pans with a flat base of the correct size for electric hotplates.
Do not place flammable materials in the compartment below the oven.
Ensure the room is well-ventilated for proper gas combustion and operation.
Maintain minimum distances from walls and overhead surfaces for safe operation.
Details on connecting using rigid pipe, rubber hose, or metal hose.
Procedure for connecting to a gas cylinder with a pressure reducer.
Appliance requires 230V AC, 50Hz supply, installed by a qualified electrician.
Procedure for safely disconnecting and replacing the cooker's power lead.
Carefully remove protective film before operation; use soapy water for residue.
Instructions on how to fit and screw in the adjustable feet at the base.
Procedure for replacing injectors to adapt the cooker for different gas types.
Guidance on adjusting primary air intake gaps for different burner types.
Procedure to regulate the minimum burner flame setting using a screwdriver.
Steps to lubricate stiff taps or thermostats for smooth operation.
Instructions for safely replacing a burnt-out oven lamp.
Detailed steps on how to remove and reassemble the oven door.
How to ignite gas hob burners using the knob and ignition switch.
Activating the grill element; note it cannot be used with the oven burner.
Properly impaling food on the spit and balancing for rotisserie cooking.
How to switch on electric hotplates and their 5 power setting positions.
Explanation of symbols like 'A', cookpot, and relay output.
Setting cooking end time or duration for semi-automatic oven operation.
Setting cooking duration and end time for fully automatic cooking programmes.
Using the minute minder to set time intervals with audible signals.
How to manually switch on oven relay contacts.
Procedure for setting the current time of day on the programmer.
How a set programme is carried out and how to verify its status.
Indicators for incorrect settings, including audible signal and flashing 'A'.
How to cancel a set cooking programme.
How the oven thermostat controls temperature and heating elements.
Explanation of when the oven light switches on.
Numerical indication of temperature from 0 to 250°C.
Using top element only, bottom element only, or grill element.
How to start the rotisserie using the corresponding switch.
Heat from above/below, needs preheating; good for cakes, pizzas, bread.
Even heat distribution from element and fan; suitable for multiple shelves.
Fan-only mode to thaw food quickly.
For small amounts of food, low energy consumption.
For grilling over a wide area.
Combines fan and grill elements for cooking large items.
Even heat distribution from below for slow, gentle cooking.
The oven door must be closed during all cooking modes, including grill.
Set thermostat to 250°C when using the grill or double grill with fan.
Check oven accessories and preheat for 15 minutes before cooking.
Avoid opening the oven door frequently for best results.
Place fat collection tray below the grating when grilling.
Shelf levels, temperatures, and times for various foods in a single oven.
Shelf levels, temperatures, and times for various foods in a double oven.
Tips on using data as guidelines, adjusting for fan cooking, and shelf placement.
Disconnect power before cleaning; avoid abrasive materials.
Regular cleaning prevents grease build-up, fumes, and malfunctions.
Use soapy water; avoid steel blades, powder detergents, or acidic products.
Free repair or replacement for faulty parts within 2 years of purchase.
Faults due to workmanship/material, reported within 2 years, proper installation.
Unauthorized alterations void the guarantee.
