IS-HF-AirSentinelIII-100123 Rev 0 5
Installation and Commissioning
Air Supply
This instrument requires water free and oil free air, Dry Air, Particles <5u,
ISA Grade Hydrocarbon Free. Requirements are full time, clean dry air
at a cabinet pressure of 0-10 mbar at a flow rate of 0-50 SLPM. Please
note that 10 mbar and 50 SLPM are maximum values that will probably
not be attained in practice.
Electrical Power Input Connections
The Air Sentinel III purge controller requires 100-240 VAC 47-63 Hz.
A circuit breaker must be placed prior to the power connection in close
proximity and within easy reach to allow for service. This circuit breaker
must be marked to indicate that it is a disconnecting means for the
instrument. The rating of the circuit should be 5A.
Supply power connections are made ONLY to top “MAINS” connection
on the back of the Air Sentinel III purge controller:
Terminal 3: Earth Ground
Terminal 2: Neutral
Terminal 1: Line or Hot
Suitable wire would be stranded,
3 conductors 18-12 AWG
copper or tin plated copper with
a voltage rating of 600 VAC with
a temperature rating of 90°C or
higher.
Common earth bond points
are provided both inside the
enclosure on the chassis and
outside of the enclosure. This
terminal set can be removed
for easier connections. Please
ensure this terminal set is properly tightened using the two side screws.
Electrical Power Output Connections
The second or lower three terminals are controlled power output.
This is where a powered device is connected to ensure power is not
applied unless the enclosure is purged and pressurized. The output is
connected to the mains power after the purge time has been exceeded
assuming the enclosure is under pressure and air is exiting the vent.
The load should not exceed 2A at 240VAC.
This terminal set can be removed for easier connections. Please ensure
this terminal set is properly tightened using the two side screws.
Electrical Alarm Connections
Three relay (1 Form A) alarm connections are supplied that can be used
to indicate an Alarm condition under the following modes of operation:
1. Loss of Pressure or Flow. Under this condition, the front panel LED
labeled Pressure will turn RED and the associated alarm contacts
will close.
2. Purge Timer enabled. Under this condition, the front panel LED
labeled Timer will turn RED and the associated alarm contacts will
close.
3. Bypass enabled. Under this condition, the front panel LED labeled
Bypass will turn RED and the associated alarm contacts will close.
These contacts are rated 2A at 250VAC or 2A at 24VDC. Refer
to Electrical connections image for the alarm connections. These
connection terminals are NOT removable.
Only qualified electricians should be allowed to perform the
installation of the instrument as it involves a line voltage that
could endanger life.
DANGER
!
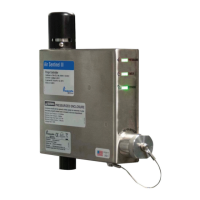
Mechanical Mounting
The Air Sentinel III is mounted to an enclosure using the 10,1/4”-
20 studs. The recommended hardware is a 1/4” flat washer and
locking nut, or the provided locking nut with the built-in washer. The
recommended enclosure opening is shown below.
There are 3 ports: air port, pressure port and drain vent. The air purge
is the main vent that all enclosure exhaust air should exit the enclosure
through. The Air Sentinel III measures this air to ensure continuous
venting is occurring. The pressure port is where the Air Sentinel III
measures the enclosure pressure to ensure the enclosure is kept above
atmospheric pressure (overpressure). The drain vent is an optional
atmospheric pressure vent for certain applications such as venting a
drain. If this vent is not used, it must be capped.
 Loading...
![Preview: Watts AERCO Edge [ii]](https://data.easymanua.ls/products/808371/200x200/watts-aerco-edge-ii.webp)