CLEANING
Engine Care
Clean the engine regularly with a cloth or brush. Keep the top of the engine clean to permit proper air
circulation. Remove all grass, dirt and debris from the exhaust (muffler) area.
CAUTION
Do not use a water hose or pressure washer to clean the engine. Water can damage the engine or
contaminate the fuel system.
1. Engines stored for over 30 days need to have the fuel drain from the fuel tank or a fuel stabilizer applied
to prevent deterioration and gum forming in the fuel system or essential carburetor parts.
Deck Care
Clean underside of the machine after each use to prevent build-up of grass clippings or other debris. Follow
steps below:
1. Disconnect the spark plug cap. Drain petrol from the engine with a suction pump. Alternatively, tip the
scarifier/aerator so that it rests on its side. Keep the side with the air filter housing facing up. Drain all fuel
from fuel tank into proper receptacle for storage ir disposal. Secure the scarifier/aerator.
WARNING
Never tip the scarifier/aerator more than 90 degrees in any direction and do not leave the scarifier/aerator
tipped for any excessive length of time. Oil can drain into the upper part of the engine causing a starting
problem.
2. Scrape and clean the underside of the machine with a suitable tool. Do not spray with water.
3. Put the scarifier/aerator back onto its wheels on the ground.
4. Clean the engine regularly with a cloth or brush. Keep the cooling system (blower housing area) clean to
permit proper air circulation which is essential to engine performance and life. Be certain to remove all
dust, dirt and combustible debris from exhaust area.
STORAGE & TRANSPORT
The following steps should be taken to prepare your scarifier/aerator for storage.
1. Empty the fuel tank. Disconnect the spark plug cap. Drain petrol from the scarifier/aerator with a suction
pump. Alternatively, tip the scarifier/aerator so that it rests on its side. Keep the side with the air filter
housing facing up. Drain all fuel from fuel tank into proper receptacle for storage. Secure the
scarifier/aerator.
WARNING
Do not drain the petrol in enclosed spaces, in proximity of open fire, etc.
Do not smoke! Petrol fumes can cause explosion or fire.
2. While engine is still warm, change oil. See Engine Oil Change section of this manual.
3. Clean engine of surface debris, chaff or grass.
4. Remove spark plug. Place 1 teaspoon or 5 ml. of oil into spark plug hole.
5. Pull starter rope slowly 8-10 times to properly coat the cylinder bore and piston for storage.
6. Replace spark plug and tighten. Any residual oil may burn off in subsequent starts. This may
result in white smoke emission from muffler.
7. This scarifier/aerator may be stored in a variety of positions. It is best to store in horizontal position
with the spark plug up. Do not store or transport with the spark plug down.
Changing the oil
1. Change the engine oil every year before the start of the season when the engine is warm.
2. Use only recommended engine oil.
3. Place a suitable oil drip tray beneath the oil drain screw.
4. Remove the oil filler screw (Fig. 9 / Item A).
5. Undo the oil drain screw (Fig. 9 / Item B) and drain the oil into a suitable container.
6. Close the drain screw again when all the used oil has been drained.
7. Add oil slowly into the engine oil fill tube (the use of a funnel will aid the filling). Do not overfill. After
adding oil wait one minute and then recheck the oil level.
8. Dispose of the used oil in accordance with applicable regulations.
Spark Plug
To ensure proper engine operation, the spark plug must be properly gapped and free of deposits.
1. Remove the spark plug cap.
WARNING
If the engine has been running, the exhaust (muffler) will be very hot. Be careful not to touch the exhaust
(muffler).
2. Visually inspect the spark plug. Discard it if the insulator is cracked or chipped.
3. Measure the spark plug gap with a feeler gauge. The gap should be 0.76, correct as necessary by bending
the side electrode.
4. Attach the plug washer, thread the plug in by hand to prevent cross‐threading.
5. When mounting a new spark plug, you should screw 1/2 more thread with the wrench after the washer is
compressed. If you are mounting an old one, you should only screw 1/8‐1/4 more thread.
CAUTION
The spark plug must be securely tightened. An improperly tightened plug can become very hot and possibly
damage the engine. Never use a spark plug with an improper heat range.
Air Filter
Soiled air filters reduce the engine output by sup‐ ply too little air to the carburetor. Regular checks are
therefore essential. The air filter should be checked after every 50 hours of use and cleaned if necessary. If the
air contains a lot of dust, the air filter should be checked more frequently.
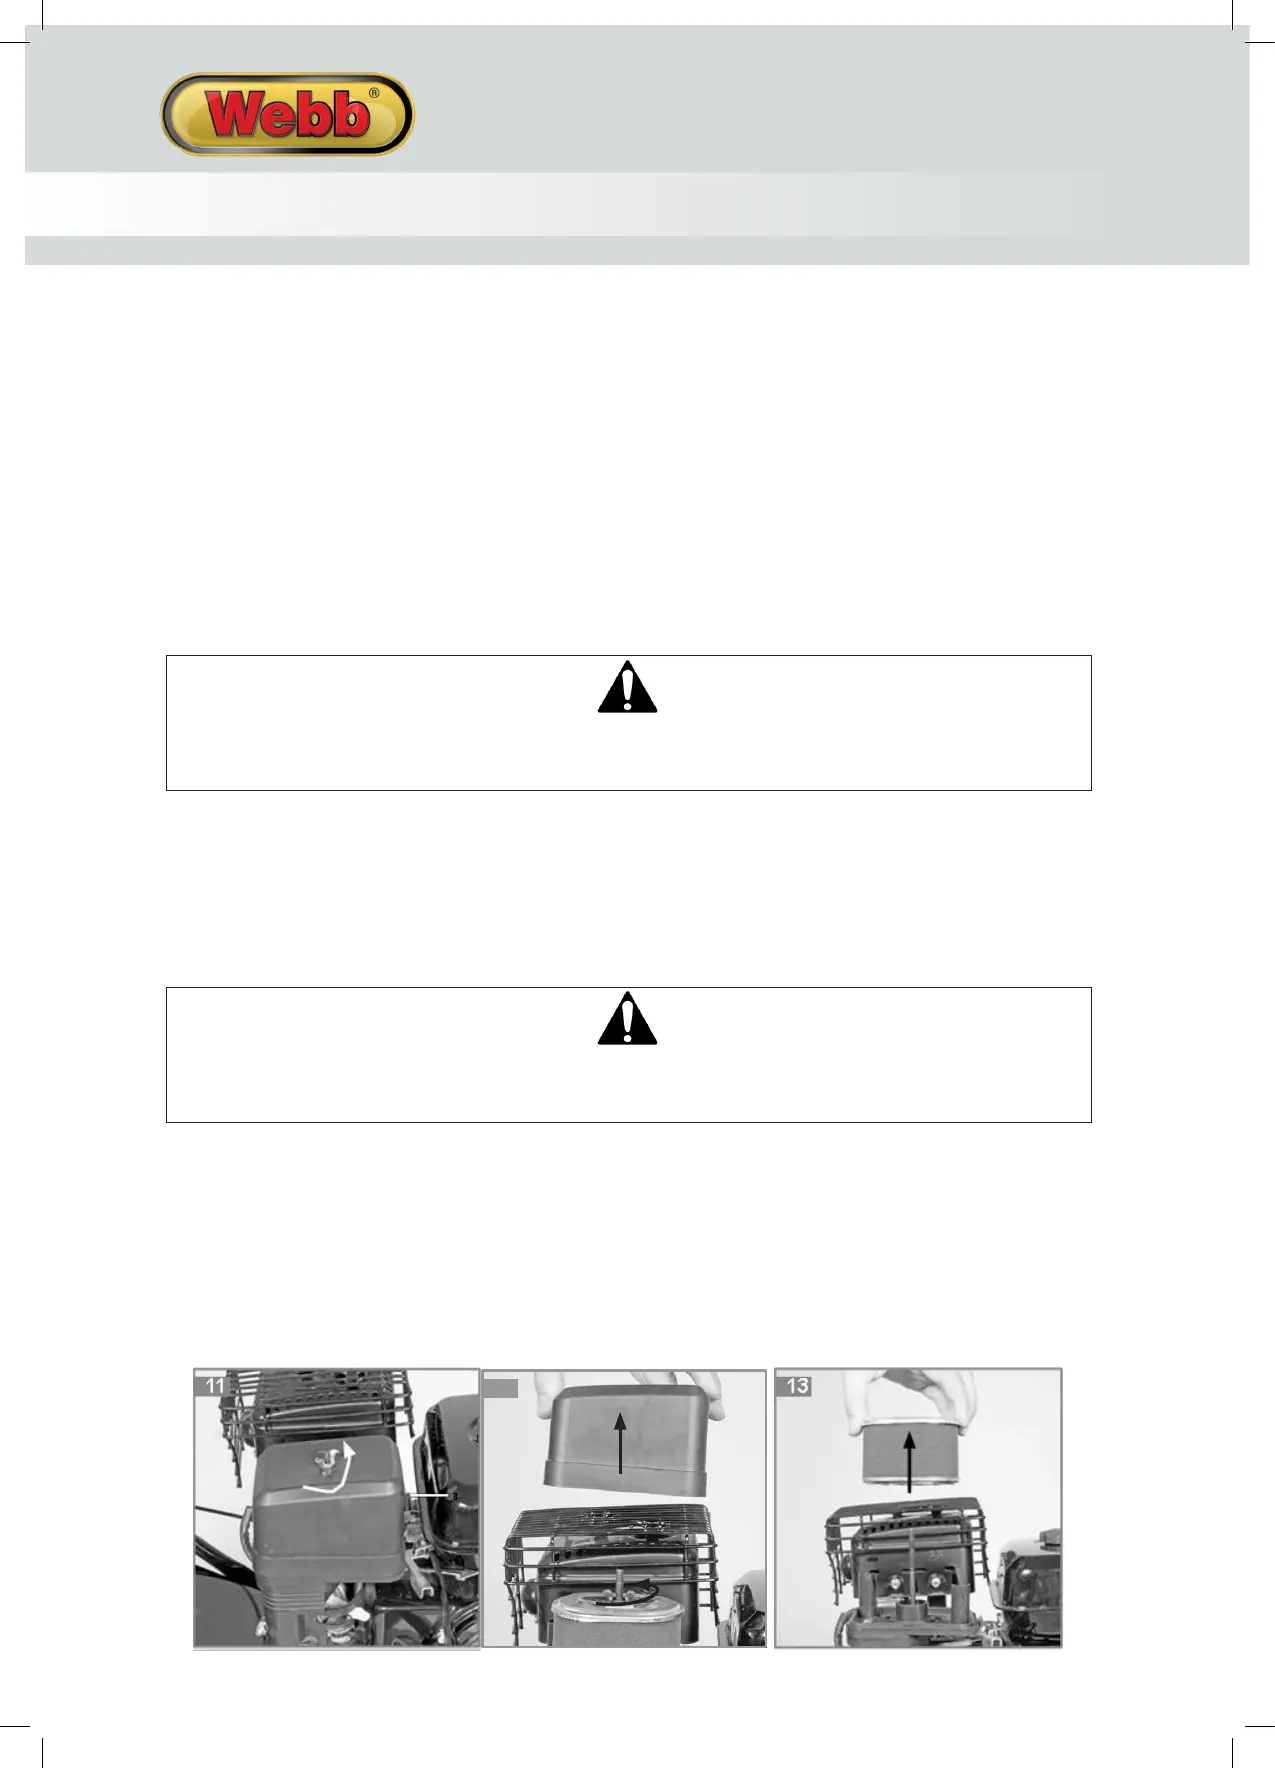
1. Remove the air filter as shown in Fig. 11‐13.
2. Clean the air filter only with compressed air or by tapping it.
3. Assemble in reverse order.
Important!
Never clean the air filter with petrol or inflammable solvents.
 Loading...