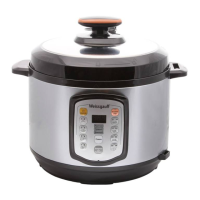
This document describes the Weissgauff MCP-3050 Multi-Cooker, an electric multi-cooker and pressure cooker designed for domestic use.
Function Description
The Weissgauff MCP-3050 is a versatile kitchen appliance capable of cooking a wide variety of dishes under pressure and without pressure. Its primary functions include frying, baking, making yogurt, and preparing desserts, all in an automatic mode. The device offers 17 automatic cooking programs, allowing users to prepare diverse meals with ease.
Important Technical Specifications
- Intended Use: Cooking under and without pressure, frying, baking, making yogurt, desserts in automatic mode at home.
- Power Supply Voltage: 220 V, ~50 Hz.
- Power Demand: 900 W.
- Quantity of Programs: 17.
- Body Material: Plastic, steel.
- Material of the Cooking Container: Aluminum with non-stick coating.
- Max Volume: 5 liters.
The product is certified in compliance with technical regulations. The manufacturer reserves the right to change the configuration, appearance, country of manufacture, and technical characteristics of the model without additional notifications.
Usage Features
Before Operation:
- Unpack the appliance and remove all accessories.
- Turn the cover (2) with the handle (4) to the "Open" position (Figure No. 1, point 5) and remove the cover.
- Check that all parts and details are in place (refer to "DESCRIPTION OF THE APPLIANCE DETAILS").
- Carefully wash the measuring glass (13), spoon set (14), and steamer plate (7).
- Wipe the cover (2) inside and outside with a wet, clean cloth, then dry it.
- Remove and wash the inner plug of the ventilation holes (17), then put it back.
- Prepare and correctly install the removable inner seal ring of the cover (3), container (11), and steam release valve (6). Refer to "CLEANING OF THE STEAM RELEASE VALVE AND INNER COVER" and "CLEANING OF THE COOKING CONTAINER" sections.
- Attention: The removable seal ring (3), valve (6), container (11), and cover (2) cannot be washed in a dishwasher.
- Before first use, carefully read the "SAFE OPERATION RULES AND CONDITIONS" section.
- Attention: The multi-cooker and pressure-cooker is a pressure-operated appliance, so proper and regular cleaning is crucial.
Start of Operation, Adding Products:
- Place prepared ingredients into the container (11) according to the recipe, adding the necessary amount of water and spices. The total volume of water and products must not exceed the maximum level mark on the container.
- Attention: Do not exceed the maximum level mark, and do not put too few products into the appliance. Foreign objects in the work section or blocked ventilation holes can cause appliance breakdown.
- Attention: For products that quickly and significantly increase in volume during cooking (pasta, milk, etc.), the total volume should not exceed 1/3 of the container's volume.
- Ensure the outer surface of the container (11) is dry.
- Note: For steam cooking, refer to the "Steam Cooking" section.
- Attention: Before each cooking, thoroughly check the cleanliness of the steam release valve (6), inner parts of the cover (2) – the removable seal ring (3) and inner cover of the steam release valve (17). Clean them if necessary (refer to "MAINTENANCE" section).
- Correctly install the removable seal ring (3) – after installation, press it firmly with your fingers along its entire length.
- Important: The ring ridges (3) must fit into the slots with a slight click – this is extremely important for correct and durable operation of the appliance!
Selecting a Cooking Program:
- Insert the container (11) into the work section of the appliance.
- Attention: Ensure there are no foreign objects inside the cooking section.
- Close the cover (2) and fix it in the correct "Closed" position (Figure No. 1, point 5).
- Check the correct installation of the steam release valve. It must be closed, i.e., in the position shown in Figure No. 3.
- Attach the condensate container (24).
- Connect the electric cord to the appliance, then plug it into a socket. After connection, a sound signal will be heard, and the HEATING/CANCELLATION button indicator will blink – the appliance will switch to program selection waiting mode.
- Check the cover position (2): if "Open," a "zigzag" will appear on the display. If "Closed" and correct, "---" will appear, indicating program selection waiting mode.
- To select a program, press the program buttons (19), (23) – refer to Table No. 1. A short sound signal will confirm selection. Paired program buttons (19) have two programs: e.g., pressing "Soup" once selects "Soup" (button indicator lights up), pressing it again selects "Steamer" (button indicator blinks).
- Attention: For pressure-cooking programs, the operation time in Table No. 1 does not include pressure build-up time, which depends on product quantity and liquid temperature (approx. 20-25 minutes).
- To select a different program or change settings, press HEATING/CANCELLATION (18) immediately. A sound signal confirms cancellation, and the HEATING/CANCELLATION indicator blinks. You have 10 seconds to change settings.
- After 10 seconds, cooking and pressure build-up begin, and a "running zigzag" appears on the display.
- Once the required pressure and temperature are reached, the "zigzag" is replaced by the program duration and countdown begins.
- Note: For non-pressure programs (e.g., FRYING), the display immediately shows program duration and countdown.
- Note: To cancel a running pressure program, press HEATING/CANCELLATION. Since the cover is locked, you may need to open the steam release valve (6) to release pressure. Carefully turn it to the steam release position (Figure No. 3) and wait for "OH" symbols to appear before opening the cover.
After Program Completion:
- Several sound signals will be heard, "OH" will appear on the display, and the appliance will automatically switch to heating mode (heating mode indicator (18) lights up).
Exiting Heating Mode:
- Press HEATING/CANCELLATION (18) – the appliance will switch to setting selection waiting mode, "---" will appear on the display, and the HEATING/CANCELLATION indicator (18) will blink.
- Important: HEATING/CANCELLATION mode is blocked for programs No. 6, 10, and 16 (FRYING, FRIED POTATOES, YOGURT). After completion, the appliance automatically switches to waiting mode.
Changing Programmed Cooking Time:
- You can change the cooking time. Default times and intervals are in Table No. 1.
- To change: select the program with MENU (point 3 of "COOKING PROGRAM SELECTION"). MEDIUM time is set automatically (red indicator lights up).
- After selecting, press MODE repeatedly to cycle through SHORT, MEDIUM, LONG intervals (Table No. 1).
- Wait a few seconds for the appliance to start cooking and pressure build-up; a "running zigzag" will appear.
- Important: Cooking times for programs No. 6 and 10 (FRYING, FRIED POTATOES) are fixed and cannot be changed.
- Important: Programs No. 6, 10, and 16 (FRYING, FRIED POTATOES, YOGURT) operate without pressure. Upon start, program operation time and countdown appear.
Deferred Start:
- To cook a dish by a specific time, use the DEFERRED START function.
- Select the program with MENU (point 3 of "COOKING PROGRAM SELECTION").
- If needed, change program duration ("CHANGE OF THE PROGRAMMED COOKING TIME").
- Immediately press DEFERRED START (20) – the button indicator lights up, and the display shows the minimum deferred start time (2 hours).
- Press DEFERRED START repeatedly to add 30 minutes with each press. Maximum deferred start time is 24 hours.
- Wait 10 seconds – the appliance saves settings, and the DEFERRED START indicator stops blinking.
- Note: Deferred start time must include program operation duration. Add 30 minutes for pressure programs to account for pressure build-up.
- Important: DEFERRED START is not available for programs No. 6, 10, 16 (FRYING, FRIED POTATOES, YOGURT).
- Attention: Consider product shelf life at room temperature. Not recommended for perishable products over long periods (e.g., raw meat or eggs in hot weather).
- Attention: If deferred start time is less than selected program duration, the appliance operates in standard mode.
- Note: After program completion, the appliance switches to heating mode (Table No. 1).
Temperature Maintenance and Defrosting Functions:
- The appliance is ideal for defrosting frozen products and warming up dishes.
- The ready dish temperature maintenance function automatically activates after program completion (except for programs No. 6, 10, 16 FRYING, FRIED POTATOES, YOGURT). Operation time is unlimited.
- To manually activate: press HEATING/CANCELLATION (18).
- Connect the electric cord, plug it in. A sound signal will be heard, and HEATING/CANCELLATION indicator blinks – appliance switches to program selection waiting mode.
- Open the cover, place products into the container.
- Place the container into the work section.
- Close the cover, fix it in the correct position (Figure No. 1, point 5).
- To activate this mode, press HEATING/CANCELLATION (18) – appliance switches to HEATING/DEFROSTING mode, indicator stops blinking, "OH" appears on display.
- To deactivate, press HEATING/CANCELLATION (18) once more.
Steam Cooking:
- Pour water into container (11) up to the minimum level mark (unless specified in recipe).
- Wash steam plate (7). Place products into it and insert it into container (11).
- Place container into the appliance.
- Select program No. 2 STEAMER with MENU (section 3 "COOKING PROGRAM SELECTION").
- If needed, change cooking time with MODE button ("CHANGE OF THE PROGRAMMED COOKING TIME").
- Program starts in 10 seconds, program button indicator turns off, "running zigzag" appears on display.
Yogurt Cooking:
- Attention: Initial ingredients must be of excellent quality: "live" yogurt or ferment with active lactic acid bacteria (at least 100 million bacteria per 100 ml), fresh or pasteurized milk.
- Thoroughly clean container (11) inside and out, sterilize with boiling water. Wipe inside with soft, boiled fabric.
- Pour fresh warm (approx. 50 degrees) milk into container (11). Add yogurt or ferment at room temperature in a 7:1 ratio (approx. 150 ml per 1 liter of milk). Stir evenly.
- Select program No. 16 YOGURT with MENU (section 3 "COOKING PROGRAM SELECTION").
- Default operation is 8 hours. Longer program yields denser yogurt. If needed, change operation time with MODE button ("CHANGE OF THE PROGRAMMED COOKING TIME").
- Program starts in 10 seconds, program button indicator turns off, countdown begins.
- After completion, place container (11) with yogurt in the fridge for several hours. Then transfer ready yogurt to a suitable storage box and refrigerate.
Maintenance Features
General Maintenance:
- Unplug the appliance and let it cool before cleaning.
- Do not immerse the appliance in water or wash the cooking section or cover under running water.
- Do not use hard sponges or abrasive agents, as they can damage the appliance surface.
- Store the appliance in a ventilated, dry place. Ensure it is completely cool, clean, dry, and the cover is closed before storage.
Cleaning of the Steam Release Valve and Inner Cover:
- Use a soft cleaning agent and wet fabric to clean the inner and outer surface of the cover (2). Wipe dry with a soft, clean fabric.
- Remove the upper part of the steam release valve (6) by pulling the ledge.
- Remove the internal cover of the steam release part (17) by gently pulling it.
- Carefully clean the valve (6) and cover of the valve (17) with a clean, wet fabric. Let it dry.
- Wipe the inner details of the valve with a soft, wet fabric – they must be clean.
- Attention: Regularly check the screw of the steam release valve – fasten it if loosened.
- Remove the inner removable seal ring of the cover (3) by gently pulling it.
- Clean the ring (3) with neutral cleaning agent, warm water, and soft, wet fabric. Wipe dry, then place it back – press it firmly with your fingers lengthwise.
- Important: Ring ridges (3) must fit into the slots with a slight click – this is extremely important for correct and durable operation!
- Place back the inner cover (17) and upper part of the valve (6). The correct position is shown in Figure No. 3.
- Attention: It is prohibited to wash the cover (2), seal ring of the cover (3), upper part of the valve (6), and container (11) in the dishwasher!
- Attention: Never use the appliance without the upper part of the valve (6) and inner ring of the cover (3). This can disrupt program operation and cause appliance breakdown.
Cleaning of the Cooking Container:
- The inner surface of the container (11) has a special non-stick coating. Protect it from scratches and damage by using only the supplied spoons or silicon/wooden accessories.
- Clean the cooking container (11) with a soft fabric or sponge and mild dishwashing detergent. Dry it.
- Attention: Do not use any grinding or abrasive sponges/agents.
- Attention: To avoid damage, do not wash the container in the dishwasher.
- Advice: To remove odors from previous dishes (e.g., fish before baking a cake), wipe the container with a piece of lemon.
Cleaning of the Work Section:
- To avoid breakdown, clean the work section. Use a slightly wet, soft fabric, then wipe dry.
- Attention: Do not use any sharp or piercing accessories that can damage the surface of the work section or the heating element.