EasyManua.ls Logo

West Bend 55108 - User Manual

West Bend 55108
12 pages
Print Icon
To Next Page IconTo Next Page
Loading...
3 IN 1 COFFEE CENTER
Instruction Manual
Register this and other Focus Electrics products through our website:
www.focuselectrics.com
Important Safeguards...............................................................................................2
Heat Precautions...................................................................................................... 2
Electricity Precautions..............................................................................................3
Pressure Precautions...............................................................................................4
Precautions For Use Around Children......................................................................4
Glass Carafe Cautions ............................................................................................. 4
Using Your 3 in 1 Coffee Center – First Use ............................................................ 5
Using Your 3 in 1 Coffee Center – Preparing Coffee ...............................................6
Using Your 3 in 1 Coffee Center – Preparing Espresso...........................................7
Using Your 3 in 1 Coffee Center – Preparing Cappuccino ....................................... 8
Steaming/Frothing Without Making Espresso ..........................................................9
Pressure – Checking and Releasing...................................................................... 10
Cleaning Your 3 in 1 Coffee Center ....................................................................... 10
Decalcifying Your 3 in 1 Coffee Center .................................................................. 11
Problems and Causes............................................................................................ 12
Warranty................................................................................................................. 13
SAVE THIS INSTRUCTION MANUAL FOR FUTURE REFERENCE
© 2008 West Bend
®
, a Brand of Focus Electrics, LLC.
www.focuselectrics.com
Question and Answer IconNeed help?

Do you have a question about the West Bend 55108 and is the answer not in the manual?

Summary

Important Safeguards

Heat Precautions

Discusses precautions related to high temperatures during operation of the appliance.

Electricity Precautions

Pressure Precautions

Precautions For Use Around Children

Glass Carafe Cautions

Using Your 3 in 1 Coffee Center - First Use

Optional Auto Shut-Off Feature

Using Your 3 in 1 Coffee Center - Preparing Coffee

Using the Pause n Serve Feature

Describes the feature that allows pouring coffee mid-brew without interrupting the brewing cycle.

Using Your 3 in 1 Coffee Center - Preparing Espresso

Using Your 3 in 1 Coffee Center - Preparing Cappuccino

Steaming;Frothing Without Espresso (Using Steam Plug)

Pressure - Checking and Releasing

Pressure Checking

Steps to verify if the appliance's steam system is currently under pressure.

Pressure Releasing

Instructions for safely venting built-up steam pressure from the appliance.

Cleaning Your 3 in 1 Coffee Center - General

Cleaning Your 3 in 1 Coffee Center - Cleaning the Steam Nozzle

Specific instructions for cleaning the steam nozzle to ensure proper frothing.

Decalcifying Your 3 in 1 Coffee Center - General

Decalcifying Your 3 in 1 Coffee Center

Espresso Maker

Steps to decalcify the espresso making components using vinegar.

Coffeemaker

Steps to decalcify the coffee making components using vinegar.

Problems and Causes

Overview

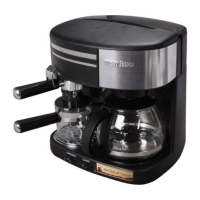
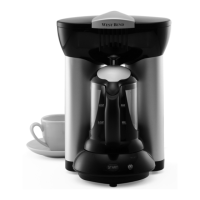
The West Bend 3-in-1 Coffee Center is a versatile appliance designed to prepare drip coffee, espresso, and cappuccino. It combines the functionalities of a coffeemaker and an espresso machine into a single unit, featuring separate brewing systems for each.

Function Description:

The device allows users to brew traditional drip coffee, prepare espresso, and froth milk for cappuccinos and lattes. It features a coffee filter holder for drip coffee, an espresso filter holder with a 2-cup adaptor for espresso, and a steam wand with a frothing nozzle for steaming and frothing milk. The appliance has two power switches: one for the coffeemaker (CAFFÉ) and one for the espresso maker (ESPRESSO), allowing independent operation of each function. An optional Auto Shut-Off feature is available, which turns off the espresso boiler after 10 minutes of continuous use and the Keep Warm feature after 2 hours.

Important Technical Specifications:

The appliance operates on a 120-volt AC electric outlet. The espresso carafe has markings for 2 and 4 cups, where one cup of espresso is approximately 2 oz. The boiler chamber for espresso should not be filled with more than 10 oz. (300ml) of water. The ideal temperature for frothed milk is 150-170°F (66°-77°C). The coffee filter basket is designed for a #4 paper coffee filter.

Usage Features:

  • Drip Coffee Preparation:
    • Place the appliance on a dry, level, heat-resistant surface.
    • Insert a #4 paper coffee filter into the brew basket and add the desired amount of ground coffee. One measuring spoon of ground coffee per cup is recommended, adjustable to taste. The coffee grind should be appropriate for a "drip" coffeemaker, not too fine to avoid clogging.
    • Close the brew basket firmly until it "clicks" into place, ensuring the filter is properly seated to prevent overflow or weak coffee.
    • Open the hinged water reservoir and pour in clean, cool water up to the desired number of cups, never exceeding the maximum level. Do not use warm or hot water.
    • Place the coffee carafe with its lid properly positioned on the warming plate.
    • Turn the CAFFÉ on/off switch to "ON." The indicator light will illuminate, signifying the start of brewing and that the coffee will be kept warm.
    • The "Pause 'n Serve" feature allows pouring a cup of coffee mid-brew, but the carafe must be returned within 30 seconds to prevent overflow.
  • Espresso Preparation:
    • Place the espresso filter basket into the filter holder and fill with ground espresso coffee, using the 2 or 4 cup markings as a guide. Press the coffee lightly, clearing any excess from the rim. Do not overfill or pack too tightly to prevent clogging.
    • Insert the filter holder into the appliance by aligning the arrow on the thumb guard with the arrow on the left side of the appliance, raising it into the brewing head, and turning it firmly to the right until it is as far right in the lock-range as possible. This ensures proper sealing under pressure.
    • Open the hinged lid, unscrew the boiler cap (counter-clockwise), and fill the boiler chamber with cold water, using the espresso carafe markings (2 or 4 cups). Never fill more than 10 oz. (300ml).
    • Replace and secure the boiler cap by turning it clockwise.
    • Ensure the overflow grid and base are in place. Place the espresso carafe with its lid (spout pointing towards the filter holder spout) under the filter holder. For two cups, clip the 2-cup adapter onto the filter holder and place cups underneath.
    • Turn the ESPRESSO switch to "ON." Water will heat for approximately 2 minutes, then be forced through the coffee into the carafe. Wait until all water in the boiler chamber is used, then switch the ESPRESSO switch to "OFF."
    • Do not unscrew the boiler cap or remove the filter holder while the machine is in operation or under pressure.
  • Cappuccino Preparation (with Espresso):
    • Follow steps 1-7 of espresso preparation, but do not start brewing until step 3 of cappuccino instructions.
    • Fill a stainless steel, ceramic, or high-temperature glass pitcher with 4 oz. of fresh, cold milk. The pitcher should be wide-mouthed and fit under the steam wand.
    • Turn the ESPRESSO switch to "ON."
    • Once espresso fills the carafe to the foam mark, immerse the frothing nozzle halfway into the milk pitcher. Do not open the steam release valve before immersing the nozzle.
    • Turn the steam release knob counter-clockwise to release steam. Keep the pitcher tilted, adjusting its height as the froth rises to keep the nozzle tip just beneath the surface of the rising foam.
    • When milk doubles in volume, insert the nozzle deeper to heat the milk to 150-170°F (66°-77°C). Avoid boiling the milk.
    • Close the steam release knob clockwise while the nozzle is still immersed to prevent splattering.
    • Allow espresso to finish brewing, then turn the espresso switch to "OFF."
    • Combine espresso and frothed milk in a cup.
  • Steaming/Frothing Without Espresso (Using Steam Plug):
    • Ensure both Espresso and CAFFÉ switches are "OFF" and the appliance is cool and pressure released.
    • Insert the steam build-up plug into the filter holder, then insert the filter holder into the appliance as described in espresso preparation (aligning arrows and turning firmly to the right).
    • Do not fill the glass espresso carafe. Fill the boiler chamber with cold water up to the 2-cup marking. Have 4 oz. of fresh, cold milk ready.
    • Place the glass espresso carafe with lid under the filter holder.
    • Turn the espresso switch to "ON" and immediately open the steam release knob.
    • Immerse the frothing nozzle halfway into the milk pitcher. Steam will emerge in 30-60 seconds. Adjust pitcher height as froth rises.
    • When milk doubles in volume, insert the nozzle deeper to heat the milk to 150-170°F (66°-77°C).
    • Close the steam release knob clockwise while the nozzle is immersed.
    • Move the espresso switch to "OFF."
    • If not all water was used for steaming, release remaining steam pressure into another container. Do not close the steam release knob until all steam is released.
  • Pressure Checking and Releasing:
    • Switch both Espresso and CAFFÉ switches to "OFF" and unplug.
    • Slowly open the steam release valve (counter-clockwise). If steam emerges, pressure is present.
    • To release pressure, hold a pitcher of water under the steam wand, immerse the frothing nozzle, and slowly open the steam release valve to vent steam into the water until it stops. Then, slowly open the boiler cap.

Maintenance Features:

  • General Cleaning:
    • Ensure all switches are "OFF," unplug the appliance, and allow it to cool completely.
    • Discard used coffee grounds and disposable filters. Clean the brewing head with a damp cloth.
    • Remove and clean the espresso filter holder, filter cup, brew basket, overflow grid, grid base, carafes, and covers in warm, mild soapy water. Rinse thoroughly and dry.
    • Empty any remaining water from the boiler chamber or coffee water reservoir by turning the unit upside down. Do not clean the inside of these chambers with cloths or paper towels to avoid clogging; rinse with cold water periodically.
    • Remove the rubber-frothing nozzle from the steam wand. Clean both the frothing nozzle and steam wand thoroughly with warm, mild soapy water. Rinse and replace the rubber-frothing nozzle.
    • Wipe the exterior with a damp cloth.
  • Cleaning the Steam Nozzle:
    • After each use, wipe the steam nozzle clean with a damp cloth to prevent milk residue buildup and clogging.
    • If clogged, ensure switches are "OFF," appliance is unplugged, pressure is released, and it's cooled.
    • Remove the rubber frothing nozzle and the steam nozzle using the tool on the coffee measure spoon.
    • Clean the nozzle with warm water, ensuring the small hole is clear.
    • Reattach the steam nozzle securely and slide the rubber-frothing nozzle onto the steam wand.
  • Decalcifying (General):
    • Decalcification is necessary periodically due to mineral deposits affecting appliance operation. Frequency depends on water hardness and usage:
      • Soft water: once per year.
      • Medium water: every three months.
      • Hard water: monthly.
    • Indications for decalcifying include increased noise, excessive steaming, longer brewing times, or the pumping action stopping before all water is pumped.
    • Vinegar is recommended for decalcifying.
  • Decalcifying Espresso Maker:
    • Release all pressure and allow to cool.
    • Pour 8 oz. (4-cup mark on espresso carafe) of fresh, cool, undiluted white household vinegar into the boiler chamber.
    • Run the vinegar through the espresso making cycle (without coffee grounds).
    • Place a cup of cool water under the steam wand. When the solution reaches the 2-cup mark on the espresso carafe, insert the steam wand into the water and open the steam release valve for 10-15 seconds. Close the valve and allow remaining vinegar to pump into the carafe.
    • Repeat these steps twice using clear, cool water to rinse the system.
  • Decalcifying Coffeemaker:
    • Release all pressure and allow to cool.
    • Pour 20 oz. (4-cup mark on coffee carafe) of fresh, cool undiluted white household vinegar into the water reservoir.
    • Run the vinegar through the coffee making cycle (without coffee grounds).
    • Repeat these steps twice using clear, cool water to rinse the system.

West Bend 55108 Specifications

General IconGeneral
BrandWest Bend
Model55108
CategoryCoffee Maker
LanguageEnglish

Related product manuals