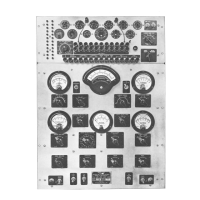
29. Lift the Signal toggle switch to the "Cal." posi-
tion and rotate the Signal Amplitude Adjuster to
bring the Micromhos meter to exactly top mark.
30. Release Signal toggle switch.
31. To take the Gm reading, index the "Gill" tog-
gle switch to the "Reading" position and read the
Micromhos meter. Read the scale which corresponds
to the "Gm Range" switch setting and multiply by an
added factor of 10 if the "Gm Factor" switch is set to
the "XI0" position.
RECTIFIERTUBES:
32. Patch jumper leads as in steps "3 and 3-(B)."
If rectifier has double plates, patch one of the plates
to the Plate 1 jack and the other to Plate 2 jack.
33. Follow steps 4-10 inclusive. If double rectifier
plates have been patched as above, short check the
tube as in step 9 indexing the Plate toggle switch to
both "Plate I" and "Plate 2" positions.
34. Follow steps 12-15 inclusive.
35. Set G.mFactor switch to "xl0."
36. Turn "Signal Amplitude" adjuster to zero. Note:
If steps 35 and 36 are not followed, the emission
measurements will not be in error. However, follow-
ing these two steps reduces the Gm meter sensitivity.
37. Index Element Current switch to "Plate" posi-
tion.
38. Index Element Current Range switch to "120"
position.
39. Index Element Volts switch to "60."
40. Place Plate Supply toggle switch in the "On"
position.
41. Advance the Plate Voltage Adjuster carefully
until the Element Current meter indicates the current
listed in the Tube Data Chart suppli~d separately.
42. Reject the tube as bad if the plate voltage re-
quired to give the specified current is greater than
that shown in the Tube Data Chart su,Pplied sep-
arately.
43. Repeat the emission check on the second plate
in the same manner indexing the Plate 1- Plate 2
toggle to its other position.
44. If the two plates have materially different emis-
sion readings the tube should be rejected.
DIODEDETECTORS:
45. Patch jumpers as in step 32 and in addition
connect all other elements to cathode.
46. Follow steps 33-44 inclusive, except that in
step 38 the Element Current Range switch should be
indexed to the "3" position. Note: The 0.8 MA. limit at
10 volts maximum is usually considered satisfactory,
however, diodes normally pass considerably greater
current, some going as high as 2 or 3 MA.
CONVERTERAND MIXER-OSCILLATOR TYPES:
47. Patch the jumper leads in accordance with the
information in Tube Data Chart supplied separately.
A-The figure in parenthesis in the Tube Data
Charts refers to the pin connection. Example:
A type lA7-GT shows the figure (3) and (6) in
parenthesis in the column headed Plate Volts.
Hence pins 3 and 6 are connected together
and patched to the Plate 1 jack by means of
the jumper leads.
B-The letter (C) in parenthesis denotes Grid Cap.
Example: A type lA7-GT shows the figure (5)
and the letter (C) in parenthesis in the column
headed Control Grid VoHs. Hence pin 5 and
the tube's grid cap are connected together and
patched to the Control Grid jack by means of
the jumper leads.
48. Follow steps 4 through 31 omitting any re-
marks concerning "manufacturer's specifications"
and substituting "value specified in the Tube Data
Chart supplied separately.
49. Reject tube when the mutual conductance indi-
cation is below that value specified in the column
headed "Life End."
THYRATRONTUBES:
Thyratrons such as the 2050 and 2051 can be
checked in any type Model 686. The step-by-step
procedure given below is for the tube type 2050.
Checking other thyratrons involves the same pro-
cedure but it must be kept in mind that the tubes
should be of a type similar to the 2050 and 2051.
1. Make connections by use of patch cords in
accordance with the base diagram except that
a 100,000 ohm 1/2 watt resistor should be in-
serted in the grid lead to pin 5. Number 2 grid
should be connected directly to cathode.
2. Set G./IIFactor switch to "x 10".
3. Turn Signal Amplitude Adjuster to zero.
4. Set Element Current Range switch to "120" milli-
amperes.
5. Set Element Current switch to "Plate" posi-
tion.
6. Before inserting the tube apply the following
element voltages:
. .
Filament _ _ _ ____ __ ___ _ _____ __ _. 6.3
Control Grid m___m m_. - 10volts d-c
Platem_m m m +212 volts d-c
7. Insert tube, readjust filament voltage and allow
to heat for at least 30 seconds.
8. Reduce the grid bias carefully until the thyra-
tron fires. .
-8-
--
 Loading...