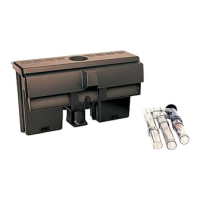
USING THE WHISPER
®
FILTER TROUBLESHOOTING
USO DEL FILTRO WHISPER
®
USO DEL FILTRO WHISPER
®
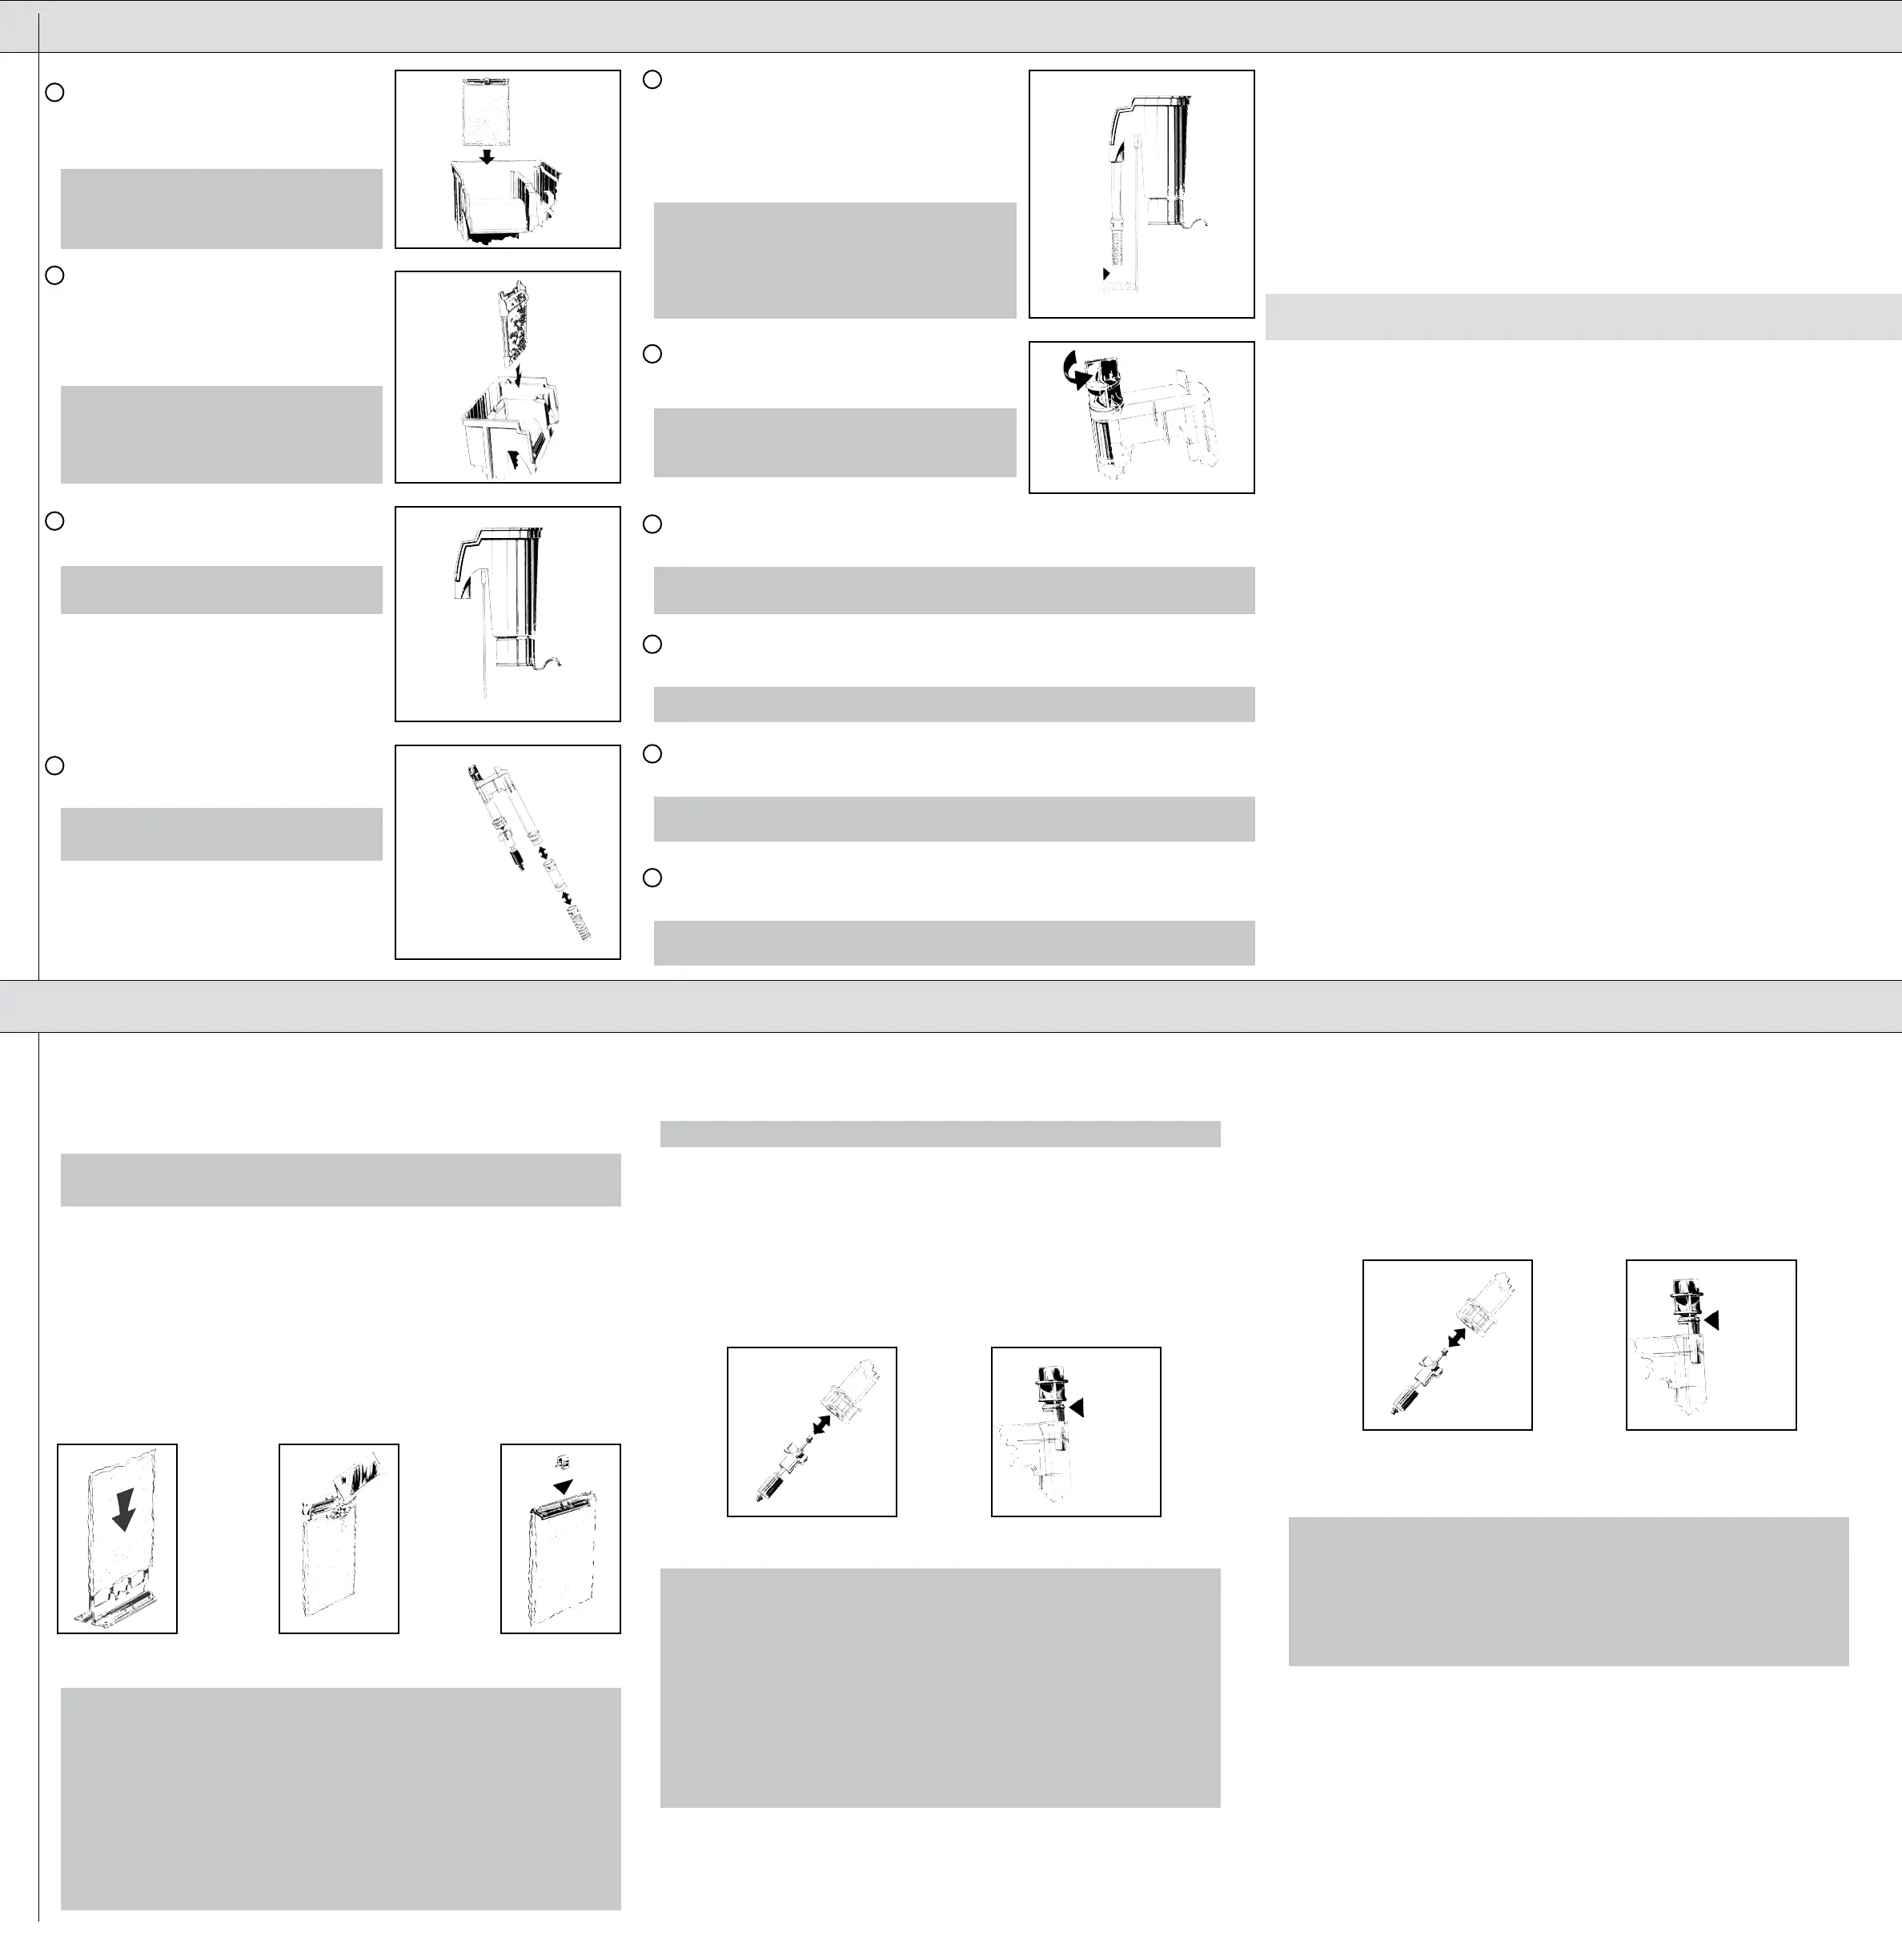
Rinse Bio-Bag
®
and slide into
v-notched slot in aquarium well
wall. (Note: Before installing, fill wells with water
and check for leaks.)
Slide Wonder Tube
®
into filter box so
that the impeller slides all the way into
the Energizer Well. If necessary, add
or remove extension tubes to position
the strainer at least one inch above the
gravel. (Leave three inches above gravel for cichlids
and goldfish.)
Assemble the Wonder Tube
®
.
(Note: Not all filters include extension tubes.)
Changing the Bio-Bag
®
Cambio de la Bio-Bag®
Maintaining the Energizer
Mantenimiento del Energizer
Cleaning The Wonder Tube
®
Limpieza del Wonder Tube®
When water flows excessively from the Wonder Tube Chamber into the aquarium, it is time to
change the Bio-Bag®. The Bio-Bag®should be changed once per month
to prevent backflow and avoid filtration problems resulting from a clogged Bio-Bag®
Caution: Only remove Energizer when absolutely necessary.
Using a ready-to-use, assembled Bio-Bag®
• Remove filter box cover.
• Lift Bio-Bag® and allow excess water to drain into filter box.
• Dispose in garbage can.
• Rinse new Bio-Bag®, insert into filter, replace filter cover.
Using an unassembled Bio-Bag®
• Remove Bio-Bag® from filter, allowing excess water to drain into filter box
• Remove clip from frame, fold up frame flap, and remove floss bag from frame. Place new floss
bag over frame.
(See Illustration B.)
• Add one packet of Ultra-activated®carbon.
(See Illustration C.)
• Fold flaps of Aerobic Frame® over filter bag and replace clip.
(See Illustration D.)
• Rinse Bio-Bag®, insert into filter, replace filter cover.
• Unplug power cord, empty filter box, and place it upside down on a flat sur face.
• Grasp Energizer with one hand and filter box with the other. Gently turn Energizer counter-clockwise
until its sidewall is parallel to the raised line on the bottom of the filter box. (See Illustration F.)
• Hold Filter Box with one hand and gently pull the Energizer with the other. (If necessary, rock the
Energizer back and forth to ease removal.)
• Clean inside of Energizer Well with a Q-tip Cotton Swab. Do not use a metal instrument of any kind.
Before replacing Energizer, wet the “o-ring” with water, or coat its surface with a small amount of
non-medicated petroleum jelly. (See Illustration G.)
• Replace Energizer and fill filter box with water. Check to be sure that Energizer is seated properly
and does not leak. (When seated properly, the red o-ring will not be visible.)
• Re-install filter.
• Unplug power cord and remove filter box cover.
• Lift Wonder Tube® out of filter.
• Remove Magnet Impeller Assembly. (See Illustration H.)
• Clean all parts under running water. If needed, use a filter stem spring brush (available at your
dealer).
• The Flow Control Knob can be removed to aid in cleaning. Before replacing the knob, wet its “o-ring”
with water, or coat the surface of the o-ring with a small amount of non-medicated petroleum jelly.
(See Illustration I.)
• Reinstall the Wonder Tube®
Hang filter tank on rear wall of
aquarium.
Remove Bio-Foam
®
from Aerobic
Grid
®
. Rinse it in cold water,
squeezing until it is thoroughly wet.
Place the Bio-Foam
®
back into the
Aerobic Grid
®
and slide it into the
filter box next to the Bio-Bag
®
.
Set Control Knob at maximum flow by
pointing indicator arrow at aquarium
wall.
Pour water into the Wonder Tube Chamber until it overflows into
Bio-Bag Chamber.
Cover the filter and fill your aquarium with water
(1/2” to 1 1/4” from top).
Plug in power cord; the filter should start automatically within
10 to 20 seconds.
If filter does not start, remove cover and slide Wonder Tube up and
down with one or two short strokes. Replace Cover.
Enjuague la Bio-Bag
®
y deslice ésta en la ranura
V entallada en la pared del pozo de la pecera.
(Nota: Antes de instalar, llene los pozos con
agua y compruebe que no hay fugas.)
Desclice e inserte el Wonder Tube
®
en la caja del filtro,
a fin de que el impulsor se delice e inserte totalmente
dentro del Pozo Energizer. Si es necesario, agregue o
quite tubos de extensión para situar el filtro de malla
a 2.54 cm de la grava como mínimo. (Deje 7.6 cm
sobre la grava para cíclidos y pecetos rojos).
Arme el Wonder Tube
®
. (Nota: No todos los
filtros incluyen tubos de extensión.)
Cuando fluye demasiada agua de la Cámara del Wonder Tube® a la pecera, es hora de
cambiar la Bio-Bag®. Se debe cambiar la Bio-Bag®una vez al mes para prevenir el contraflujo y
evitar problemas de filtración resultantes de una Bio-Bag®obstruida.
Precaución: Sólo desmonte el Energizer cuando sea absolutamente necesario.
Uso de una Bio-Bag® ya armada y lista para usar
• Retire la cubierta de la caja del filtro.
• Levante la Bio-Bag® y permita que todo el exceso de agua drene en la caja del filtro.
• Deseche la bolsa en el tacho de basura.
• Enjuague la nueva Bio-Bag®, inserte ésta en el filtro, y vuelva a colocar la cubierta del filtro.
Uso de una Bio-Bag® desarmada
• Extraiga del filtro la Bio-Bag® y permita que todo el exceso de agua drene en la caja del filtro.
• Retire la presilla del bastidor, doble o pliegue la tapa del bastidor y extraiga de éste la bolsa de
pelusa. Coloque la nueva bolsa de pelusa sobre el bastidor. (Véase la Ilustración B).
• Agregue un paquete de carbón Ultra-activado. (Véase la Ilustración C).
• Despliegue las tapas del Aerobic Frame® sobre la bolsa de filtración y vuelva a colocar la
presilla. (Véase la Ilustración D).
• Enjuague la Bio-Bag®, inserte ésta en el filtro, y vuelva a colocar la cubierta del filtro.
• Desenchufe el cordón de alimentación y retire la cubierta de la caja del filtro.
• Levante y extraiga del filtro el Wonder Tube®.
• Extraiga el Conjunto del Impulsor Magnético. (Véase la Ilustración H).
• Limpie todas las partes con agua fluyente. Si es necesario, utilice una escobilla elástica para
conducto de filtro (disponible a través de su distribuidor).
• La Perilla de Control de Flujo se puede desmontar para facilitar la limpieza. Antes de volver
a instalar la perilla, moje su “anillo O” con agua o cubra la superficie del “anillo O” con una
pequeña cantidad de vaselina no medicinal. (Véase la Ilustración I).
• Vuelva a instalar el Wonder Tube®
• Desenchufe el cordón de alimentación, vacíe la caja del filtro y colóquela boca abajo en una
superficie plana.
• Sujete el Energizer con una mano y la caja del filtro con la otra. Gire cuidadosamente el
Energizer en sentido antihorario (hacia la izquierda) hasta que su pared lateral esté paralela
con la línea en relieve que está en la parte inferior de la caja del filtro. (Véase la Ilustración F).
• Sujete la Caja del Filtro con una mano, y con la otra mano tire cuidadosamente del Energizer.
(Si es necesario, mueva el Energizer hacia adelante y hacia atrás para facilitar su extracción).
• Limpie el interior del Pozo Energizer con un bastoncillo de algodón. No utilice ningún tipo de
instrumento metálico. Antes de volver a instalar el Energizer, moje el “anillo O” con agua o
cubra su superficie con una pequeña cantidad de vaselina no medicinal.
(Véase la Ilustración G).
• Reinstale el Energizer y llene la caja del filtro con agua. Asegúrese que el Energizer esté
asentado correctamente y no tenga fugas. (Cuando está asentado correctamente, no se ve el
“anillo O” rojo).
• Vuelva a instalar el filtro.
Cuelgue el tanque del filtro en la pared
posterior de la pecera.
Retire la Bio-Foam
®
del Aerobic Grid
®
.
Enjuáguela en agua fría, y exprímala hasta
ques esté totalmente mojada. Coloque la Bio-
Foam
®
nuevamente dentro del Aerobic Grid
®
e
inserte en la caja del filtro, junto a la Bio-Bag
®
.
Fije la Perilla de control en la posición de flujo
máximo. La flecha de indicación debe apuntar hacia la
pared de la pecera.
Vierta agua en la Cámara de Wonder Tube
®
hasta que rebalse y pasa a la Cámara de la
Bio-Bag
®
.
Cubra el filtro y llene la pecera con agua (1.27 cm a 3.2 cm de la parte superior).
Enchufe el cordón de alimentación; el filtro debe comenzar a funcionar automáticamente al
cabo de 10 a 20 segundos.
Si el filtro no arranca, retire la cubierta y deslice el Wonder Tube hacia arriba y hacia abajo
con uno o dos movimientos cortos. Vuelva a colocar la cubierta.
1
5
4
3
2
6
7
8
9
10
MAINTENANCE
If the lter doesn’t start, lift the Wonder Tube
®
out of the lter and remove the Magnet Impeller
Assembly. Use tweezers to remove any stringy or hair-like material that may have twisted around the
shaft. Hold the assembly by its endcaps and try to spin the magnet. If the magnet does not spin freely,
rinse under a jet of tap water to “unlock” it. Now hold the magnet and try to spin the impeller one turn in
either direction. If the impeller doesn’t spin freely, rinse under a jet of tap water to “unlock” it. If rinsing
doesn’t free up the magnet or impeller, replace the assembly.
If you’ve replaced the assembly and the lter still won’t start, it is possible the carbon or aquarium
gravel may have lodged at the bottom of the Energizer Well. Slide the Wonder Tube
®
up and down in the
lter box (with water still in it). If this doesn’t work, unplug the lter and empty it in your sink. Insert a
drinking straw–not a metal instrament–into the Energizer Well and try to break up any sediment. Rinse
the Energizer Well and re-assemble the lter.
To determine if the Energizer is functioning, plug it into an electric outlet and hold the Magnet Impeller
Assembly against its outside wall. If you feel a magnetic attraction, the Energizer is functional. If not,
replace the Energizer.
Si el ltro no arranca, levante y extraiga del ltro el Wonder Tube
®
y luego extraiga el Conjunto del
Impulsor Magnético. Use una aguja o pinzas para extraer todo material broso o pelos que se hayan
enrollado alrededor del eje. Sujete el conjunto por los extremos de su eje y trate de hacer girar el imán.
Si el imán no gira libremente, enjuáguelo bajo el chorro de agua de un caño para “desbloquearlo”.
Ahora sujete el imán y trate de hacer girar el impulsor una vuelta hacia la izquierda o hacia la derecha.
Si el impulsor no gira libremente, enjuáguelo bajo el chorro de agua de un caño para “desbloquearlo”.
Si el enjuague no desbloquea el imán o el impulsor, reemplace el conjunto.
Si usted ha reemplazado el conjunto y el ltro todavía no arranca, es posible que el carbón o la grava
de la pecera pueda haberse depositado en el fondo del Pozo Energizer (Energizer Well). Deslice el
Wonder Tube
®
hacia arriba y hacia abajo en la caja del ltro (con agua aún en ella). Si esto no funciona,
desenchufe el ltro y vacíelo en el fregadero. Inserte una cañita para beber — no un instrumento
metálico,— en el Pozo Energizer y trate de romper el sedimento que se haya depositado allí. Enjuague el
Pozo Energizer y vuelva a armar el ltro.
Para determinar si el Energizer funciona, enchufe éste en un tomacorriente y sostenga el Conjunto del
Impulsor Magnético contra su pared externa. Si usted siente una atracción magnética, el Energizer
funciona. Si no es así, reemplace el Energizer.
SOLUCIÓN DE PROBLEMAS
Illustration B
Ilustratión B
Illustration F
Ilustratión F
Illustration H
Ilustratión H
Illustration G
Ilustratión G
Illustration I
Ilustratión I
Illustration C
Ilustratión C
Illustration D
Ilustratión D
United Pet Group, Inc. (UPG)
3001 Commerce Street
Blacksburg, VA 24060-6671 EE.UU.
www.tetra-fish.com
®Registered Trademark of United Pet Group, Inc.
or one of its affiliates
®Marque deposée de United Pet Group, Inc.
ou de l’une de ses filiales
© 2014 UPG
25772-994 Rev. B
 Loading...