English
Installation and operating instructions Wilo-DrainLift XS-F 27
7.2 Electrical connection
DANGER! Risk of fatal injury!
If the electrical installation is not properly carried out, there is a risk of fatal electric
shock.
• Always have the electrical connection performed by a qualified electrician.
• For installation in bath and shower rooms, observe the relevant local regulations [e.g.
VDE 0100 Part 701 in Germany].
The unit is delivered ready to plug in and may only be connected to standard safety
sockets.
• The current type and voltage of the mains connection must correspond to those stated on
the name plate,
• Mains fuse: 10 A, slow-blow
• Earth the unit according to the regulations.
7.2.1 Mains connection
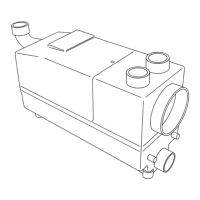
Fig. 10: Ventilation insert
Fig. 10 shows a cross-section through the finished wall-
mounted installation around the ventilation insert. If ventila-
tion is through the roof, the ventilation insert and the active
carbon filter are not required.
1 HT pipe sleeve DN 50
2 Ventilation insert
3 Ventilation grille
4 Compensating orifice plate
5 Active carbon filter
6 Tiles
7 Tile adhesive
8 Moisture-proof board
Fig. 11: Position of the safety socket
There are two options for positioning the safety socket:
1 Within the front wall installation, behind the cover
of the maintenance hatch (Fig. 11, Pos. 1). The
inspection hatch must be opened in order to
respond to an alarm by pulling out the mains plug.
2 Outside the front wall installation, near the main-
tenance hatch (Fig. 11, Pos. 2). There is immediate
access to the main plug for responding to an alarm
or switching off the unit in an emergency.
 Loading...