EasyManua.ls Logo

WLIVE ASNG015 - User Manual

WLIVE ASNG015
23 pages
Print Icon
To Next Page IconTo Next Page
Loading...
ASNG015
SW 2 Drawer Storage Cabinet
wlive-cs@devaise.com
V2.0
Question and Answer IconNeed help?

Do you have a question about the WLIVE ASNG015 and is the answer not in the manual?

Summary

Important Information and Safety

General Guidelines

Read and follow instructions carefully for product use.

Notes for Assembly

Follow instructions precisely, check for defects, and use recommended tools.

Warnings

Keep parts away from children and pets; avoid sharp objects and chemicals.

Anti-Tip Warning

Furniture tip-over can cause serious injury; must be fixed to the wall.

Product Overview

Exploded Drawing

A detailed diagram showing all parts and their assembly order.

Parts List

Identifies all components with labels (A, B, C...) and quantities required.

Assembly Remarks and Techniques

General Assembly Remarks

Provides general notes and remarks for assembly steps.

Minifix Position

Illustrates the correct method for installing Minifix connectors.

Assembly Steps 1 & 2

Step 1 Remarks

Please don't fully tighten screws F; the holes on part 2 should face up.

Step 2 Remarks

Fully tighten screws E and F, use a blanket, and wait for glue to dry.

Assembly Steps 3 & 4

Step 3 Remarks

Ensure screw A is screwed to an appropriate depth, not too deep or too shallow.

Step 4 Remarks

Illustrates the correct and incorrect methods for attaching components in Step 4.

Assembly Step 5

Step 5 Remarks

Ensure screws are flattened and not crooked for perfect drawer installation.

Assembly Steps 6 & 7

Step 6 Remarks

Connect grooves on part 8 to the groove on part 7 as shown.

Step 7 Remarks

Connect the grooves on part 8 to the groove on part 7 using Minifix connectors.

Assembly Steps 8 & 9

Step 8 Remarks

Ensure grooves on parts 4 and 5 connect to the groove on part 7.

Step 9 Remarks

Shows how to place part 10 correctly onto the structure.

Assembly Steps 10 & 11

Step 10 Remarks

Illustrates connecting parts 4, 5, and 6 to form the main structure.

Step 11 Remarks

Attaching drawer runners (CL, CR) to the cabinet sides.

Assembly Steps 12 & 13

Step 12 Remarks

Shows insertion of drawer parts (11) into the cabinet.

Step 13 Remarks

Attaching the magnetic catch (I) to the cabinet using screws.

Assembly Steps 14 & 15

Step 14 Remarks

Shows how to attach part 9 using screws.

Step 15 Remarks

Attaching part 12 using screws and other hardware.

Assembly Step 16

Step 16 Remarks

Connecting top panels (9) to the main cabinet structure.

Assembly Steps 17 & 18

Step 17 Remarks

Attaching parts 14, 16, and 17 using screws and connectors.

Step 18 Remarks

Assembling drawer sides (14, 16) with drawer front (15).

Assembly Steps 19 & 20

Step 19 Remarks

Inserting the drawer bottom (18) into the drawer assembly.

Step 20 Remarks

Attaching the drawer front (17) to the drawer assembly.

Assembly Step 21

Step 21 Remarks

Attaching drawer runners (DL, DR) to the drawer sides.

Assembly Steps 22 & 23

Step 22 Remarks

Inserting the completed drawer into the cabinet.

Step 23 Remarks

Securing the drawer mechanism within the cabinet.

Assembly Steps 24 & 25

Step 24 Remarks

Attaching part 13 to the cabinet, noting shadow part orientation.

Step 25 Remarks

Shows how to attach part L to the cabinet.

Assembly Step 26

Step 26 Remarks

Securing the drawer mechanism using screws and part K.

Anti-Tipping Device Installation

Wall Anchoring Guide

Provides instructions on securing furniture to various wall types to prevent tipping.

Step 1: Drill Hole

Drill a hole in the solid wall using a 10.5-11mm drill bit.

Step 2: Insert Anchor

Insert the plastic plug into the drilled hole.

Step 3: Attach Bracket

Attach the bracket to the wall using the provided screw.

Step 4: Attach Furniture

Screw the bracket to the furniture.

Step 5: Tighten

Tighten the threading to secure the furniture to the wall.

Overview

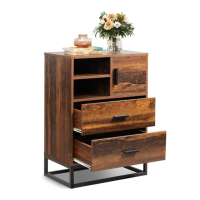
This document provides assembly instructions and important information for the ASNG015 SW 2 Drawer Storage Cabinet.

Function Description:

The ASNG015 is a two-drawer storage cabinet designed to provide organized storage space. It features multiple shelves, two drawers, and a cabinet with a door, making it suitable for various items. The cabinet is intended for indoor use and requires assembly. An anti-tipping device is included to ensure safety by fixing the furniture to a wall, preventing tip-over accidents.

Important Technical Specifications:

  • Model Number: ASNG015
  • Type: SW 2 Drawer Storage Cabinet
  • Hardware:
    • A: M6x30 screws (x32)
    • B: Dowels (x16)
    • C: Minifix cams (x32)
    • D: Drawer runners (x2 sets: CL, DL, DR, CR)
    • E: M6x30 screws (x4)
    • F: M6x40 screws (x8)
    • G: G1 (x1), G2 (x2) - specific function not detailed but likely related to magnetic catch or similar
    • H: Magnetic catch plate (x1)
    • I: Magnetic catch (x1)
    • J: M4x14 screws (x20)
    • K: Wall anchors (x4)
    • L: Shelf pins (x16)
    • M: Door stoppers/bumpers (x4)
    • N: Drawer knobs (x2)
    • O: M4 screws (x1) - likely for magnetic catch
    • P: Plastic caps (x4)
    • Q: Anti-tipping strap (x1)
    • R: M3x14 screws (x4)
  • Drill Bit Recommendations for Anti-Tipping Device:
    • Electric drill (not provided)
    • For wood/concrete walls: 0.41-0.43 inches (10.5-11mm) drill bit
    • For drywall/plaster with wood stud: 1/8-inch (3mm) diameter pilot hole
    • For drywall without wood stud: 27/64-inch (10.5mm) diameter hole
    • For masonry: 27/64-inch (10.5mm) diameter hole, 2-inches (50mm) deep

Usage Features:

  • Assembly: The product requires self-assembly. It is recommended that two people assemble this product to ensure ease and safety.
  • Drawer System: Features two drawers with runners (CL, DL, DR, CR) for smooth operation. Instructions emphasize proper installation of drawer runners to ensure perfect drawer function.
  • Adjustable Shelving: The design includes shelves, some of which appear to be adjustable using shelf pins (L).
  • Door Cabinet: Includes a cabinet with a door, secured by a magnetic catch (I) and plate (H).
  • Anti-Tip Safety: A critical safety feature is the anti-tipping device (Q, K). This device must be permanently fixed to the wall to prevent serious or fatal crushing injuries from furniture tip-over. Different wall materials require specific fixing systems, and users are advised to consult a local specialized dealer for suitable fixing systems if their wall material is not listed.
  • Drawer Knobs: Two drawer knobs (N) are provided for easy access to the drawers.
  • Plastic Caps: Plastic caps (P) are included, likely to cover exposed screw heads for a cleaner finish.

Maintenance Features:

  • Regular Checks: It is suggested to regularly check the product's bolts and connections to ensure safe use.
  • Cleaning: Avoid sharp objects or corrosive chemicals to prevent damage to the product surface.
  • Odor Management: If an odor is present when first opening the package, leave the unwrapped product in a shaded and ventilated area for a few days to air out.
  • Contact for Assistance: Users are encouraged to contact wlive-cs@devaise.com for any further questions, missing parts, or defects.

General Guidelines and Warnings:

  • Read Instructions: Always read the instructions carefully and use the product as intended.
  • Keep Manual: Keep the manual for future reference and hand it over if the product is transferred.
  • Pre-Assembly Check: Before assembly, check for defects or missing accessories. Do not use the product if defects are found or accessories are missing; contact customer service for assistance.
  • Tightening Screws: During assembly, only slightly tighten all screws initially, then fully tighten them once all are in their correct positions. A Philips screwdriver is recommended but not included.
  • Assembly Surface: Assemble the item on a soft, flat, and clean surface to avoid scratches and damage.
  • Child and Pet Safety: Keep parts and packaging materials away from children and pets during assembly to prevent injury and choking hazards.
  • Pinching Hazard: Open the item slowly and cautiously to avoid pinching hands, especially children's, by metal joints.
  • Anti-Tip Installation: The anti-tipping device is crucial for safety. Ensure it is installed correctly according to the wall material. Do not over-tighten screws when installing the anti-tipping device.

WLIVE ASNG015 Specifications

General IconGeneral
BrandWLIVE
ModelASNG015
CategoryIndoor Furnishing
LanguageEnglish

Related product manuals