Overview
Toothsetter Introduction
Overview BMT10013doc082115 1-1
1
SECTION 1 OVERVIEW
1.1 Toothsetter Introduction
There are four steps to maintaining blades used on the Wood-Mizer sawmill. They should
ALWAYS be followed in this order:
1. Blade Cleaning
2. Sharpening
3. Deburring
4. Toothsetting
See Figure 1-1. The blades supplied by Wood-Mizer have a raker-style set in the teeth. If
you look at a blade from the top, you will see that the teeth are set (or bent out) in a
repeating sequence; straight, left and right. The teeth that are set left and right do the cut-
ting. The straight teeth (rakers) clear the cut of sawdust.
See Figure 1-2. As the blade is sharpened, the tip of the tooth recedes and the set
becomes smaller. Correct setting is one of the most important factors in the cutting ability
of a blade. Check used blades regularly to see if they need resetting.
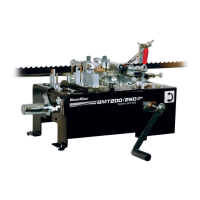
The BMT100-2/BMT100-3 Toothsetter allows you to accurately and evenly set the teeth
of a bandsaw blade. The spring-loaded clamping mechanism lets you position a tooth in
front of the gauge and clamp it in place. You can then measure the set. The tooth is bent
by clamping the blade further. This chapter describes proper setup and operation of the
toothsetter.
FIG. 1-1
FIG. 1-2
Set After
Sharpening
Original
Set
 Loading...