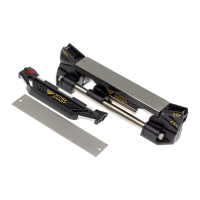
SHARPENING PLATFORM
17° AND 20° ANGLE GUIDES
25° BUILT-IN ANGLE GUIDES
6” DIAMOND PLATES
PLATE HOLDER
PIVOT RESPONSE LOCK
MEDIUM CERAMIC ROD
2 GRIT LARGE CERAMIC ROD
SMALL CERAMIC ROD
1. Rest the knife blade on the angle guide to
establish the proper angle.
2. While maintaining the proper angle, lightly
push the edge of the blade along the
ceramic rod until the tip stops at the end of
the rod. Do not slide the tip of the blade o
the ceramic rod.
3. Use the same technique for the other side
of the blade – starting from the opposite
end of the sharpener and pulling the blade
toward you.
(Or switch hands and ip the knife over,
using the push technique in step 2.)
TIP: Alternate sides with each stroke
4. Repeat this process 10-15 times to ensure
burr removal. Decrease pressure with each
stroke, nishing with only the weight of
the blade.
5. Enjoy your sharp knife!
TIP: Clean with warm soapy water as needed.
(Do not use honing oils with ceramic hones.)
1. Install Angle Guides and select the Pivot Response Lock position:
A. Slide to the unlocked position for sharpening curved blades.
B. Slide to the locked position for sharpening straight blades.
2. Rest the knife blade on the Angle Guide to establish the proper
edge angle.
3. While maintaining the proper angle, lightly push the edge of the
blade across the diamond plate. Keep the blade perpendicular to
the sharpening platform.
For curved blades (sharpening with the plate holder unlocked),
allow the plate holder to pivot and follow the curve of the blade.
TIP: Use light pressure for sharpest edge and longest abrasive life.
TIP: Stop before the tip of the blade leaves the edge of the abrasive.
4. Repeat step 3 until a burr develops.
5. Use the same technique for the other side of the blade, starting
from the opposite end of the sharpener and pulling the blade
toward you. (Or switch hands and ip the knife over, using the
push technique above – step 3)
TIP: For a consistent bevel, make the same number of passes on each
side of the blade.
6. Remove the coarse diamond plate and install the ne diamond
plate. Repeat steps 2-5, using light pressure and alternating sides
with each stroke.
7. Now proceed to hone your knife following the instructions below.
2O° ANGLE GUIDE FOR HUNTING & POCKET KNIVES / 17° ANGLE GUIDE FOR KITCHEN
sharpening a knife
honing a knife
Flip for more instructions
serrations tools
Burr
Burr
Cutting
Edge
Darex, LLC
210 E Hersey St.
Ashland, OR 97520
1-800-597-6170
WorkSharpTools.com
WARNING: To minimize the risk of injury, always use
proper eye and respiratory protection. Use only as
directed in the Work Sharp User’s Guide.
scan for video
WorkSharpTools.com/GSS
PP0003344 Rev 1 6/19
Designed, calibrated and quality
checked in Ashland, OR
WARNING! CHOKING HAZARD!
Small Parts - Not for children under 3-yrs.
pivot-response
unlocked
Sharpener comes ready to use with the 320 Grit Diamond Plate and 20˚ Angle Guides installed.
Angle Guides and Diamond Plates are held in place with magnets – lift o to remove.
pivot-response
locked
1. Attach the coarse diamond plate to the plate holder, and
hold the sharpening platform like a sanding block.
2. Secure the dull tool to a at surface, or clamp in a vise.
3. Run the diamond abrasive along the cutting edge of the
tool, using light to medium pressure. Continue until any
edge damage is removed and the cutting edge is sharp.
1. Match the size of serration to the small, medium or large
ceramic rod, and place the serration onto the ceramic rod.
2. Matching the bevel angle of the serration, slide the blade
back and forth until a burr is raised. Repeat for each serration.
3. Remove the burr by lightly sliding the at side of the
serrations along the ne ceramic rod.
1A
1B
A
TIP: Some tools are best sharpened with
only the diamond plate
TIP: Check for a burr
by brushing ngers
across and away
from the blade edge.
curved Blades
set up
honing
straight blades
a. Remove the plate holder, and insert the Guided Field
Hone (listen for a “click”).
b. Rotate the red knob to select the desired abrasive:
Fine (smooth): regular honing
Coarse (ribbed): touch-up sharpening
while in the eld or sharpening
recurved blades
Hooks (2 grooves): sh
hooks and other
ne points
FINE
HOOKS
COARSE
Plate holder pivots to follow curved blades.
Use the same technique
to hone straight and
curved blades.
2
1
3
B