12
C
L
E
A
N
I
N
G
A
N
D
S
A
N
I
T
I
Z
I
N
G
I
N
S
T
R
U
C
T
I
O
N
S
EQUIPMENT AND SUPPLIES NECESSARY
• Clean 5 gallon bucket (1)
• Clean cloth towel (1)
• Safety goggles and rubber gloves
•
CLEANING SOLUTION
Kay-5® Sanitizer/Cleaner, chlorinated alkaline product is approved for use as a
manual type cleaner or for use as a chlorinating sanitizer. Kay-5® is available in 1
oz. packets. Two, 1 oz. packets of Kay 5® mixed with 5 gallons of water, will
deliver the appropriate cleaner concentration.
PREPARATION:
Prepare sanitizing solution by adding two, 1 oz. packets of Kay-5® to 5 gallons of
potable water (not greater than 100°F) in a clean 5 gallon bucket. This produces a
100 PPM chlorine solution. Stir to ensure Kay-5
® crystals are completely
dissolved.
CAUTION: Chlorinated detergents are corrosive. Wear rubber gloves and safety
goggles while performing all cleaning and sanitation procedures.
Note: If a chlorinated sanitizer/cleaner other than Kay-5® is used, follow the manufac-
turer’s instructions for proper dilution to produce 100 PPM Sanitizer/Cleaner solution.
DO NOT USE BLEACH. Bleach is abrasive and harsh on the numerous plastic
components in our dispensing systems. We have confirmed that using a buff-
ered chlorinated detergent and following the prescribed procedures ensures
optimum sanitation and maintenance of dispensing equipment. This will limit
sanitizer odor/off-taste carryover that could be perceived as a hazard
CLEANING THE SHEATHING
Materials Required:
Cleaning Solution (see CLEANING SOLUTION, above)
Flexible soft plastic bristle brush
Clean, dry Bar Towel
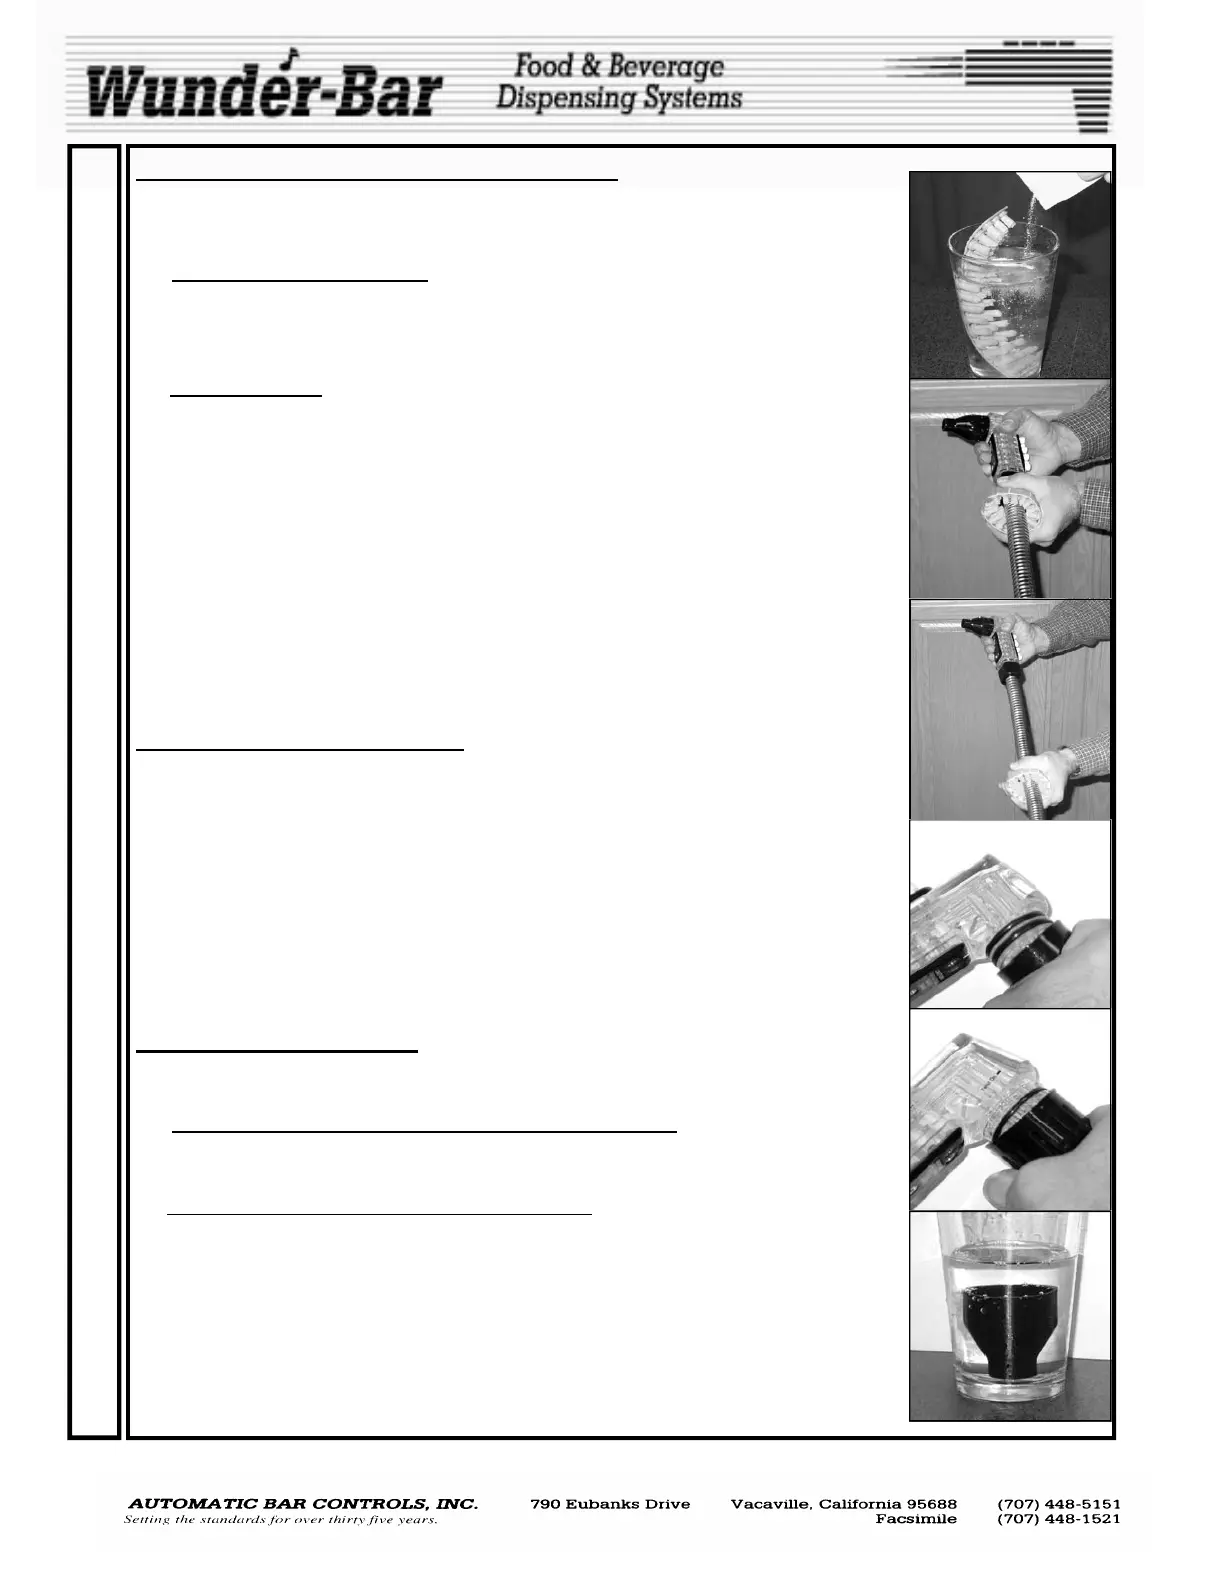
1. Immerse the Brush in Cleaning Solution as shown in Fig.1.
2. Wrap the brush around the sheathing at the Heel end (Fig.2). Move the brush up and down
the entire length of the Sheathing, from Heel to Manifold (Fig.3), a minimum of 6 times.
3. Immerse the Brush in the Cleaning Solution. Rotate the Sheathing Brush 1/2 turn. Move
the Brush up and down the entire length of the Sheathing 6 more times.
4. Immerse the Sheathing Brush in the Cleaning Solution. Rotate the Sheathing Brush an
other 1/2 turn. Move the Sheathing Brush up and down the entire length of the Sheathing
a minimum of 6 more times. Dry the entire length of the Sheathing with a clean bar towel.
CLEANING THE NOZZLE
Material Required:
Cup of Cleaning Solution (see CLEANING SOLUTION above)
1a. SERIES II NOZZLE REMOVAL: (Compression Fit, two O-rings) (Fig.4)
Grasp the nozzle and twist back and forth while pulling the nozzle away from the
handle. If he nozzle is difficult to remove, immerse nozzle end of the handle in a cup of
carbonated water for five minutes before attempting removal again.
1b. SERIES 2.5 and SERIES III: (Twist-Lock, one O-ring)
(Fig.5)
Grasp and twist the nozzle counterclockwise to unscrew the nozzle from the Handle.
If the nozzle is difficult to remove, immerse nozzle end of the handle in a cup of
carbonated water for five minutes before attempting removal again.
2. Remove nozzle and place in cup of cleaning solution (see CLEANING SOLUTION above)
for 2 minutes. Immerse a clean brush in the sanitizer solution. Scrub nozzle and diffuser
with a clean brush until any and all buildup is removed.
3. Remove nozzle from sanitizer solution. Allow nozzle and diffuser to air dry.
4. Reinstall nozzle onto diffuser.
5.
Dispense a beverage to confirm proper operation.
Fig.5
Fig.1
Fig.4
Fig.2
Fig.6
Fig.3
MARK 4 MANUAL
www.wunderbar.com

 Loading...