Do you have a question about the X-tra Seal Smart Sensor Pro+ and is the answer not in the manual?
Device complies with FCC Part 15 rules, subject to conditions for interference.
How to react to low/high pressure or temperature alerts by reducing speed.
Avoid sealants/propellants to prevent sensor damage and warranty void.
Guidance on charging, handling, and proper disposal of batteries.
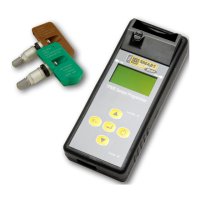
Identifies the main buttons and their functions on the Pro+ Tool.
Turn the Pro+ Tool on or off by pressing and holding the power button.
Back, Enter, and Arrow buttons for menu navigation and selection.
Hard contact point for programming Smart Sensor TPMS Sensors.
Smart Sensor Cradle and thumb latch for secure sensor placement.
LED Display, Low Battery, and Charge Indicator lights provide status.
Power, Back, Enter, and Arrow buttons for navigation and operation.
OBDII, USB, and DC Power Jack for connections and charging.
Configure units, formats, language, and auto-off behavior.
Adjust screen contrast and display formats (Temp, Pressure, ID).
Displays Serial Number and Software Version.
Select a vehicle to diagnose and service using the tool.
Quickly select the last vehicle an operation was performed on.
Access customizable options for units, ID format, language, and power.
Choose the vehicle make and model before scanning.
Proper positioning for scanning the TPMS sensor with the tool.
The tool sends a signal to wake up and read the sensor.
Displays Sensor ID, Pressure, Temperature, and Battery Status.
Choose the vehicle before programming a new sensor.
Ensures proper connection for programming blank sensors.
The tool initiates the programming sequence for a new sensor.
Confirms successful programming and displays the new Sensor ID.
Copies sensor ID wirelessly by scanning the existing sensor.
Prepares the blank sensor for programming.
Scan ID, program sensor, and confirm successful copy.
Manually enter the Sensor ID for copying.
Select option and enter ID character by character.
Secures the blank sensor for programming.
Programs the blank sensor with the manually entered ID.
Confirms successful programming and displays the new Sensor ID.
Select vehicle, highlight OBDII, and scan the first sensor.
Navigate to next wheels and scan all sensors sequentially.
Prepare for upload and set ignition status for communication.
Connect the OBDII module to the tool and then to the vehicle.
Initiates the process to upload sensor IDs to the vehicle's ECU.
Confirms that sensor IDs have been successfully uploaded.
Lists and explains common OBDII communication and writing errors like E1, E2, E3, E4, E5.
Specific issue for Toyota/Lexus vehicles stuck in a relearn loop.
| Brand | X-tra Seal |
|---|---|
| Model | Smart Sensor Pro+ |
| Category | Motherboard |
| Language | English |