Page 15
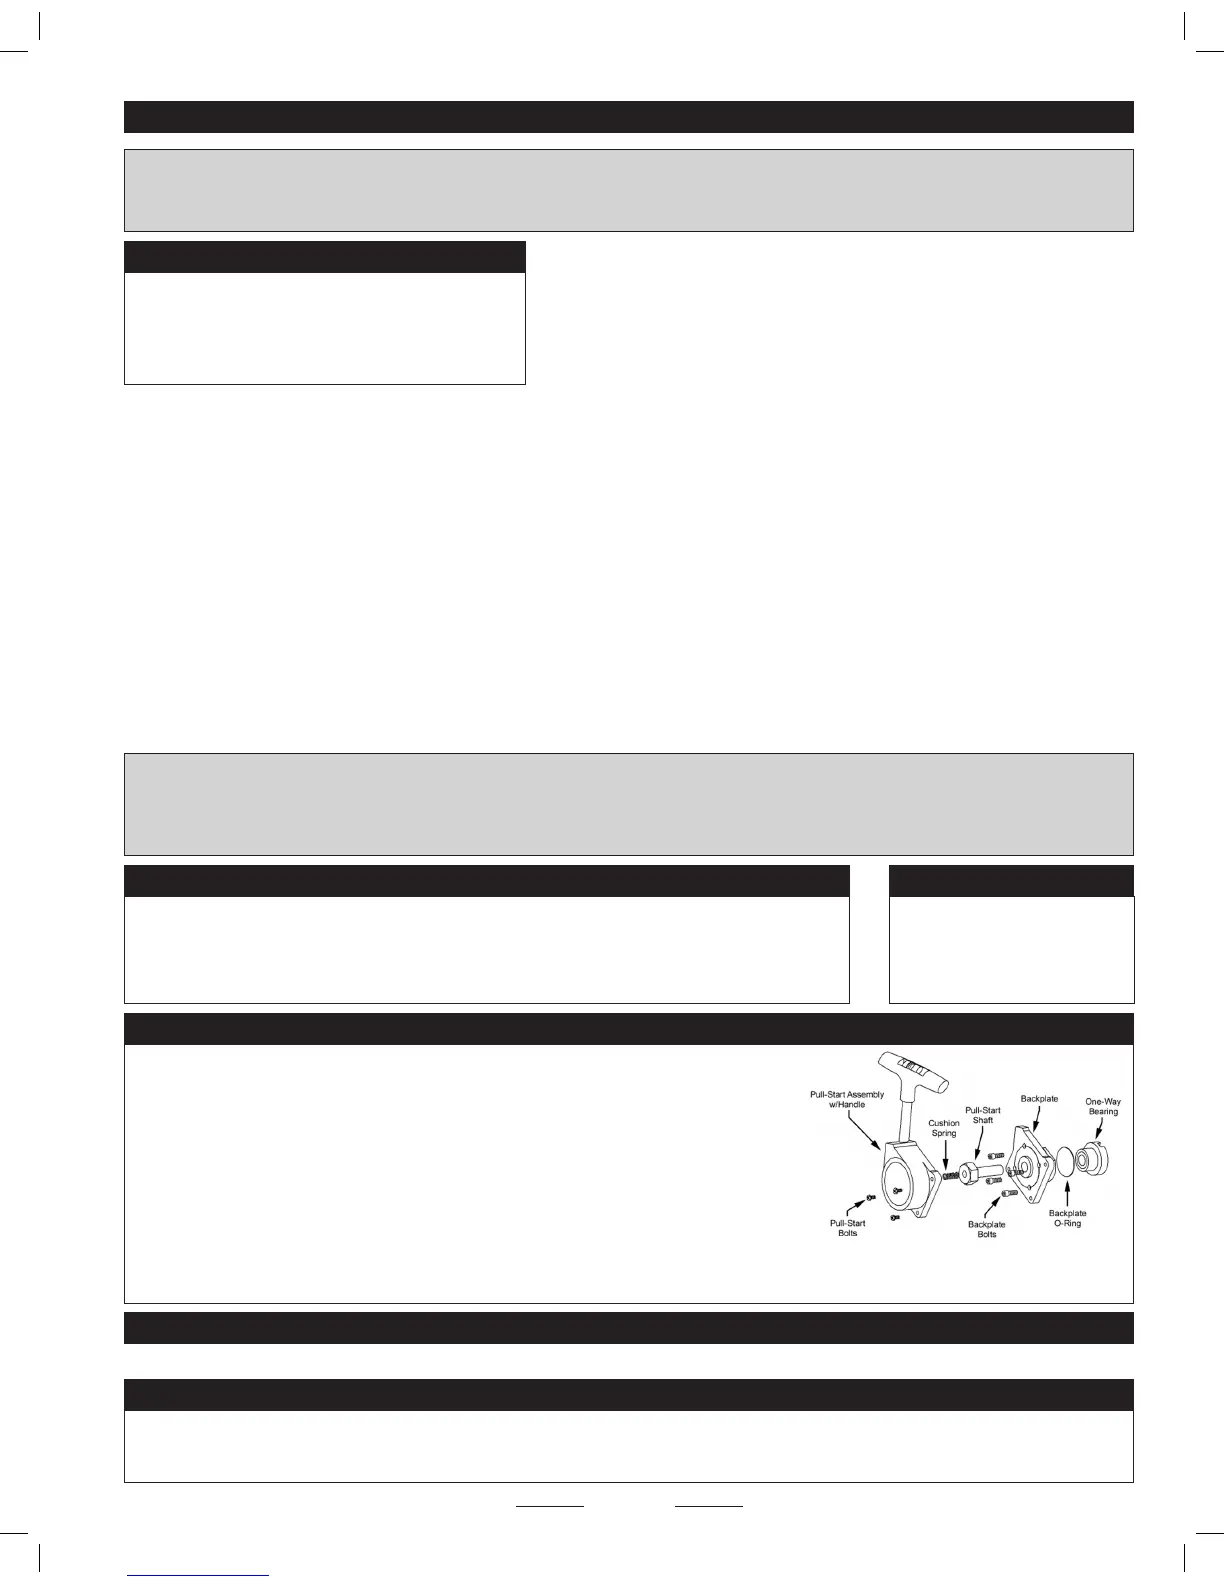
If, during the break-in process, the pull-start assembly slips when you try to start the
engine, the one-way bearing and pull-start shaft may be coated with excess fuel oil.
This can occur because the excess oil in the engine during the break-in process gets
into the one-way bearing. To x this, carefully remove the one-way bearing and the
pull-start shaft, clean them with rubbing alcohol and reassemble the parts. Use the
engine exploded parts view to see how the parts are assembled. Also, be careful when
removing the pull-start assembly to ensure that the recoil spring does not uncoil and y
out. After removing the screws securing the pull-start carefully insert a flat bladed
screwdriver or similar between the engine backplate and the pull-start itself. Apply
slight p r essure a g a i n st t h e p u l l - s t a r t t o help p r e v e nt t h e p u l l - s t a r t s p r i n g f r o m u n w inding. Temporari l y
secure the pull-start with a rubber band or tape whilst cleaning the one-way parts and be very careful when reassembling the unit.
ENGINE BREAK-IN TIP: "WHY IS MY PULL-STARTER SLIPPING?"
STEP 1: BREAKING IN THE ENGINE
WARNING Do not adjust the low speed needle valve until after the engine has been broken in. You can begin to adjust the low speed
needle valve after you have broken in the engine and after you have read and understood Step 2: Fine Tuning the Engine below. The
high speed needle valve is preset from the factory for easy starting in most conditions for the break-in period.
❑ Follow the previous procedures to ll the fuel tank and start the engine.
❑ Once the engine starts, keep the glow starter attached to the glow plug and
let the engine run for about 10 seconds without giving it throttle. This will allow
the engine to warm up. At this point the engine should be running very "rich" and
the engine will also sound like it's running rough.
❑ After the engine has been running for about 10 seconds, remove the glow starter from the glow plug. Advance the throttle in short,
quick bursts and drive the X-Terminator 2 RTR 4WD Nitro Buggy for about 2~3 minutes. If the engine is running rich enough, you should
notice smoke coming from the tuned pipe and the engine should sound like it’s running very rough. Also, the Nitro Buggy will barely be
moving because the engine is running so rich that it won't produce much power. This is what you want for now. If there is not smoke
coming from the tuned pipe, richen the high speed needle valve 1/4 turn (turn counterclockwise). After 2~3 minutes stop the engine by
pinching the fuel line to the carburettor.
❑ Let the engine cool for approximately 10 minutes, then restart it. Set the high speed needle valve mixture to a slightly
leaner setting, about 1/8 turn more in (turn clockwise). Repeat the procedure above, then stop the engine and let it cool for
approximately 10 minutes.
❑ Repeat the procedure above, leaning the high speed needle valve 1/8 turn more each time. In all, you should run the engine a total of
about 45 minutes. After 45 minutes of run-time the engine will be broken in. Run the engine with the high speed needle valve set slightly
rich, but lean enough to power the X-Terminator 2 RTR 4WD Nitro Buggy adequately. At this point the engine should hold a good setting
on the high speed needle valve and you can begin to ne tune the needle valve settings to increase performance.
IMPORTANT It is of the utmost importance that the engine never be leaned out too much. When running the engine, you
should always be able to see a slight trail of smoke coming from the tuned pipe. If you can’t, stop the engine immediately
and richen the high speed needle valve. You should also make sure there is plenty of air owing over the cylinder head to
keep the engine from overheating.
ENGINE BREAK-IN TIP
Break in the engine by running on a at surface (car
park/parking lot, etc.) without the body installed. It's
important that the engine have adequate airow
during the break-in process.
ENGINE BREAK-IN TIP
During break-in, it's normal for
excess fuel oil and exhaust
residue to drip from the tuned
pipe.
After your engine has been broken in, you can set the high and low speed needle valves for optimum engine performance.
STEP 2: FINE TUNING THE ENGINE
Be careful to never lean out the engine too much. Remember that the lubricants for your engine are suspended in the fuel. If you lean
out the fuel mixture too much you will also be lowering the amount of lubricant entering your engine. Less lubricant means more
chance of your engine overheating and possible engine failure.
WARNING ABOUT TUNING YOUR ENGINE
Continued On Next Page
No two engines have the exact same needle valve settings once broken in. Different fuels, types
and heat-ranges of glow plugs, outside air temperature and air pressure all affect the engine. The
factory needle valve settings on page 12 are break-in settings. If you reset the needle valves to
the factory settings, the engine will run very rich and you will need to retune the engine.
ENGINE TUNING TIP
 Loading...