Do you have a question about the Yamaha C1 and is the answer not in the manual?
Instructions for inserting, removing, and write-protecting 3.5-inch floppy disks for the C1 computer.
Explanation of the write-protect tab on 3.5-inch floppy disks to prevent accidental erasure.
Details on the Ni-Cd battery for real-time clock and system settings, including recharge time.
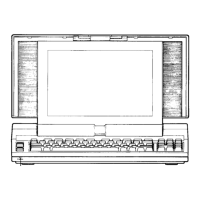
Identifies the LCD display and power LED on the front panel of the C1 computer.
Describes the backlit 640x400 LCD, backlight off when folded, and contrast/brightness controls.
Details on external CRT indicator, disk access LEDs, and Caps Lock status LED.
Describes keyboard layout, Scroll Lock/Num Lock LEDs, and control sliders.
Details on the 3.5-inch floppy disk drives and the optional hard disk drive.
Explains the vent, power switch, backlight brightness, and LCD contrast controls on the left side panel.
Details on MIDI OUT, MIDI THRU, MIDI IN, and AC Out connectors on the rear panel.
Describes AC IN, Expansion Slot, Time Code, RS232C, Printer, DIP Switches, and CRT connectors.
Overview of MS-DOS as the master program managing the C1 computer and running applications.
Explains the system prompt (e.g., 'A>') and how to enter commands.
Instructions for making a copy of the included MS-DOS system disk for safety.
Explains how MS-DOS handles drives in hard disk models, treating them as disks instead of drives.
Guide to formatting new disks for data storage and creating MS-DOS system disks.
Steps to copy the original system disk to a newly formatted disk for backup.
Explains how data is organized in files, viewing file listings with 'dir', and file naming conventions.
How the system prompt indicates the default drive and how to specify or change it.
How to create and manage directories for organizing files on a disk.
Instructions for changing the current directory using the CHDIR command.
How to create new directories using the MKDIR command.
How to remove unwanted directories using the RMDIR command.
Explanation of copying files to another file or disk drive.
How to delete unwanted files from the disk.
Instructions for renaming files using the REN command.
Explanation of external commands like .EXE or .COM files that are read from disk.
Details on formatting new disks for data or as system disks.
How to copy an entire disk to another disk.
How to pause, break, or manage scrolled output in MS-DOS commands.
Procedure for safely exiting programs and turning off the C1 computer.
Introduction to models with hard disks and the need for partitioning and formatting.
Step-by-step guide to partitioning a hard disk using the FDISK utility.
Instructions for formatting the partitioned hard disk with the /s option.
How to boot the C1 from the hard disk drive (C:) for faster startup.
Recommendations for creating directories to organize files on the hard disk.
Importance and methods for regularly backing up important data from the hard disk.
Advice on handling the hard disk, avoiding shocks, and powering off.
Explains how RAMDRIVE.SYS creates a fast virtual disk drive using system memory.
Warning that data in RAMDRIVE is lost when power is turned off; backup is necessary.
Configures the C1 to use its internal LCD or an external CRT display.
Sets the mode for external CRT displays (CGA or Monochrome).
Disables the C1's music I/O ports if special hardware is attached.
Disables the C1's second RS232C interface.
Option to disable the 512 Kbytes of extended memory already installed.
Switches the CPU clock speed between 10 MHz and 8 MHz.
Overview of the MIDI Monitor software for troubleshooting MIDI setups and monitoring data.
Explains the main displays for viewing incoming MIDI data as hexadecimal or graphic symbols.
How to open windows for functions like Patchbay, Filter, File, etc., using function keys.
Details on routing MIDI inputs to outputs and making connections in the Patchbay.
Explains how to filter unwanted MIDI messages from inputs like MIDI IN 1, MIDI IN 2, and RS232C.
Saving and loading MIDI data symbols in disk files.
Editing and defining MIDI data symbols for custom messages.
Viewing received data up to 16 KBytes ago in hexadecimal or ASCII format.
Configuring the RS232C-1 interface for MIDI communication.
How to get on-screen explanations for commands and functions.
Typing commands directly to perform functions instead of using function keys.
Defining words (symbols) to represent strings of MIDI data for easier output.
Steps to launch the MIDI Monitor program from MS-DOS command level.
Procedure for safely exiting the MIDI Monitor and returning to MS-DOS.
How current settings are saved to MON.STU and automatically loaded on startup.
Description of where incoming MIDI data is displayed on the screen.
How to enter commands, define symbols, or transmit MIDI data.
Shows where entered commands or data are displayed after pressing ENTER.
Area for displaying error messages encountered during operation.
Area showing input-to-output connections and how to change them.
Displays current assignments for the two control sliders on the C1 keyboard.
Shows commands assigned to function keys F1-F10 depending on the current window.
Details on filters for inputs (MIDI IN, RS232C) and display, and how to bypass them.
Commands to specify how incoming data is displayed in Data Monitor mode.
Switching between hexadecimal and symbolic/ASCII display for MIDI data.
Switching line feed on/off to change how MIDI messages are displayed.
Pausing the screen display to read data, and resuming.
Transmitting MIDI data from the keyboard or sliders.
Transmitting MIDI Start, Stop, or Continue messages to control external sequencers.
Determining how incoming data is transmitted from outputs and making connections.
Bypassing or enabling filters for MIDI IN 1/2 and RS232C inputs.
Opening the Filter Edit window to configure individual input filters.
Restoring patch bay conditions to their state when the window was opened.
Filtering unwanted MIDI data from MIDI IN 1/2 and RS232C inputs.
Converting incoming MIDI channels to different outgoing channels.
Restoring filter conditions to their state when the window was opened.
Enabling or bypassing filters using keyboard shortcuts.
Entering MIDI data from the keyboard or sliders for transmission.
Entering raw MIDI data in Hexadecimal or Decimal format.
Using Shift+TAB to recall and edit last-entered data.
Defining words (symbols) to represent strings of MIDI data for complex output.
Rules and examples for defining symbols, including nesting and illegal symbols.
Examples of using defined symbols to transmit MIDI data.
Interface for viewing and editing defined symbols.
Sorting the symbol list alphabetically using F3.
Saving and loading symbol files directly from Symbol Edit.
Using F6/F7 to input Slider1= or Slider2= for defining sliders.
Deleting selected symbols or all symbols from memory.
Using variables within symbol definitions for dynamic MIDI data.
Using addition and subtraction within symbol definitions.
Splitting data into High/Low or Low/High bytes using DHL and DLH functions.
Assigning sliders to transmit specific MIDI data, including range and resolution.
Using predefined symbols for common slider assignments like foot controller or volume.
Defining sliders to transmit MIDI Timing Clocks for tempo control.
Defining sliders to determine the MIDI channel for data transmission.
Window for saving and loading symbol data files.
Loading symbol data from a disk file, which erases current symbols.
Saving current symbols to a disk file with a specified filename.
Selecting the disk drive (A or B) for file operations.
Navigating between directories on the disk.
Deleting unwanted directories from the disk.
Creating new directories for file management.
Permanently deleting files from the disk.
Searching for files using wildcards (*, ?) for filename extensions.
Entering Memory Dump mode to view received data up to 16 KBytes ago.
Switching between hexadecimal and ASCII/Character display.
Clearing the entire dump memory to all '00h'.
Searching for a specified string of MIDI data within the dump.
Printing dump memory contents to a printer or a file.
Transmitting data from the dump window using numbers or symbols.
Making settings for the RS232C-1 port for MIDI communication.
Selecting the communication speed for the RS232C interface.
Selecting the data bit length (7 or 8 bits) for the RS232C interface.
Selecting the number of stop bits (1 or 2) for the RS232C interface.
Selecting parity check type (odd, even, or none).
Table showing function key assignments for different modes (Main, P.Bay, Dump, etc.).
Overview of the Bulk Manager for storing and transferring MIDI bulk data.
Explanation of MIDI System Exclusive messages used for transmitting internal memory data.
Steps to launch and exit the Bulk Manager program from MS-DOS.
Information on loading BULK.SBL for predefined symbols and defining custom symbols.
Using the BEEP command to sound the internal buzzer for task completion.
Defining words (symbols) to represent strings of MIDI data for bulk transfers.
Deleting symbols or disk files using the DELETE command.
Editing existing symbol definitions.
Exiting the Bulk Manager and returning to MS-DOS.
Displaying a help screen explaining Bulk Manager commands.
Loading symbol files (compatible with MIDI Monitor) into memory.
Pausing command file execution to prompt user actions.
Receiving System Exclusive messages from MIDI IN and saving to disk.
Saving loaded symbols to a file, automatically creating BULK.SBL if named correctly.
Sorting loaded symbols alphabetically for easier reading before saving.
Displaying symbols currently loaded into memory.
Transmitting data (files, symbols, MIDI data) from MIDI OUT ports.
Pausing command file execution for a specified time to manage data flow.
Using CHDIR, DIR, MKDIR, RMDIR commands within the Bulk Manager environment.
Example of creating and running a command file (e.g., SAVEALL) to automate tasks.
Using CHDIR to organize Bulk Manager files for a specific song.
Information on symbols predefined in BULK.SBL for Yamaha devices.
Details on permitted uses, copying, modification, and transfer of the software license.
Conditions for license effectiveness and termination.
Details on the program's 'as is' provision and warranty limitations.
Information on YAMAHA's liability and user's exclusive remedies.
Terms regarding sublicensing, assignment, governing law, and jurisdiction.
| Manufacturer | Yamaha |
|---|---|
| Model | C1 |
| Touch Sensitivity | Hard/Medium/Soft/Fixed |
| Type | Digital Piano |
| Polyphony | 64 notes |
| Effects | Reverb |