EasyManuals Logo

Yamaha DM2000 Service Manual

Yamaha DM2000
100 pages
To Next Page IconTo Next Page
To Previous Page IconTo Previous Page
Page #52 background imageLoading...
Page #52 background image
DM2000
52
29-6. Display Tube B (2/2):
Remove the four (4) screws marked [180C]. The
display tube B (2/2) can then be removed. (Fig.11)
30. LCD Assembly
(Time required: About 5 minutes)
30-1. Remove the eight (8) screws marked [290B] from
the control panel side. The LCD assembly can then
be removed. (Fig.9)
Be careful no to scratch the control panel during
installation.
LCD assembly
Control panel
Knob wheel
[290B] x 8
[330A] x 4 [334] x 4
[332] x 5
[336] x 8
[338B] x 8
[350B]
[340]
[330B]
[320B] x 9
[320A] x 16
[338A] x 16
<Top view>
Photo.8
Fig.9
[290B]:Flat Head Tapping Screw-B 3.0X8 MFZN2BL (EP600790)
Control panel
Knob wheel
Hexagonal nut

Table of Contents

Other manuals for Yamaha DM2000

Questions and Answers:

Question and Answer IconNeed help?

Do you have a question about the Yamaha DM2000 and is the answer not in the manual?
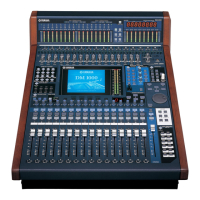
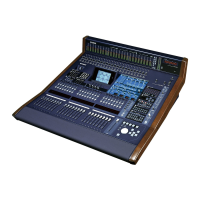
Yamaha DM2000 Specifications

General IconGeneral
TypeDigital Mixing Console
Channels96
Sampling Rate44.1 kHz, 48 kHz, 88.2 kHz, 96 kHz
Bit Depth24-bit
Aux Sends12
Matrix8 x 8
EQ Bands4-band parametric
Word ClockYes
EffectsInternal Effects Processors
Digital I/OAES/EBU, ADAT
DisplayLCD

Related product manuals