Do you have a question about the YitaHome HNXD-V1 and is the answer not in the manual?
Steps for initial setup including security key, batteries, and password.
Details on keypad functions, default codes, sleep mode, and input feedback.
Guide to setting a new management password using the keypad and screen.
Instructions for setting a new personal access code via the control panel.
How to open the safe, change passwords, and use hidden code function.
How to set and disable the vibration alarm feature for security alerts.
Instructions for setting and adjusting the safe's date and time settings.
How to view recent door access records and identify access type.
Details on battery usage, low voltage warnings, external power, and reset procedure.
This document provides assembly and usage instructions for the YITAHOME Safe Box, model HNXD-V1 (IMISSB-0001, IMISSB-0002).
The YITAHOME Safe Box is a security device designed to store valuables. It features a digital keypad for access, an emergency key system, and the ability to be securely mounted to a wall. The safe includes an adjustable internal shelf for organizing contents and a fireproof bag for additional protection of sensitive items. It operates on four 1.5V alkaline batteries and also supports an external power source.
1. Components: * A. Security Key (x2): Used for primary access. * B. Emergency Key (x2): Used for emergency access when digital keypad is inaccessible or batteries are dead. * C. Emergency Battery Box (x1): Provides external power in case internal batteries are depleted. * D. Expansion Screw (x6): For mounting the safe to a wall. * E. Fireproof Bag (x1): For storing items that require fire protection.
2. Adjustable Shelf: * To adjust the shelf, turn the fastener clockwise and pull it out horizontally. This allows you to change the shelf's position or remove it entirely to suit your storage needs.
3. Mounting the Safe: * Step 1: Position the cabinet against the desired wall and mark the locations for the anchor holes using a marker. * Step 2: Use a hammer drill to create holes at the marked positions. * Step 3: Move the cabinet to its final location and insert the expansion screws into the drilled holes with a hammer. * Step 4: Securely tighten the expansion screws to complete the installation.
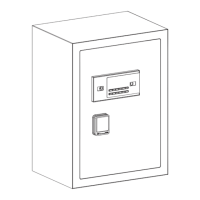
4. LCD User Manual - First-Time Safe Setup: * Security Key Usage: The security key (blue) is located on the left side of the product. The emergency key/password lock (black) is on the right. To use the emergency key/password lock, turn the blue security key clockwise. The vertical key slot cannot use the emergency key/password lock. If the key is lost, contact customer service. * Battery Installation: Install the batteries as per instructions. * Password Setting: Refer to the detailed instructions for setting the security key password. * Display Panel: Shows information such as time, date, and operational status. * Emergency Key: Used for manual override. * Key Panel: The digital keypad for entering codes. * Door Handle: For opening and closing the safe door. * Reset Button: Located inside the safe, used for resetting passwords.
5. LCD User Manual - Instructions: * Default Codes: Personal code is "1234", management code is "123456". * Power-On Key: The "#" key activates the keypad. After powering up, the lock scans, displays "ALL READY", then enters sleep mode. Pressing "#" wakes up the LCD and circuit board. * Clear Key: The "*" key clears incorrect digit inputs, one digit per press. * Number Key Input: Each press of a number key produces a beep and displays the entered number. If no key is pressed for about 10 seconds, the circuit board enters sleep mode, displaying year, month, day, hour, minute, and day of the week. Pressing "#" wakes it up.
6. Setting the Management Password: * Press the red key once. The screen displays "--". * Enter any 1-8 digit password. * Press "#" to confirm. The screen displays "INTO" to indicate success.
7. Setting Personal Code: * Press "#" to wake the control panel. * Press "0" twice, then press the red key once. The screen displays "--". * Enter any 1-8 digit password. * Press "#" to confirm. The screen displays "INTO" to indicate success.
8. Door Opening and Password Change: * To Open: Wake the system by pressing "#". Input the correct 1-8 digit personal or management code. A buzzer will sound twice, and the screen will display "open," indicating correct password. The electromagnetic lock engages, allowing the door to open. * To Change Password: If "open" is displayed, press the "*" key to enter password change mode. Enter a new 1-8 digit password, then press "#" to confirm. The screen displays "INTO" for success. * Incorrect Input: If the password input is incorrect, the screen displays "Error," and it will return to the waiting input state. Three incorrect password inputs will trigger an alarm for one minute.
9. Hidden Code Function: * Press "#" to wake up, then press "*" key once before entering the password. The entered password will not display digits. After opening the door, it automatically returns to the non-hidden digit state.
10. Setting and Disabling Vibration Alarm: * In sleep mode, press the "0" key once. The screen displays "BELL ON" and enters the alert state. A strong vibration triggers an alarm. * Once the alarm is activated, entering the correct password displays "OPEN" and the blue screen lights up. The electromagnet engages, automatically deactivating the alert state. * If the incorrect password is entered, the alarm stops automatically after one minute, but the alert state remains active.
11. Date and Clock Settings: * Initial Power-Up: Year, month, and day are set to 00-01-01. Time is 00-00, with Monday being the first day of the week. * Setting Time: In sleep mode, press the "*" key to access time settings. The display shows year, month, and day as 00-01-01, and they will be flashing. Input numbers sequentially to change the current time. After inputting, wait three seconds for an automatic transition back to sleep mode, with the set time displayed. * Note: When setting the hour, the tens digit of the hour will appear as shown in the icon below, indicating that the tens digit of the hour is 0.
12. Door Access Records Inquiry: * To Inquire: Enter the correct password to unlock the door. Once the "open" message disappears, press the "0" key once. * Display: The display shows the time of the previous door access, starting with the date, followed by the time, and then indicating which type of password was used. * "PASS1" indicates access using the personal password. * "PASS2" indicates access using the management password. * Viewing Records: While "PASS1" or "PASS2" is visible, press the "0" key again to view the last door access record. Repeat this process to access up to 14 recorded door access times.