EasyManua.ls Logo

YitaHome TZSK-V 1 - User Manual

YitaHome TZSK-V 1
22 pages
Print Icon
To Next Page IconTo Next Page
Loading...
CARRO REFRIGERADOR RODANTE
CARRELLO FRIGO AVVOLGIBILE
CHARIOT RÉFRIGÉRANT À ROULETTES
ROLLKÜHLERWAGEN
ROLLING COOLER CART
FTPLDB-2005
FTPLDB-2014
TZSK-V 1
Question and Answer IconNeed help?

Do you have a question about the YitaHome TZSK-V 1 and is the answer not in the manual?

Summary

Important Installation Precautions

Preparation and Environment

Gather parts, assemble on a clean surface, and avoid low temperatures for proper installation.

Assembly Guidance

Refer to accessory guides for correct orientation during assembly steps.

Parts Identification and Overview

Panel with Drain Hole (Part A)

Identify panel A, which features a drain hole for water drainage.

Panel with Reinforcement Rod (Part C)

Identify panel C, equipped with an iron rod for structural reinforcement.

Other Key Components (B, D, E, J, G, H, I)

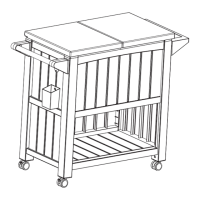
Overview of additional parts including panels, bin, brackets, and plates.

Assembly Step 1: Base Panels

Connect Panels A and C

Assemble the main side panels A and C as the initial structural step.

Assembly Step 2: Structure Reinforcement

Attach Panel D to Panel C

Secure panel D to panel C using the iron rod for added structural support.

Assembly Step 3: Bottom and Side Elements

Connect Panels B and W

Integrate panels B and W into the base and sides of the cart frame.

Assembly Step 4: Frame Continuation

Attach Additional Panels B and W

Continue building the cart frame by attaching more panels B and W.

Assembly Step 5: Install Mobility

Mount Casters (W1, W2)

Attach the wheels (W1 and W2) to the bottom of the assembled cart.

Assembly Step 6: Attach Side Features

Install Hooks (G) and Rack (K)

Mount the side hooks (G) and the storage rack (K) onto the frame.

Assembly Step 7: Install Accessories

Attach Bin (J), Opener (O), Pen Holder (S)

Mount the container (J), bottle opener (O), and pen holder (S).

Assembly Step 8: Support Rods

Connect Rod Components (P, L, R)

Assemble the support rod assembly using parts P, L, and R.

Assembly Step 9: Side Handles;Hooks

Secure Hooks (G) on Side Handles

Attach the hooks (G) securely to the side handles of the cart.

Assembly Step 10: Top Panel Installation

Attach Top Panel E with Hinges

Mount the top panel (E), ensuring correct hinge positioning.

Assembly Step 11: Structural Fastening

Secure Assembly with Screws (Q)

Use screws (Q) to firmly attach various components of the cart.

Assembly Step 12: Mounting Plates

Attach Plates (H, I) with Brackets (N)

Secure plates (H, I) to the structure using brackets (N) and screws (Q).

Assembly Step 13: Top Reinforcement

Secure Panel A with Screws (Q)

Fasten panel A using screws (Q) for enhanced structural stability.

Assembly Step 14: Support Pegs

Insert Support Pegs (M)

Place the support pegs (M) into their designated slots on the frame.

Assembly Step 15: Inner Bin Insertion

Place Bin (U) into Frame

Insert the inner bin (U) into its designated position within the cart.

Assembly Step 16: Drain Pipe System

Attach Drain Pipe (V) and Cover (Q)

Install the drain pipe (V) and its cover (Q), ensuring proper fitment.

Final Assembly Confirmation

Customer Support and Contact

YitaHome TZSK-V 1 Specifications

General IconGeneral
BrandYitaHome
ModelTZSK-V 1
CategoryIndoor Furnishing
LanguageEnglish

Related product manuals