EasyManua.ls Logo

ZachTek WSPR - User Manual

ZachTek WSPR
3 pages
Print Icon
To Next Page IconTo Next Page
Loading...
Quick Guide for WSPR Desktop transmitter
Setting the configuration for the Transmitter.
1. Download and install the Configuration software from my web
www.zachtek.com/download
2. Connect the USB port of the Transmitter to a PC with the USB
cable and connect the included GPS antenna to the GPS input.
Put the GPS puck near a window to get a good GPS signal
3. On the other side of the box connect a suitable HF antenna to the
port marked Transmitter Output
4. Start the configuration software and choose a Serial port from the
drop down list.
5. Click the “Connect” button. If the serial port was the correct one
then the software will pull data from the Transmitter and display
the data from it in the Software.
If you have several serial ports in your PC, you may have to try to
connect to each of them in order until you find the right one.
Question and Answer IconNeed help?

Do you have a question about the ZachTek WSPR and is the answer not in the manual?

Overview

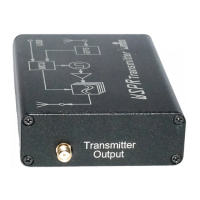
The ZachTek WSPR Desktop Transmitter is a device designed for transmitting WSPR (Weak Signal Propagation Reporter) beacons across various HF bands. It functions as a standalone WSPR beacon or a signal generator, configurable via a dedicated software interface.

Function Description:

The primary function of the WSPR Desktop Transmitter is to broadcast WSPR signals. It utilizes a GPS module to acquire precise time and location data, which is crucial for WSPR operation. The device can be configured to transmit on multiple amateur radio bands, ranging from 2190m (137.500kHz) to 4m (70.092,500MHz). Users can set their call sign, select desired transmission bands, and specify the output power. The transmitter can operate in three modes: WSPR Beacon, Signal Generator, or Idle. In WSPR Beacon mode, it continuously transmits WSPR packets based on the configured settings. The Signal Generator mode allows for continuous signal output at a specified frequency. The device's operational status is indicated by a yellow LED.

Important Technical Specifications:

  • Supported Bands:
    • 2190m (137.500kHz)
    • 630m (475.700kHz)
    • 160m (1.838,100MHz)
    • 80m (3.594,100MHz)
    • 40m (7.040,100MHz)
    • 30m (10.140,200MHz)
    • 20m (14.097,100MHz)
    • 17m (18.106,100MHz)
    • 15m (21.096,200MHz)
    • 12m (24.926,200MHz)
    • 10m (28.126,200MHz)
    • 6m (50.294,500MHz)
    • 4m (70.092,500MHz)
  • Output Power: Configurable, with a default setting of 23dBm.
  • GPS Integration: Includes a GPS input for an external antenna to acquire time and location data (Maidenhead locator).
  • Connectivity: USB port for PC connection and configuration.
  • Antenna Port: Dedicated port for connecting an HF antenna, labeled "Transmitter Output."

Usage Features:

  1. Software Configuration: The device is configured using a dedicated software application available for download from the manufacturer's website.
  2. Initial Setup:
    • Download and install the configuration software.
    • Connect the transmitter to a PC via a USB cable.
    • Connect the included GPS antenna to the GPS input and place it near a window for signal acquisition.
    • Connect a suitable HF antenna to the "Transmitter Output" port.
  3. Software Interface:
    • Upon launching the software, select the correct serial port from the drop-down list and click "Connect." The software will then retrieve and display the current settings from the transmitter.
    • Users can set their call sign in the "WSPR Configuration" section.
    • Desired transmission bands can be enabled by checking the corresponding boxes.
    • The Maidenhead locator can be set to "Auto (GPS)" for automatic acquisition or "Manual" for manual entry.
    • Output power can be adjusted.
    • After making changes, click the "Save" button to store the settings on the transmitter.
  4. Starting WSPR Beacon: To initiate WSPR transmissions, click the "Start" button within the "WSPR Configuration" section of the software.
  5. Verification: To confirm settings have been saved correctly, close and re-open the serial port in the software. This will re-read all settings from the transmitter.
  6. Standalone Operation: Once configured, the transmitter can operate independently without a continuous PC connection. It will start in the mode (WSPR Beacon, Signal Generator, or Idle) that was last set in the configuration program.
  7. Status Indication (Yellow LED):
    • Off: Waiting/Idling.
    • Single Blinking: Acquiring position from GPS satellites.
    • Double Blinking: Waiting for the top of an even minute (for WSPR synchronization).
    • Pulsating Rapidly: Transmitting a WSPR packet.
  8. Dynamic Configuration Changes: If any settings are changed in the software while the device is in WSPR beacon mode, it will exit that mode. Users must click the "Start" button again to resume WSPR transmissions with the new settings.

Maintenance Features:

  • Firmware Updates: The device likely supports firmware updates, though specific instructions are not detailed in the provided text. The "Information console" in the software shows "ZachTek WSPR-TX_LP1 standard firm," suggesting a firmware version.
  • Troubleshooting: If the software fails to connect, users may need to try different serial ports until the correct one is identified.
  • Documentation and Support: Additional information and support are available on the manufacturer's website and via email.

ZachTek WSPR Specifications

General IconGeneral
BrandZachTek
ModelWSPR
CategoryTransmitter
LanguageEnglish