XS1930 Series User’s Guide
31
CHAPTER 3
Hardware Panels
This chapter describes the front panel and rear panel of the Switch and shows you how to make the
hardware connections.
3.1 Front Panel
The following figures show the front panels of the Switch.
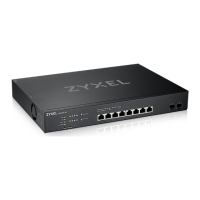
Figure 10 Front Panel: XS1930-10
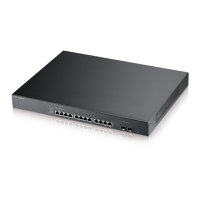
Figure 11 Front Panel: XS1930-12HP
The following table describes the ports.
Table 4 Front Panel Connections
CONNECTOR DESCRIPTION
2 or 8 100 Mbps, 1
Gbps, 2.5 Gbps, 5
Gbps, and 10 Gbps
RJ-45 Ethernet Ports
These are 10GBase-T auto-negotiating and auto-crossover Ethernet ports.
Connect these ports to a computer, a hub, a router, or an Ethernet switch.
8 100 Mbps, 1 Gbps,
2.5 Gbps, 5 Gbps,
and 10 Gbps RJ-45
PoE Ports
These are 10GBase-T auto-negotiating and auto-crossover Ethernet ports.
Connect these ports to a computer, a hub, a router, or an Ethernet switch.
2 10 GbE SFP+ Slots Use SFP+ transceivers in these ports for high-bandwidth backbone connections. You can
also insert an SFP+ Direct Attach Copper (DAC) in the SFP+ slot.
Reset Press the RESET button to reboot the Switch without turning the power off. See Section 3.3 on
page 35 for more information about the LED behavior.
Restore Press the RESTORE button for three to six seconds to have the Switch automatically reboot
and restore the last-saved custom default file. See Section 3.3 on page 35 for more
information about the LED behavior.
Press the RESTORE button for more than seven seconds to have the Switch automatically
reboot and restore the factory default file. See Section 3.3 on page 35 for more information
about the LED behavior.
 Loading...