EasyManua.ls Logo

10L0L Front Inner Storage Basket User Manual

10L0L Front Inner Storage Basket
2 pages
To Next Page IconTo Next Page
Page #1 background imageLoading...
Page #1 background image
3/8 inch (10mm) 3/8 inch (10mm) 1/2 inch (13mm)
10mm Wrench......................................1
13mm Wrench......................................1
10mm Sleeve.......................................1
13mm Sleeve.......................................1
Socket..................................................1
Screw..................................................12
Screw Nut............................................ 8
Gasket.................................................16
Plastic Buckle.......................................1
Metal Buckle........................................ 4
Basket...................................................1
Socket 1/2 inch (13mm)
Front Inner Storage Basket for
Golf Cart Club Car DS and Precedent
1. Fasten the buckle in middle.
See figure 1
2. Prepare screws and bolts.
See figure 2
3. Tighten the screws with No.
13 sleeve & wrench.
See figure 3
4. Fix the screws well.
See figure 4
We are striving to build an reliable brand of golf carts parts and accessories.
Hope this manual can assist you to easier install.
For more technical support, please reach us via
Website : www.10l0l.com
Email : sale_service@10l0l.com
Facebook : zhong zaiyang
Youtube : 10L0L
Installation Tools Qty
Installation Tools
Installation Steps
International Smart Production, Global Direct Supply International Smart Production, Global Direct Supply
Question and Answer IconNeed help?

Do you have a question about the 10L0L Front Inner Storage Basket and is the answer not in the manual?

10L0L Front Inner Storage Basket Specifications

General IconGeneral
Brand10L0L
ModelFront Inner Storage Basket
CategoryAutomobile Accessories
LanguageEnglish

Summary

Front Inner Storage Basket Installation

Step 1: Fasten the buckle

Secure the buckle in the center of the basket assembly.

Step 2: Prepare screws and bolts

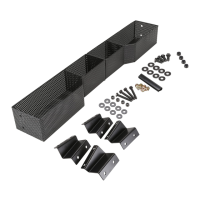
Gather the necessary screws and bolts for assembly.

Step 3: Tighten screws

Use the specified sleeve and wrench to tighten the screws.

Step 4: Secure screws

Ensure all screws are firmly fixed in place.

Step 5: Drill on tube

Drill holes into the designated tube for mounting.

Step 6: Align components

Align the basket components as shown in the figure.

Step 7: Align mounting holes

Carefully align the holes for mounting the basket.

Step 8: Insert screws

Insert the screws into the aligned holes.

Step 9: Tighten final screws

Tighten the remaining screws using the correct sleeve and wrench.

Step 10: Final adjustments

Make any final adjustments as illustrated.

Step 11: Installation finished

The installation process is now complete.