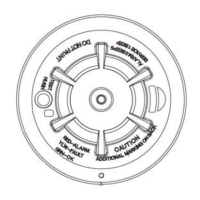
2GIG‐SMKT3‐345
WIRELESS SMOKE/HEAT/FREEZE ALARM
INSTALL INSTRUCTIONS
FCCID:ZFH‐SMKT3345
IndustryCanadaID:9640A‐SMKT3345
2GIG’sWirelessSmoke/Heat/FreezeAlarmisa3xAAAbattery‐poweredwirelessalarmintended
foruseina2GIGsystem.Thealarmhasabuilt‐inwirelesstransmitter,whichcommunicates
withthe2GIGControlPanel.Whensmoke,excessiveheatorcoldisdetected,thealarmsounds
aloudlocalalarmandthebuilt‐int
ransmittersendsasignaltotheControlPanel.Thisalarmis
designedtoprovideprotectionwithina35‐footradiusoftheunit.The2GIG‐SMTK3‐345can
sendalarm,tamperandbatteryconditionmessagestotheControlPanel.
Box Contents
•WirelessSmoke/HeatAlarm
•Packofscrewsandfixings
•3AAAEnergizerE92batteries(1.5V1100mAh)orequivalent
TheWirelessSmoke/HeatAlarmcontainsasounderthatgeneratestheASHIs3.41temporal3
patterninanalarmcondition.
Inalarm,amessageisalsosenttotheControlPanelandthealarm’szonetypeandnamear
e
displayedatthepanel.Duringanalarmcondition,pressingthealarm’shushbuttonsilencesthe
sounder.TricoloredLED(red,yellow,green)andasounderonthealarmprovidelocalvisualand
audibleindicationofthealarm’sstatus.
Afterpower‐uphascompletedandthealarmisfunctioningnormally,thegreenLEDblink
severy12
seconds.
AlarmTrouble:Whenthealarmhasageneralfault,theyellowLEDblinksonceeveryfourseconds
andthereisachirpevery48seconds.After4hoursthe2GIGControlPaneldisplaysalossof
supervisionmessage.
AlarmDirtyFeature:Whenthealarmhasbeencontaminated,they
ellowLEDblinksonceevery8
secondsandthereisachirpevery48seconds.After4hoursthe2GIGControlPaneldisplaysaloss
ofsupervisionmessage.
LowBatteryDetection:TheWirelessSmoke/HeatAlarmispoweredby3AAAbatteries.Thealarm
regularlychecksforalowbattery.Ifalo
wbatteryisdetected,thetransmittersendsalowbattery
messagetothe2GIGControlPanel,thatdisplaysthealarm’sIDatlowbattery.Inaddition,the
yellowLEDofthealarmblinksevery12seconds.Thealarm’ssounderchirpsevery48seconds
(yellowLEDcontinuestoblink)untiltheba
tteriesarereplaced.Pressingthehushbuttonsilences
thechirpingfor12hoursifnoothertroubleconditionsexist.Replacethebatterieswhenthe
chirpingbegins.Replacetheoldbatterieswithnewones.
Ifyouareexperiencinglowbatteryissues,checktomakesurethatyouhavethecorrectbatteries
installed(3AA
AEnergizerE92).
Inserting and Replacing Batteries
1. Removethealarmfr omitsbasebytwistingtheitcounter‐clockwise.Removeanddisposeof
thebatteriesaccordingtoyourlocalregulations.
2. Toensureproperpower‐downsequence,waitaminimumof20secondsbefore
insertingnewbatteries.
3. Insert3AAAEnergizerE92batteriesinthebatterycompartment.Followthepolaritydiagr
am
insidethecompartment.Ifthebatteriesareinsertedincorrectly,removegentlywithanon‐
conductivetoolandcorrectlyreinsert.
4. Reinstallthealarmontothemountingbasebyturningthealarmclockwiseuntilthemating
marksalign.
5. Afterthepower‐upsequence,thegreenLEDshouldblinkaboutonceevery12secondsto
indic
atenormaloperation.Ifthebatteriesarenotinsertedcorrectly,thealarmwillnotoperate
andthebatteriesmaybedamaged.Ifthealarmdoesnotpower‐up,checkforcorrectbattery
insertionandforfullychargedbatteries.
Constantexposuretohighhumiditymayreducebatterylife.
Programming
Thefollowingstepsdescribegeneralguidelinesforprogramming(learning)theWireless
Smoke/HeatAlarm(2GIG‐SMKT3‐345)intothe2GIGControlPanel.Scrollbetweenoptions
usingthe←and→arrows.Movetothepreviousornextpromptbypressingthe↑and↓
arrows.FormoredetailsregardinghowtoprogramtheControlPanel,refertothe2G
IG
ControlPanelInstallGuide.
1. SelectRFsensor#(01to48).AssigntheWirelessSmoke/HeatAlarmtoanewzone.
2. SelectRFsensortype.
(09)24‐hourfire(recommendedforsmokeandfire)
(16)24‐hourfirewithverification(optional)
(23)noresponsetype(optionalwithfreeze)
3. SelectRFequipmenttype.
4. SelectRFsensorequipmentcode.Enter1058forth
eSMKT3‐3452GIG Smoke/HeatAlarm.
5. EnterRFsensorserialnumber(7digits).
ManualEntry:Typeinthelast7digitsoftheTXIDthatisfoundoutsidetheboxoronthe
bottomoftheheadunitbyremovingthebase.
AutoEntry:WiththepanelinLearn‐inmode(p
ressShiftthenLearn)causeatamperonthe
alarmbytwistingthebaseunitcounter‐clockwiseandremovingit.ThecorrectTXIDshould
appear.A cceptthecorrectTXIDbypressingok.
Remembertopressthe↓arrowtocontinuethroughthesystemconfigurationprompts.
6. SelectRFsensorequipmentage.
(0)new(p
roductisnew)
(1)existing(productalreadyexists).
7. SelectRFsensorloopnumber.Selectwhichloopyouwouldliketosetup.
(1)Smoke
(2)Heat
(3)Freeze
NOTE:Eachloopmustbesetupasadifferentzone.Ifyouwanttoutilizeallthreefeatures
(smoke,heat,freeze)youwillneedtose
tupthreedifferentzonesanduseeachloop.
8. SelectRFsensor1dialerdelay
(0)disabled(thereshouldneverbeadialerdelayonthistypeofalarm)
9. ConstructRFsensordescriptor.PressInsertthenpressanynumberbetween002and255to
addaword.Forexample,ifyouwantedtona
methisalarmas“smokealarm,”pressInsertthen
press208forSMOKE.PressInsertthenpress005forALARM.
10. SelectRFsensorreports(0to1).
(0)disabled(sensordoesnotreporttocentralstation)
(1)enabled(sensorreportstothecentralstation)
11. SelectRFsensorsupervised(0to1)
.
(0)disabled(sensordoesnotreportlossofsupervisionorlowbattery)
(1)enabled(sensorreportslossofsupervisionorlowbattery)
12. SelectRFsensorchime(0to13).
(0)disabled(panelwillnotchimewhensensorisactivated)
(1)‐(13)(selectsavoiceandchimetosoundwhensensorisactivated)
13.
Toprogramanothersensor,clicknext.
14. Toexitprogramming,clickskipthenendandexit.Uponexit,thepaneltakesafewsecondsto
reset.
Testing
Beforete sting,putthepanelintotestmodesothecentralstationisnotnotifiedtoprevent
unwantedalarms.TestingthealarmactivatesanalarmsoundandsendsasignaltotheControl
Panel.Thetestfunctioncannotbeusedifthealarmhasatroublecondition.
Test alarmsounder,LEDsandtransmitter
1.HoldtheTestbuttonfor4beeps(approximately6seconds).
2.ReleasetheTestbutton.
3.Oncereleased,theproductwillcontinuetobeep5moretimes.Bef orethebeepsstop,a
signalwillbesenttriggeringthealarm.
SmokeTest
Holdacottonwickatthesideofthealarmandgentlyblowsmokethroughthealarmuntilthe
smoketriggersthealarm.Youcanalsousesmokeaerosol.
DirectHeatTest (UseHairDryer1000‐1500Watts)
Directheattowardthealarm.Holdtheheatsourceabout12inchesfromthealarmtoavoid
damagetotheplastic.Thealarmresetsonlyafterithastimetocool.
Ifanalarmfailsanyofthesetests,seeMaintenanceforhowtocleanthealarm.
Mounting the Alarm
1. Seethediagramtoinstallthemountingbaseontheceilingoronthewall.Usethe2screwsand
anchorsprovided.Maneuverthebasesothescrewsareattheelbowofthescrewslotsand
secure.
2. F itthe alarminsidethebasebyaligningitoverthebaseasshown(a
larm’salignmentnotch
shouldbeslightlyoffsetfromthemountingbasetamperreleasetab),thenturnthealarm
clockwiseuntilthealarmclicksintothebase.

 Loading...