Do you have a question about the 3 Day Blinds HONEYCOMB SHADE ARCHES and is the answer not in the manual?
| Product Type | Honeycomb Shade |
|---|---|
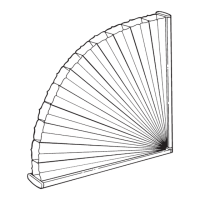
| Style | Arches |
| Light Filtering | Yes |
| Energy Efficient | Yes |
| Material | Fabric |
| Mounting Type | Inside or Outside Mount |
| Brand | 3 Day Blinds |
Instructions for installing a half arch inside a window opening.
Lists and shows standard hardware components included with the shade.
Lists and shows optional hardware components for the shade.
Specific installation steps for shades with arch tops in an inside mount.
Instructions for installing a half arch outside a window opening.
Step-by-step guide for installing a full arch shade outside mount.
Basic instructions on how to operate the standard shade.
Operation instructions for shades with top-down/bottom-up functionality.
Operation instructions for shades with top-down functionality.
Guide on how to adjust and level the bottom rail of the shade.
Steps for safely removing the shade from its mounting.
Safety information regarding cords and child protection.
General safety warning about strangulation hazards with cords.
