Do you have a question about the 3Doodler Start+ and is the answer not in the manual?
Choking Hazard: Not suitable for children under 36 months. May contain small parts.
Details on transformers, batteries, FCC, and ICES compliance.
Ensure the filament is cut correctly before inserting into the pen.
Extruded plastic cannot be reused.
Clean away plastic stuck to the nozzle while the pen is switched on.
Turn pen on, wait for solid green LED before starting.
Click to start, insert filament until grip is felt.
Click again to stop; plastic will appear from nozzle.
Double-click the button when the pen is idle and LED is solid green.
Plastic reverses for ~10 seconds; LED flashes green during process.
Push short strands through if reversing fails, do not force removal.
Slowly flashing orange LED indicates low battery. Turn off and charge.
Connect via USB cable; LED flashes orange while charging.
Solid orange LED indicates the pen is fully charged.
Push pen into surfaces or other doodles for better sticking.
Mold and shape plastic for a few seconds after extrusion before it hardens.
Layering more plastic makes your doodles stronger.
Use a table edge to join two shapes together.
Follow steps 1-7 to learn how to draw a name with the 3Doodler.
Follow steps 1-3 to build a simple 3D cube.
| Device Type | 3D Printing Pen |
|---|---|
| Suitable Age | 6+ years |
| Power Source | Rechargeable Battery |
| Material | Plastic |
| Charging Time | 1-2 hours |
| Material Compatibility | 3Doodler Start Plastic |
| Safety | No hot parts |
| Battery Type | Lithium Polymer |
| Usage Time | Approx. 60 minutes |
| Nozzle Temperature | Low temperature |
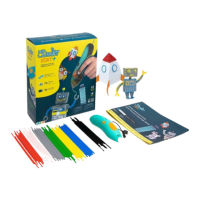
| Includes | 3Doodler Start+ Pen, Micro-USB Charging Cable, Activity Guide |
| Filament Type | 3Doodler Start Plastic |