7
Fig. F:1
Fig. F:2
Fitting 3M
TM
PELTOR
TM
TEP-200 EU/LEP-200 EU/LEP-200 EU OR/EEP-100 EU and
EEP-100 EU OR Earplugs
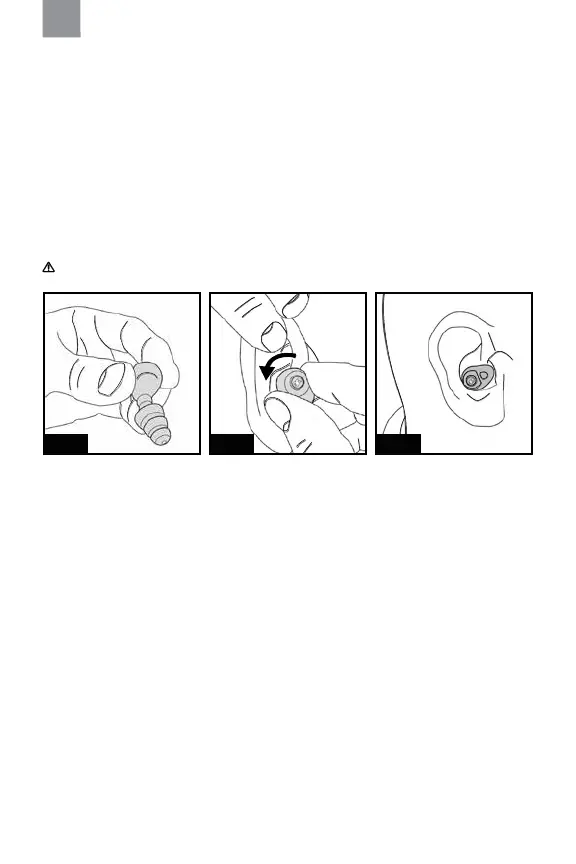
The earpiece should be powered off prior to insertion. Eartips should be clean and in good
condition before tting.
1. Select a proper eartip size for your ear canal.
2. Hold the earplug with the eartip attached (Fig. F:1).
3. Insert the eartip into the ear canal while pulling the ear outward away from the head
and upward with the opposite hand (Fig. F:2).
4. Rotate the earplug toward the back of the head (Fig. F:3).
5. With the earplug powered off, check to ensure you have a good eartip t. Pull the
earpiece gently. It should not come out of the ear easily. If it does, repeat the insertion.
Listen to steady loud noise with eartips in both ears. The noise should sound softer.
Cover your ears with tightly cupped hands. The noise should sound about the same
whether or not your ears are covered. If you cannot obtain a good t, try a different type
or size of eartip.
CAUTION: For greater comfort and safety, remove the eartips slowly with a twisting
motion to gradually break the seal.
Fig. F:3
Using the TEP-200 EU/LEP-200 EU/LEP-200 EU OR earplug
1. Power On: Turn the product on by pressing and holding the Power/Control button for
2 seconds (Fig. A:1). This is referred to as a “long” press. You may release the button
when you hear a tone. The earpiece should now be on and in the low volume setting.
Repeat this process for the other earpiece.
Note: When the earpiece is turned on and properly tted in your ear, sound entering your
ear should not sound distant, faint, or mufed. If it does, make sure the device is turned
on.
2. Environmental Listening: When the earplugs are powered on, you can adjust the
volume to a comfortable setting by quickly pressing and releasing the Power/Control
button. This is referred to as a “quick” press. When powered on, the earpieces allow
sounds to pass through in quiet environments while restricting the volume level in loud
environments.
Upon power on:the TEP-200 EU/LEP-200 EU/LEP-200 EU OR defaults to the low
setting, which reproduces the environmental sounds at a reduced level. Each setting is
indicated by a unique tone.
Additionally, audio levels are selectable by pressing the Power/Control button quickly.
This cycles through the following audio levels (each level is indicated by a “beep”):
• TEP-200 EU and LEP-200 EU: low, medium, high and microphone off.
• LEP-200 EU OR: low, medium, high and extra high
.
Note for TEP-200 EU and LEP-200 EU, the microphone off setting allows you to shut off
the environmental microphones without turning off the earpiece. This can be especially
helpful when the earpieces are in the “comms mode” and you are experiencing difculty
hearing your radio or phone due to environmental noise. A quick press will cycle back
through the volume settings.
EN