8
Seite 8
-
210 x 297 mm
-
3100016478/01
-
SCHWARZ
-
19-187 (kn)
6.
Malfunctions and Error Messages
7.2 Care
Clean all components with a soft cloth and, if necessary, a mild cleaning
agent (e.g., dish-washing detergent). Solvents or abrasive cleaners may
not be used in any case, as they can damage the plastic components!
-
Cleaning agents must not enter the unit!
To disinfect all components, spray the disinfectant on a towel and
use it to disinfect the unit. Do not spray the disinfectant directly on
the device.
-
Disinfectant agents must not enter the unit!
-
Dry residual disinfectants on the device with a soft and fluff-free
cloth, as they damage the plastic components.
If necessary, ask the manufacturer of the disinfectant if its constant use
will damage plastic surfaces.
7.3 Maintenance and Repair
No components inside the unit require servicing or repair by the user.
3M Deutschland GmbH will accept responsibility for the safety, reliability,
and correct function of the unit only if:
-
Any modifications or repairs are carried out only by personnel
authorized to do so by 3M Deutschland GmbH;
-
The electrical fittings in the room comply with all regulatory
requirements;
-
The unit is operated according to these Operating Instructions.
Plastic cartridges are subject to wear depending on the material and
frequency of use and are therefore not covered by the warranty for this
unit. They should be regularly checked for signs of wear (e.g., fissures)
and replaced with new Penta cartridges for Pentamix Lite two years after
initial operation at the very latest. The use of worn or defective cartridges
can have adverse effects on the evenness of the mixture, reducing the
quality of the impression.
8. Customer Information
No person is authorized to provide any information that deviates from the
information provided in this instruction sheet.
8.1 Warranty
3M Deutschland GmbH warrants this product to be free from defects
in material and manufacture. 3M Deutschland GmbH MAKES NO
OTHER WARRANTIES, INCLUDING ANY IMPLIED WARRANTY OF
MERCHANTABILITY OR FITNESS FOR A PARTICULAR PURPOSE. User is
responsible for determining the suitability of the product for user’s
application. If this product is defective within the warranty period, your
exclusive remedy and 3M Deutschland GmbH’s sole obligation shall be
repair or replacement of the 3M Deutschland GmbH product.
8.2 Limitation of Liability
Except where prohibited by law, 3M Deutschland GmbH will not be liable
for any loss or damage arising from this product, whether direct, indirect,
special, incidental or consequential, regardless of the theory asserted,
including warranty, contract, negligence or strict liability.
Malfunction Cause Remedy
The unit does The plungers are Turn the plunger
not start either fully advanced adjustment knob to
or retracted move the plungers
from their upper or
lower limit
Unit starts, but no Material has set in Attach a new mixing
paste is extruded the mixing tip tip
The plungers are Turn the plunger
jammed adjustment knob to
check for smooth
movement
The paste flows too The pastes are too Allow the pastes to
slowly or not at all cold, or sealing cap
attain room temperature
of the base paste is (at least 18° C).
defective Replace defective foil
bag
The paste is extruded The drive shaft has Remove the mixing tip.
but the rotor in the tip not engaged the Turn the plungers
does not rotate mixing tip, it is stuck several times up to
in its top position their upper limit,
thus regaining axial
moveability. Attach
new mixing tip
The cartridge will not The plungers are not Turn the plungers up
fit into the unit fully retracted to their limit by turning
the adjustment knob
clockwise and arresting
it. Check the plunger
discs for damage
The cartridge Clean the cartridge
receptacle is dirty receptacle
The unit does not The “Start” button Press the “Start” button
switch off is stuck again or unplug the
unit and release the
“Start” button
The plungers are Foil of a bag is Retract plunger
difficult to retract wedged between against the resistance,
the cartridge and but avoid damage of
the plunger plunger discs
7. Maintenance and Care
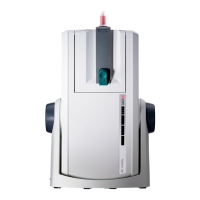
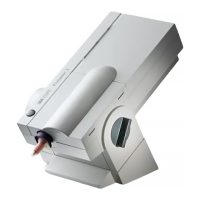
7.1 Replacement of the Plunger Discs
If damaged, the plunger discs must be replaced. Only original parts may
be used as replacements to insure safe operation.
왘
Turn off the unit and disconnect the plug from the power source. Use
an Allen wrench to remove the screw in the center of the plunger disc.
Remove the disc and screw a new one into place (Fig
.21).
When changing the plunger discs, make sure you position them with the
correct alignment (see Fig. 21) to prevent damage to the foil bags.