2
Sensitivity
The sensitivity setting of the weld arc detection system can
be adjusted to accommodate a variety of welding methods
and workplace conditions. In order to see the current
sensitivity setting, momentarily press the SENS button. To
select another setting, press the SENS button repeatedly
until the indicator shows the desired setting, as indicated on
the scale above the indicators
Position
Locked in light state (shade 3) at all times
Used for grinding
Position 1 Least sensitive setting. Used if there is
interference from other welders’ arcs in the
vicinity.
Position 2 Normal position. Used for most types of
welding indoors and outdoors.
Position 3 Position for welding with low current or with
stable welding arcs. (eg TIG welding)
Position 4 Suitable for very low current welding, use of
invertertype TIG welding machines.
Position 5 Most sensitive setting. Used for TIG welding
where part of the arc is obscured from view.
Position
Locked in selected dark state. Same
function as a passive welding lter.
Position locked light state
This setting could be used for grinding or other non-
welding activities. When the welding lter is locked in the
light state (shade 3) the LED under the symbol will ash
every 8 seconds to alert the user. The welding lter must
be unlocked before arc welding is performed, by choosing a
sensitivity setting for welding. When the welding lter turns
OFF (after 1 hour inactivity), it will automatically leave the
locked state and go to sensitivity setting 2.
Position 1-5
If the lter does not darken during welding as desired,
increase the sensitivity until the welding lter switches
reliably. Should the sensitivity be set too high, the lter may
remain in the dark state after welding is complete due to
ambient light. In this case, adjust the sensitivity downward
to a setting where the welding lter both darkens and
lightens as desired.
Position locked dark state
When the welding lter is locked in the dark state and
the welding lter turns OFF (after 1 hour inactivity), it will
automatically reset to sensitivity setting 2. The shade
number to be used in the locked dark state, is selected by
the SHADE/ON button.
Delay
The delay function should be used to set the recovery delay
from dark to light of the welding lter according to welding
method and current. See table g. (E:3). The scale for the
open-up delay function is placed below the indicators.
Comfort mode for tack welding
This setting may help reduce eye fatigue resulting from
the eye constantly adjusting to differing light levels during
tack welding. Tack welding mode uses an intermediate light
state (shade 5). If an arc is not struck within 2 seconds
the welding lter will switch back to its normal light state
(shade 3).
Note that the Sensitivity and Delay function are using the
same indicators on the display.
IN USE
To check that the electronics and buttons are working,
press the buttons and the indicators will ash. The batteries
should be replaced when the low battery indicator ashes or
indicators do not ash when the buttons are pressed.
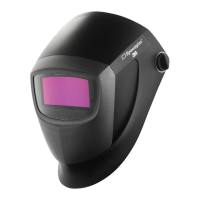
The welding lter is equipped with three optical sensors
(see g A:1) reacting independently causing the lter to
darken when a welding arc is struck. The sensors on the
welding lter must be kept clean and uncovered at all times
for optimal function.
The recommended operating temperature range for the
product is -5°C to +55°C.
Flashing light sources (e.g. safety strobe lights) can
trigger the welding lter when no welding is occurring. This
interference can occur from long distances and/or from
reected light. Welding areas should be shielded from such
interference.
CLEANING INSTRUCTIONS
Clean the welding lter and protection plates with a lint-free
tissue or cloth.
To avoid damage to the product do not use solvents for
cleaning. Do not immerse in water or spray directly with
liquids.
MAINTENANCE
Replacement of outer protection plate.
Remove silver front cover (see welding shield user
instruction) and replace the outer protection plate (see
gure B:1)
Replacement of inner protection plate
The welding lter must be dismounted to replace the inner
protection plate, the used inner protection plate is removed
as illustrated in gure C:1. The new inner protection plate
should be inserted after the protective lm has been
removed as illustrated in gure C:2.
Magnifying lens (accessory) mounting (see gure C:3).
Replacement of batteries
Dismount the welding lter, take out the battery holders (use
a small screwdriver if necessary) and replace the batteries
in the battery holders (see gure D:1) Slide each battery
holder into the welding lter until it snaps in position. Note
that all settings will be reset to the original manufacturing
setting.
The used batteries/worn out product parts should be
disposed of according to local regulations. The welding
lter should be disposed of as electronic waste.
STORAGE AND TRANSPORTATION
Store in a clean and dry environment, temperature range
-30°C to +70°C and relative humidity less than 90%. The
original packaging is suitable for transporting the product.
 Loading...