Do you have a question about the 4DRC AERIUM F3 and is the answer not in the manual?
Covers age limits, safe flying distances, proper assembly, and avoiding hazardous environments.
Includes keeping manuals, handling small parts, and using correct charging cables and safety precautions.
Lists all items included in the drone package, such as the drone, screwdriver, and spare parts.
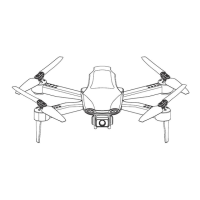
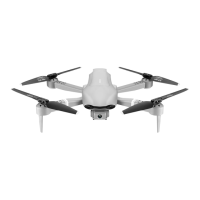
Identifies key parts of the drone, including motors, battery, camera, and LED lights.
Provides step-by-step instructions for replacing drone propellers correctly.
Details how to connect the USB cable and the indicator lights during charging.
Labels and describes the functions of various buttons and joysticks on the remote control.
Instructions for safely installing AAA batteries into the remote control, including polarity.
Guides users on how to download and install the drone control application via QR codes.
Steps to connect the drone to a mobile device via Wi-Fi for control.
Overview of primary functions like GPS, connection status, camera controls, and flight modes.
Details on selecting modes like multi-seat flight, circular flight, and speed limiting.
Explanation of beginner mode settings and display of flight distance and height information.
Specifies optimal outdoor conditions and places to avoid for safe drone operation.
Instructions on powering on the drone and remote control for frequency adjustment.
Guides on connecting the mobile device to the drone's Wi-Fi and pairing the remote.
Steps for performing horizontal calibration using the remote control or the app.
Detailed instructions for calibrating the drone's compass through specific rotations.
Explains how to check for GPS signal strength for takeoff readiness.
Instructions for unlocking the drone and initiating takeoff once satellite search is complete.
How to use the "Instant Takeoff/Landing" button for automatic flight and landing.
Explains the drone's behavior in normal mode using optical sensors for hovering.
Steps to disable GPS and start/stop the drone for indoor flights.
A sequence of essential steps to perform before drone takeoff.
Explains how to use the left and right joysticks for ascent, descent, yaw, and directional movement.
Explains the phenomenon of ground effect and its impact on flight stability at low altitudes.
How to engage and adjust settings for the drone's free flight mode.
How to activate the automatic return-to-home feature and handle obstacles.
Details on automatic return due to signal loss or low battery levels.
How to switch between low, medium, and high speed modes using the remote or app.
Instructions for setting and executing flight paths using GPS waypoints via the app.
How to activate and adjust settings for the drone to fly in a circle around a point.
How to enable and use the mode where the drone follows the mobile device.
Using hand gestures like 'Yeah' for photos and 'Palm' for video recording.
How to use filters and record video clips (MV) within the app.
Solutions for issues like unsuccessful GPS search or low battery.
Addresses problems like inability to take off or poor flight stability due to deformed blades or engine issues.
Fixes for loss of control after impact or sensor imbalance issues.
The Aerium 4DRC F3 drone is a remote-controlled aerial vehicle designed for users over 14 years of age. It comes in several models, including the 4DRC F3 4K (without GPS), 4DRC F3 GPS 1080P, and 4DRC F3 GPS 4K. The manual specifies that GPS features are not applicable to the 4K model without GPS.
The drone is designed for flight and aerial photography/videography. It features a camera for capturing images and videos, and LED lights for visibility. The remote control allows for precise manipulation of the drone's movements, including take-off, landing, and various flight modes.
Users are responsible for ensuring the drone does not cause personal injury or property damage. The drone must be commissioned and assembled strictly according to the operating instructions. During flight and landing, a safe distance of 2-3 meters from the operator and other persons must be maintained to prevent injury. The manufacturer and dealer are not liable for any loss, damage, or personal injury resulting from improper use or operation. Children over 14 may operate the drone under adult supervision; children under 14 are not permitted to operate it. Small parts are included, so it should be kept out of reach of children to prevent accidental ingestion or suffocation. Operation on roads or waterlogged ground is prohibited. Packaging materials should be disposed of promptly to avoid harm to children. The drone should not be disassembled or reassembled to prevent malfunctions.
Propeller blades are labeled A, B, C, and D, with A=C and B=D. They must be installed according to the provided drawing; incorrect installation will prevent the drone from taking off. Damaged blades should be replaced with the corresponding type (B/D with B/D, A/C with A/C). The remote control requires four "AAA" batteries, which are not included. When installing, attention must be paid to the anode and cathode markings. New and old batteries, or different types of lithium batteries, should not be mixed.
The drone battery is charged via a USB cable. The USB interface of the charging cable should be connected to a computer's USB port or a 5V = 2A power adapter, and the other end to the battery socket. During charging, the drone's red light turns on and the green light flashes. Once fully charged, the red light turns off and the green light turns on. Only the original USB charging cable should be used. Safety precautions for charging include avoiding high temperatures, open flames, or electric heating equipment. Batteries should not be thrown, disassembled, or soaked in water, and should be stored in a dry place. Charging must be done under adult supervision.
For Android users, the app can be downloaded by scanning a QR code or visiting the provided website. For iOS users, it can be downloaded from the App Store. After turning on the drone, users need to access their mobile device's Wi-Fi settings, find the "4DRC-4K-GPS *****" network, and connect. Once connected, the "4DRC PRO" app icon can be opened to enter the control interface. It is recommended to stay away from other signal sources when controlling the drone.
The remote control features a fine-tuning/gear power indicator, left and right joysticks, a switch for geomagnetism calibration, and buttons for immediate take-off/landing, common/GPS mode selection, free mode, and return. The app interface displays GPS connection status, Wi-Fi signal strength, battery status, and offers various settings and functions such as photo/video switch, media library, flight records, zoom, filters, 3D inverted camera, unlock, gesture shooting, adding music, switching cameras, multi-seat flight, circular flight, find a drone, speed limiter, and touch joystick. Beginner mode can be turned off for advanced flight operations, allowing adjustment of flight distance and altitude for longer flights.
The drone should be operated in an outdoor open area free of rain and snow, and with wind strengths below level 4. It should be kept away from crowds, trees, power lines, tall buildings, airports, and signal towers. It should not be used in enclosed areas or places with weak GPS signals.
The drone/remote must be fully charged. To begin, turn on the drone's power. The horizontal spot on the launch pad will automatically adjust the frequency, with the front white indicator light and rear red indicator light blinking. The drone's front should be positioned horizontally. Next, turn on the remote control. Long-pressing the "ON/OFF" button will cause the power light to come on. Pushing the throttle stick up and then down will pair the drone and remote, indicated by the UAV indicator light turning solid.
In GPS mode, the GPS light on the remote control will be on, indicating it's searching for satellites. When the red rear aero light flashes and the remote control beeps, satellite search is complete, and the drone is ready for use. The drone requires a satellite signal of at least level 10 to take off.
To unlock the drone, push the left and right control sticks outwards. This can only be done after satellite search is complete. After unlocking, the drone can take off, and all lights will illuminate. In the app, clicking the "One Key Unlock" icon also achieves this function.
After unlocking, lightly pressing the "Instant Takeoff/Landing" button on the remote control will make the drone automatically fly to a height of about 1 meter and maintain stable flight. Pressing the button again will cause it to land slowly. In the app, clicking the icon during flight will also initiate a slow landing.
In normal mode, the drone uses an optical sensor to hover in place when flying over suitable ground. A yaw of approximately 1 meter is normal, depending on ground conditions and flight altitude.
To enter normal mode, long-press the "GPS" button on the remote control until the GPS indicator light turns off. To unlock, press the left and right joysticks outwards. Then, push the left control lever upwards to take off. Alternatively, press the "Instant take-off" button.
The front of the drone during frequency matching is the main part in free mode. To adjust the default direction, restart the drone after frequency matching, then briefly press the "free mode" button on the remote control. Press it again when finished. To achieve straight flight, align the drone in a straight line so the gyroscope can automatically detect it.
Pressing the "Immediate Return" button will make the drone return to the geomagnetic calibration position. If the flight altitude is below the safety altitude, the drone will climb to the safety altitude before slowly landing. If obstacles are present, pressing the button again disables the function, allowing manual rudder operation to avoid obstacles, then the throttle stick can be pushed down to land. In the app, tapping the "Instant Return" icon makes the drone fly back; tapping it again cancels the return.
If the remote control signal is interrupted for approximately 4 seconds, the drone will automatically fly back to the signal location.
If the battery is low, the drone will automatically return to a position about 20 meters above the take-off point. This return cannot be canceled.
The drone defaults to low-speed mode (3 gears) after take-off. Lightly pressing the remote control will switch between "di" (low gear), "di di" (medium gear), and "di di di" (high gear). In the app, the "More settings" icon can be used to switch flight speed.
In GPS mode, click the "More Settings" icon in the app to enter multi-site flight. The interface will switch to a map page where a route can be set using single or continuous waypoints. If too many waypoints are set, the Delete icon can remove them. After setting waypoints, click the Send icon. The drone will automatically fly to all waypoints from the starting point. The drone's direction can be controlled using the joystick during flight.
In GPS mode, click the "More Settings" icon in the app to enter circle flight. The drone will automatically create an adjustable radius. Pushing the right rudder left or right will make the drone fly in a circle, and flight speed is adjustable. Pushing the right rudder back and forth adjusts the radius. Pressing the circle flight button again stops the circle flight.
In GPS mode, click the "More Settings" icon in the app to enter tracking mode. The drone will automatically fly with the movement of the mobile device, maintaining a distance from its current position to the control device (phone or iPad). Lightly pressing the GPS following button cancels tracking mode.
In GPS mode, the drone can be set to record automatically or use a timer by looking at the front camera lens and performing specific gestures. For gesture recognition, stand about 3 meters away from the lens in a well-lit location.
Click the "Filter interface" icon in the app to select filter effects. Click the Record icon to record an MV. Once finished, the short video or images will be saved to the media library.
When the drone is not in use, disconnect the battery plug from the drone's power connector to prevent battery damage. Regular cleaning of packaging materials is advised.
| Camera Resolution | 4K |
|---|---|
| Frame Rate | 30 fps |
| Wind Resistance | Level 5 |
| GPS | Yes |
| Follow Me Mode | Yes |
| Return to Home | Yes |
| Obstacle Avoidance | No |