This document provides a user manual for the Five F26 car receiver, available in G, R, and W variants. It is a car AUX/USB/microSD receiver with Bluetooth functionality.
Function Description
The Five F26 is designed to provide various audio playback options in a vehicle. It functions as a:
- Radio Receiver: Capable of tuning into FM radio stations.
- Media Player: Supports playback from USB flash drives and microSD cards.
- Bluetooth Device: Allows for wireless audio streaming and hands-free calling from mobile devices.
- AUX Input Device: Provides an audio input for connecting external audio sources.
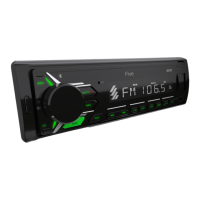
The front panel features a MOD button for power ON/OFF and mode selection (RADIO, USB, SD, AUX, BT), a MUTE button for silencing audio or interrupting calls, and a VOL/SEL encoder for volume control and sound mode selection. Navigation buttons (◄◄ and ►►|) are used for track skipping in media player mode and station searching in radio mode. Dedicated buttons for AMS (automatic tuning), EQ (equalizer settings), CLK (clock display/setting), and BND (frequency range selection/call answering) are also present. Number buttons (1-6) serve multiple functions, including selecting preset radio stations and controlling media playback features like play/pause (1/►II), intro scan (2/INT), repeat (3/RPT), random playback (4/RDM), and skipping tracks by 10 (5/-10 and 6/+10). The device also includes an AUX IN port, an RST (reset) button, a microSD card reader (TF), a USB port, and a microphone.
Important Technical Specifications
Radio
- Operating Frequency: FM 87.5 – 108 MHz
- Memory Cells: 18 for storing tuned radio stations
- Intermediate Frequency: 10.7 MHz
- Sensitivity (30 dB): 15 dB
- Reflection Ratio: 40 dB
- Signal to Noise Ratio: 65 dB
- Frequency Response: 30 Hz - 15 kHz
- File System: FAT16 / FAT32
- Flash Cards (SD, USB): Up to 32 GB
- Playable File Types: MP3/WMA/WAVE/FLAC
- ID3 Tag Support: Encoded in ISO-8859-1
- Signal to Noise Ratio: 85 dB
- Stereo Channel Separation: 80 dB
- Frequency Response: 20 Hz - 20 kHz
AUX
- Maximum Input Voltage: 1.0 V
- Input Impedance: 30 kOhm
- Frequency Response: 20 Hz - 20 kHz
- Connector: Mini Jack 3.5 mm
General
- Bluetooth Mode: Supports A2DP, HFP profiles (ver. 4.2)
- Maximum Output Power (10% distortion coefficient): 4 * 50 W
- Tone Control: ± 8 dB (low frequencies 100 Hz, high frequencies 10 kHz)
- Speaker Impedance: 4-8 ohm / channel
- RCA Stereo Audio Output: Yes
- Supply Voltage: Direct current +10.8 - 14.7 V (negative chassis connection)
- Maximum Current Consumption: 5 A
- Overall Dimensions: 178 x 90 x 50 mm
- Weight: 0.4 kg
Usage Features
Basic Operations
- Power On/Off: Press the MOD button to turn on. Press and hold MOD for 3 seconds to turn off.
- Mode Selection: Repeatedly press MOD to cycle through RADIO, USB, SD, AUX, and BT modes. USB and SD modes are only available if a drive is inserted.
- Volume Control: Rotate the VOL/SEL encoder.
- Mute: Press MUTE to instantly silence audio. Press again to restore sound.
- Sound Settings: Press the VOL/SEL encoder to access parameters like BASS, TREBLE, BALANCE, FADER, LOUD OFF/ON, EQ OFF/ON, STEREO/MONO, and DX/LOC. Rotate the encoder to adjust settings. Settings are saved after 3 seconds of inactivity.
- EQ Settings: Press the EQ button or repeatedly press the VOL/SEL encoder to select EQ mode. Rotate the encoder to choose between POP, ROCK, JAZZ, CLASSIC, and COUNT equalizer presets. Bass and treble adjustments are only available when the equalizer is off.
- Date and Time Settings: Press CLK to display the clock. Press and hold CLK to set the time. Rotate the VOL/SEL encoder to adjust hours, then press VOL/SEL to switch to minutes, adjust, and press CLK to confirm.
Radio Mode
- Frequency Range Selection: Repeatedly press BND to cycle through FM1, FM2, and FM3.
- Auto Radio Tuning: Press and hold AMS for several seconds to automatically scan and store stations.
- Introductory Listening: Briefly press AMS to play 6 seconds of each of the 18 preset stations.
- Manual Tuning: Press ◄◄ or ►►| to scan backward or forward. Press and hold ◄◄ or ►►| until "MANUAL" appears to fine-tune in 0.1 MHz steps.
- Saving Stations: Press and hold one of the digital buttons (1-6) to save the current station.
- Switching Preset Stations: Briefly press one of the digital buttons (1-6) to switch to a saved station.
- Connection: Insert a USB flash drive into the USB port or a microSD card into the TF slot. The receiver will automatically switch to USB/SD mode and begin playback if files are found. If not, press MOD repeatedly until "USB" or "SD" appears.
- Track Selection: Briefly press ◄◄ or ►►| to switch to the previous or next file. Press and hold to scroll rapidly.
- Pause/Play: Press 1/►II to pause. Press again to resume.
- Preview All Files (Intro Scan): Press 2/INT. "INT ON" will appear, and each file will play for 10 seconds. Press 2/INT again to stop.
- Repeat Playback: Press 3/RPT to repeat the current track. Press again to repeat all tracks.
- Random Playback: Press 4/RDM to play files in random order. Press again to cancel.
- Skip 10 Tracks: Press and hold 5/-10 to skip back 10 tracks. Press and hold 6/+10 to skip forward 10 tracks.
- Note on USB/SD Compatibility: The device supports standard USB flash drives approved by Microsoft. USB-MP3 players may not be fully supported due to varying standards.
Bluetooth Mode
- Pairing: Turn on the receiver. On your mobile device, search for "CAR-BT". Enter "0000" if a PIN is required. "BT ON" will display upon successful pairing.
- Music Playback: The device supports A2DP. Press 1/►II to play/pause music.
- Call Handling:
- Answer a call: Press BND (phone icon). "TALK" will display.
- End a call: Press BND (phone icon).
- Switch between BT and mobile device during a call: Press 1/►II.
- Call last person in call list: Press and hold BND (phone icon).
- Disconnection: "BT CONN" will display after disconnecting.
AUX Mode
- Connection: Connect an external audio device to the AUX IN jack on the front panel.
- Selection: Press MOD repeatedly until "AUX" mode is selected.
- Audio Output: Audio from the external device will be played through the car speakers, allowing volume and sound quality adjustments via the receiver.
Maintenance Features
Installation and Removal
- Pre-installation: Connect wiring according to the diagram and ensure functionality. Use only supplied parts. Disconnect the vehicle's negative battery terminal.
- Installation: Insert the mounting frame into the dashboard compartment and bend the "tabs" with a screwdriver. Connect power, speaker, and antenna connectors. Carefully insert the player until it latches, ensuring wires are not pinched.
- Removal: Ensure ignition is off and disconnect the negative battery terminal. Insert removal keys into the slots on the front panel sides and pull the receiver out.
- Placement: Avoid installing in direct sunlight, near heat sources, or in dusty/vibrating areas. Remove the front panel before installation.
- Compartment Dimensions: The dashboard compartment must be 182mm wide and 53mm high. Ensure sufficient depth.
Fuse Replacement
- Remove the blown fuse from its socket and insert a new one of the same rating. If fuses blow repeatedly, check for short circuits in electrical connections and vehicle electrical system voltage.
Cleaning
- Wipe the device surface with a soft, dry cloth. Do not wet the case. For heavy dirt, use a cloth slightly moistened with soapy water, then wipe with a dry cloth.
Precautions
- Temperature: Operate between 0 and +45 degrees Celsius. In winter, warm the car interior for 15 minutes before use. Avoid sudden temperature changes.
- Voltage: Operating voltage is 12V (+/- 2V) DC. Do not use at lower or higher voltages to prevent damage.
- Water/Moisture/Dust: Do not expose the unit to water, moisture, or dust.
- Repair: Do not open covers or attempt repairs yourself. Consult a dealer or technician.
- Power Disconnection: Disconnect power and aerial if not using for a long period or during a thunderstorm. Disconnect power if the system malfunctions (unusual sound, strange smell, smoke, liquid ingress) and have it checked by a qualified technician.
- Battery Terminal: Designed for negative battery terminal connection to vehicle metal. Confirm before installation.
- Speaker Wires: Do not short speaker wires when the unit is on, as this can overload or burn out the power amplifier.
- Driver Safety: Install the device so it does not interfere with the driver or injure passengers during sudden stops.
- Warranty: Installation by an authorized dealer is required to maintain the warranty. Improper connection may damage the receiver and void the warranty.
Reset Function
- The RST button can be activated with a ballpoint pen or thin metal tool. This may be needed after initial installation, if control buttons are unresponsive, or if "ERROR" is displayed.
The manufacturer sets the product life to 3 years. The device is designed for safe disposal, complying with European Directive 2002/96/EC. Dispose of old devices separately from household waste.