The i-Stitch and i-Stitch up are surgical instruments designed for secure suture placement, as detailed in their Application Manual. These devices are used in conjunction with specific i-Stitch loading units, which include models IST1021, IST1051, IST1011, and IST1031. The manual emphasizes the importance of consulting the instruction for use for detailed surgical instructions.
Function Description:
The primary function of the i-Stitch and i-Stitch up instruments is to facilitate the precise and secure placement of sutures within tissue, particularly in ligaments such as the sacrospinous ligament. The system is designed to ensure that the suture is correctly positioned and firmly attached, providing a reliable method for tissue approximation or suspension. The "i-Stitch up" variant likely offers a specific orientation or design for upward suturing, complementing the standard i-Stitch instrument.
Usage Features:
-
Secure Suture Preparation:
- Loading Unit Integration: The process begins by taking the i-Stitch loading unit.
- Suture Positioning: The suture is gently pulled backward until its blunt tip is precisely positioned at the end of the cannulated needle. This ensures that the suture is ready for deployment.
- Suture Clamp Security: The suture is then secured with a suture clamp, preventing premature release or displacement during handling and insertion.
-
Loading Unit Insertion:
- Guiding Slot Placement: The i-Stitch loading unit is inserted into the i-Stitch guiding slot. It is crucial to ensure that the loading unit fits correctly within this slot to maintain proper alignment and function.
- Stop Position Engagement: The loading unit is inserted until approximately 1 cm before the end of the guiding slot, reaching a "stop position." A slight resistance will be felt at this point, indicating correct seating.
-
Instrument Placement and Tissue Penetration:
- Index Finger Guidance: The user places their index finger at the desired target position. The blunt instrument tip is then guided along the index finger to the precise location for suture placement.
- Depth Markings: The instrument tip features depth markings that serve as a visual guide to determine the appropriate insertion depth, aiding in accurate placement within the tissue.
- Ligament Insertion: The tip of the instrument is pushed into the target ligament (e.g., sacrospinous ligament) using the index finger for guidance. A reference marking on the instrument indicates the correct position for insertion.
- Continuous Pressure: It is critical to maintain pressure with the index finger on the tip until the entire i-Stitch instrument is removed, ensuring stable placement during the initial insertion phase.
-
Suture Deployment:
- Forward Push: The loading unit is pushed forward with the thumb to release the instrument. This action deploys the suture.
- Audible Click: An audible click indicates that the suture has been successfully deployed.
- Tissue Penetration: The blunt suture tip penetrates the tissue and passes through it, securing the suture.
- Tip Engagement: The blunt suture tip is then secured in the i-Stitch's tip, indicating successful capture and readiness for withdrawal.
-
Suture Release and Instrument Removal:
- Suture Clamp Release: Before removing the loading unit, the suture must be released from the suture clamp. This action frees the suture, allowing it to remain in the tissue while the instrument is withdrawn.
- Loading Unit Withdrawal: The loading unit is then completely withdrawn from the i-Stitch/i-Stitch up instrument.
- Index Finger Removal: The index finger is removed from the tip of the i-Stitch instrument.
- Instrument Lift and Removal: The tip of the instrument is lifted slightly, and the instrument is then removed from the surgical site.
- Suture Security: At this point, the suture will remain firmly in place within the tissue.
-
Final Suture Management:
- Instrument Removal: The i-Stitch or i-Stitch up instrument is fully removed.
- Suture Grasp: The two ends of the suture are grasped.
- Suture Verification: It is essential to ensure that the suture is tight and correctly attached, confirming successful placement.
Important Technical Specifications (as observed from images):
- Model Numbers: The instruments are identified by model numbers such as REF IST1010 for i-Stitch and REF IST1040 for i-Stitch up.
- Lot Numbers: Each instrument includes a LOT number (e.g., 248579), indicating batch traceability.
- CE Mark: The presence of the CE0297 mark signifies compliance with European health, safety, and environmental protection standards.
- Loading Unit Compatibility: The instruments are designed to work with specific i-Stitch loading units: IST1021, IST1051, IST1011, and IST1031. These units likely vary in suture type, length, or needle configuration.
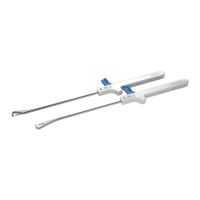
- Material: The instruments appear to be constructed from medical-grade stainless steel for the shaft and tip, with a blue polymer component for the loading unit and handle elements.
- Design: Both instruments feature a long, slender shaft with a curved, cannulated tip designed for precise tissue access and suture delivery. The handles are ergonomically shaped for user comfort and control.
Maintenance Features:
The manual does not explicitly detail maintenance features, but as a reusable surgical instrument, it can be inferred that the i-Stitch and i-Stitch up instruments would require:
- Sterilization: Thorough cleaning and sterilization according to hospital protocols before each use.
- Inspection: Regular inspection for damage, wear, or corrosion to ensure proper function and patient safety.
- Storage: Appropriate storage conditions to prevent damage and maintain sterility.
The overall design and operational steps highlight a focus on precision, ease of use, and secure suture placement in surgical procedures.