3
DD
DD
D
..
..
.
HO HO
HO HO
HO
W W
W W
W
TT
TT
T
O REMOO REMO
O REMOO REMO
O REMO
VE A VE A
VE A VE A
VE A
TT
TT
T
ORSION ASSEMBLORSION ASSEMBL
ORSION ASSEMBLORSION ASSEMBL
ORSION ASSEMBL
YY
YY
Y
1. Make sure the torsion spring has been relieved of its
tension (see Section C.)
2. Mark or make note of the location of the fabric and the
end cap on the roller tube. This is necessary to
reposition the new torsion, fabric or roller tube exactly
the same when the new part is installed.
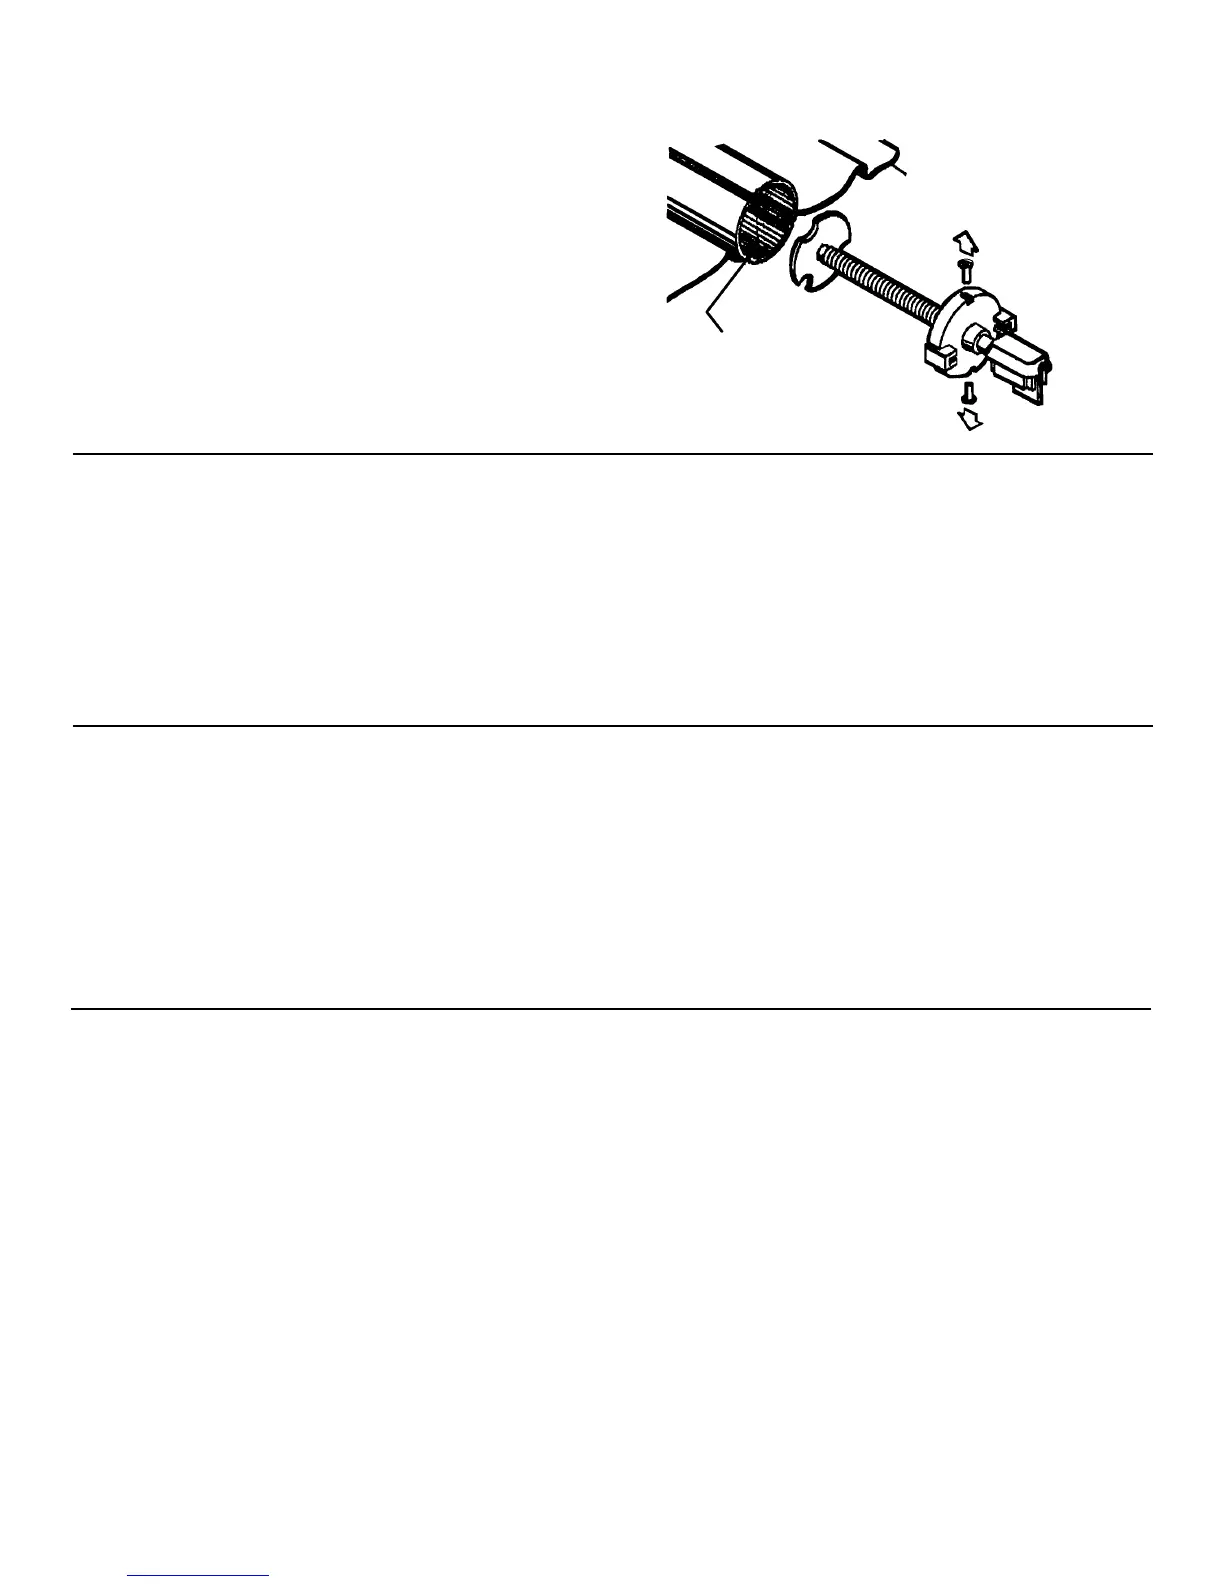
3. Remove the two screws holding the torsion assembly
to the roller tube. If secured by pop rivets, drill out the
two rivets using a 3/16" drill bit. Remove assembly from
roller tube. See FIG. 5.
E.E.
E.E.
E.
HO HO
HO HO
HO
W W
W W
W
TT
TT
T
O REMOO REMO
O REMOO REMO
O REMO
VE FVE F
VE FVE F
VE F
ABRIC FRABRIC FR
ABRIC FRABRIC FR
ABRIC FR
OM ROM R
OM ROM R
OM R
OLLER OLLER
OLLER OLLER
OLLER
TUBETUBE
TUBETUBE
TUBE
1. Remove both torsions. See Section D, Steps 1-3 for
torsion removal.
2. Roll the awning completely out on a clean smooth
surface.
3. With the awning laying flat, slide the roller tube out from
fabric.
NOTE: When removing the fabric from the 9000 and 9500
Model awning, it is necessary to remove the 1/8" pop rivets
from both ends of the roller cover. Once the rivets are
removed, you can slide the fabric out of the cover. See FIG.
6 & 7.
FF
FF
F
..
..
.
INST INST
INST INST
INST
ALLING FALLING F
ALLING FALLING F
ALLING F
ABRIC ON RABRIC ON R
ABRIC ON RABRIC ON R
ABRIC ON R
OLLER OLLER
OLLER OLLER
OLLER
TUBETUBE
TUBETUBE
TUBE
1. Unfold the new fabric and lay it on top of the existing
fabric in the
exact same positionexact same position
exact same positionexact same position
exact same position. Be sure the new
fabric is the correct size and color. If roller tube is being
replaced, make sure it is the correct length and position
it the same as the original.
2. Guide the roller tube over the poly-rope(s) of the fabric.
Be careful not to damage the roller tube or the fabric.
NOTENOTE
NOTENOTE
NOTE: When changing the fabric, it is vital that the same
groove(s) be used. This eliminates the need to redrill any
holes (i.e. center support).
3. Center the fabric on the roller tube and hand-roll the
entire assembly in the same direction as the original
fabric.
G.G.
G.G.
G.
F F
F F
F
ABRIC REPLAABRIC REPLA
ABRIC REPLAABRIC REPLA
ABRIC REPLA
CEMENT ON 9000 CEMENT ON 9000
CEMENT ON 9000 CEMENT ON 9000
CEMENT ON 9000
WITH 7 SLAWITH 7 SLA
WITH 7 SLAWITH 7 SLA
WITH 7 SLA
T RT R
T RT R
T R
OLLER COOLLER CO
OLLER COOLLER CO
OLLER CO
VERVER
VERVER
VER
RIVETS DRILLED OUT
ROLLER TUBE
FABRIC UNROLLED
SLIDE OUT TORSION ASSEMBLY
FIG. 5
Installing a new replacement fabric on a Model 9000Installing a new replacement fabric on a Model 9000
Installing a new replacement fabric on a Model 9000Installing a new replacement fabric on a Model 9000
Installing a new replacement fabric on a Model 9000
roller cover with 7 slats and a vinyl strip. See FIG. 6:roller cover with 7 slats and a vinyl strip. See FIG. 6:
roller cover with 7 slats and a vinyl strip. See FIG. 6:roller cover with 7 slats and a vinyl strip. See FIG. 6:
roller cover with 7 slats and a vinyl strip. See FIG. 6:
1. Remove vinyl strip
AA
AA
A (FIG. 11) and hinge slat
BB
BB
B (FIG.
10) from top slat
CC
CC
C (FIG. 8). Discard both vinyl strip
AA
AA
A
and hinge slat
BB
BB
B.
2. Remove top slat
CC
CC
C (FIG. 8) from roller cover assembly
and keep to be installed later.
3. The new replacement fabric will be installed as shown
in FIG.
77
77
7.
4. Use a small file to round the ends of the groove in the
5/16" channel of the main slat
DD
DD
D (FIG. 9).
5. Slide the 5/16" channel of the main slat
DD
DD
D onto the poly-
rope located approximately 12" from the top edge of the
fabric.
6. Install two pop rivets in the main slat
DD
DD
D on both ends to
prevent the fabric from shifting in roller cover. If a new
roller cover assembly is being installed, a 1/8" hole will
need to be drilled 1-1/2" to 2" from end of the main slat
for the pop rivets. To prevent damage, be sure to
remove any burrs left by the drill.
7. Use a small file to round the ends of the 5/16" grooves
on the top slat
CC
CC
C (FIG. 8) to prevent tearing of the fabric.
Slide the top slat
CC
CC
C onto both the 1/4" channel of the fifth
main slat
DD
DD
D and the polly-rope 1-1/2" from the edge of
the fabric.
8. Install the screws into the edge of the roller cover
assembly. See FIG. 7.
 Loading...