EasyManua.ls Logo

AC-Guard AC Cage User Manual

AC-Guard AC Cage
2 pages
To Next Page IconTo Next Page
Page #1 background imageLoading...
Page #1 background image
Recommended tools: Tape measure, drill with 1/4” masonry bit, four tap cons,
four washers, and a marker.
Before beginning: 1. Measure and write the a/c unit’s height, width and depth.
2. Remove all shrubs or debris from around ac unit.
3. Place all box contents flat on the ground, arranging sections
in Left, Front Center, and Right format, with stubs facing up
Assembly instructions:
1.Set Left, Front Center and Right sections flat on the ground
with stubs and stickers facing up. See diagram 2
2.Align L-shaped bar’s orange R sticker with R section R
sticker and slide fully on See diagram 2.A
3.Align L-shaped bar’s yellow L sticker with Left section L
sticker and slide fully on See diagram 2.B
4. Insert ALL set screws loosely as these will need to be tightened once cage’s
final dimension has been reached
5. Add 4 inches to the height dimension of your a/c unit
NOTE: Adjusting the Front Center section fully will simplify assembly
6. Remove yellow tape from front center section
7. Measure Front Center section top to bottom and extend the cage to the height
required (#6) See diagram 2.C
1
Depth
Height
Width
3.
4.
5.
2D
2B
2A
2C
1.
2.
6.
6A
Question and Answer IconNeed help?

Do you have a question about the AC-Guard AC Cage and is the answer not in the manual?

AC-Guard AC Cage Specifications

General IconGeneral
FinishPowder-coated
PurposeProtection
DimensionsVaries by model
WeightVaries by model
Installation TypeWall-mounted

Summary

AC-GUARD Assembly Instructions

Prepare Sections for Assembly

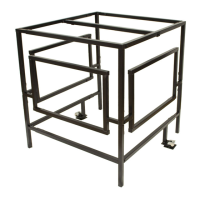
Set Left, Front Center, and Right sections flat with stubs and stickers facing up.

Connect Right Section with L-Bar

Align R sticker on L-shaped bar with R section sticker and slide fully on.

Connect Left Section with L-Bar

Align L sticker on L-shaped bar with Left section sticker and slide fully on.

Loosely Install Set Screws

Insert all set screws loosely for final dimension tightening.

Adjust Height Dimension

Add 4 inches to the height dimension of your a/c unit.

Remove Front Center Tape

Remove yellow tape from the front center section.

Extend to Required Height

Measure front center section and extend cage to required height.

Ensure Section Squareness

Adjust section squareness between top and bottom bars for correct height.

Tighten Side Bar Set Screws

Tighten 4 set screws on the Left and Right side bars.

Adjust Width Dimension

Add 6 inches to the width dimension of your a/c unit.

Extend Cage Width

Extend the cage left and right to the required width.

Tighten Remaining Set Screws

Tighten all remaining set screws on this section.

Connect Right Section to Center

Lift Right section, spread, and drop into Front Center section stubs.

Secure Right Section with Pins

Insert set pins into right section's stub holes.

Snap Locking Caps

Snap locking caps onto pins inside of the cage.

Repeat for Left Section

Repeat pin and cap installation for the Left section.

Install Back Top Bar

Install back Top Bar over corner stub, connecting stubs with set pins.

Stand Cage Upright

Carefully stand the assembled cage upright.

Confirm and Tighten Width

Confirm inside width and tighten back Top bar set screw.

Adjust Depth Dimension

Add 6 inches to the depth dimension of your a/c unit.

Extend Cage Depth

Spread cage's front and back to achieve the desired depth.

Final Dimension Check

Recheck all dimensions and tighten all set screws for squareness.

Position Cage Over Unit

Place the cage over the a/c unit with the back Top bar toward the building.

Mark Foot Bracket Positions

Trace square foot brackets onto the pad surface.

Remove Cage Temporarily

Remove the cage from the a/c unit after marking.

Position Ground Plates

Place ground-plates on pattern with hole parallel to cage.

Mark Drill Locations

Use a marker to indicate where holes are to be drilled.

Drill Holes for Ground Plates

Drill 4 holes in the marked locations on the pad.

Fasten Ground Plates

Secure ground plates with tap cons/washers, pad-lock loop away from unit.

Re-set Cage and Plates

Re-set the cage over the a/c unit and onto the ground plates.

Prepare Top Bar

Remove Top Bar from box, noting the bag of screws.

Adjust and Tighten Top Bar

Stretch Top Bar to desired length and tighten set screw.

Install Top Bar

Position Top Bar at cage's center, upward-facing, and secure with screws.

Install Locks

Install locks to secure the AC-GUARD.

Recommended Lock Maintenance

Lubricate key holes every 4 months to prevent malfunction.