EasyManua.ls Logo

Accurate Technology SMARTENTRY - User Manual

Accurate Technology SMARTENTRY
6 pages
Print Icon
To Next Page IconTo Next Page
Loading...
SMART MORTISE LOCK
Installer Guide | Two Options
If homeowners phone IS NOT available during me of installaon
Download app and follow steps
continued below.
Installer Smartphone
If homeowners phone IS available during me of installaon
Download app and follow prompts.
(Steps continued below do not apply)
Homeowner Smartphone
Installer to E-mail smartentry@accuratelockandhardware.com to become an approved
installer and bypass payment process.
- Once e-mail is recieved, we will be able to approve through Accurate’s Customer Service portal.
1.
Download the app, and create and verify account. (It is possible for the verification to go to spam in
which case installer should check their spam folder). Click on the link to activate account.
2.
Add lock by scanning QR tag and do all testing.
3.
Once tested, additional devices can be added including SmartEntry Locks, Bridges and Range Extenders.
4.
Once done, select “Transfer Ownership” option from drop down menu and type owner’s
e-mail as well as owner’s mobile number.
5.
Owner can download the SmartEntry app, create an account, activate account and log in.
6.
Payment options will be shown with activation and subscription charges.
7.
Once payment is done successfully, owner can start using the lock.8.
Question and Answer IconNeed help?

Do you have a question about the Accurate Technology SMARTENTRY and is the answer not in the manual?

Overview

The SmartEntry by Accurate is a smart mortise lock system designed for secure and convenient access control. It offers two primary installation and setup options, catering to scenarios where the homeowner's smartphone is either available or unavailable during installation. This flexibility ensures a smooth setup process regardless of the homeowner's immediate presence.

Function Description:

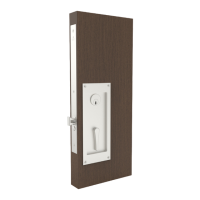
The SmartEntry lock system provides electronic access control for doors, allowing users to lock and unlock the door via a smartphone application. It integrates a mortise lock with a CPU unit and a battery pack, enabling smart functionalities such as remote access, activity monitoring, and secure ownership transfer. The system is designed to be installed in conjunction with a door prepared according to the SL-SM9159E template.

Important Technical Specifications:

  • Model: SL-SM9159E PDL Smart Mortise Lock
  • Power Source: 4 AA batteries (installed in the battery pack)
  • Connectivity: Wireless communication with a smartphone application (SmartEntry app)
  • Components:
    • SL-SM9159E Smart Mortise Lock
    • CPU Unit (with QR code for scanning)
    • Battery Pack
    • Decorative Faceplate
  • Mounting: Mortise installation, requiring a door prepared to specific dimensions (SL-SM9159E template).
  • Security: Features a security token and FCC/IC IDs for regulatory compliance and secure operation.
  • Electro-mechanical Locking: The thumb turn electro-mechanically locks the outside handle, and springs back to the home position after rotation.

Usage Features:

Installation and Setup (Installer Smartphone - Homeowner's phone IS NOT available):

  1. Installer Approval: The installer must email smartentry@accuratelockandhardware.com to become an approved installer and bypass the payment process. Accurate's Customer Service portal will then approve the installer.
  2. App Download & Account Creation: The installer downloads the SmartEntry app, creates an account, and verifies it. It's important to check the spam folder for the verification email. The account must be activated by clicking the provided link.
  3. Lock Addition & Testing: The lock is added to the system by scanning its QR tag (located on the CPU logic board). All initial testing of the lock's functionality is performed at this stage.
  4. Adding Additional Devices: After initial testing, other SmartEntry devices such as additional locks, bridges, and range extenders can be added to the system.
  5. Ownership Transfer: Once all devices are set up, the installer selects the "Transfer Ownership" option from the app's drop-down menu. The owner's email and mobile number are entered to facilitate the transfer.
  6. Owner Setup: The owner downloads the SmartEntry app, creates an account, activates it, and logs in.
  7. Payment & Activation: Payment options for activation and subscription charges are presented to the owner.
  8. Lock Usage: Upon successful payment, the owner can begin using the lock via the SmartEntry app.

Installation and Setup (Homeowner Smartphone - Homeowner's phone IS available):

  • The homeowner downloads the app and follows the prompts. The detailed steps for installer setup (1-8 above) do not apply in this scenario, implying a more streamlined process directly managed by the homeowner.

General Usage:

  • Smartphone Control: The lock is controlled via the SmartEntry app, allowing users to lock and unlock the door remotely.
  • QR Code Scanning: The CPU logic board features a QR code that is scanned with a smartphone to initiate the lock's setup and integration into the SmartEntry system.
  • Thumb Turn Operation: A physical thumb turn on the lock provides an electro-mechanical locking mechanism for the outside handle.

Maintenance Features:

  • Battery Power: The lock is powered by 4 AA batteries, which are installed in the battery pack. Users should be alerted when batteries are low to ensure continuous operation.
  • On/Off Switch: The battery pack may include an on/off switch, which should be turned "on" after battery installation. A beep sound indicates successful power-up.
  • Troubleshooting: The verification email for account creation may go to the spam folder, requiring users to check it during setup.
  • Documentation for Accessories: For Range Extenders and Ethernet Bridges, users are directed to refer to the Quick Start Guides provided with each product, indicating separate maintenance and setup instructions for these accessories.
  • Physical Installation: The installation process involves connecting 7-pin connectors, placing a ½" thick shim behind the logic board, and screwing the logic board to the door edge. This ensures a secure and stable installation. The decorative faceplate is then installed with specific machine and combo screws.
  • Functionality Testing: After installation, it is crucial to test the lock for functionality to ensure all components are working correctly. The app provides a clear "LOCKED" status display for verification.

Accurate Technology SMARTENTRY Specifications

General IconGeneral
BrandAccurate Technology
ModelSMARTENTRY
CategoryLocks
LanguageEnglish