2.B. Installation without Router
1. Connect the handset to the connection point located on the side of your
ACN Videophone.
2. Unplug the existing Ethernet cable from your computer that connects
your Cable/DSL modem to your computer. The other end of this cable
should stay attached to your modem. Connect the Ethernet cable
that you unplugged from your computer to the WAN por t of your ACN
Videophone.
3. Connect one end of the new Ethernet cable (RJ-45) that came with your
Videophone, to the LAN port of the phone. Connect the other end to the
Ethernet port of your computer.
4. Connect the power adapter to the power port and then plug it into an
electrical outlet.
Note: Do not use Power Adapters from other devices.
5. Turn the Power Switch to ON on your ACN Videophone.
6. You will see a status line on your screen as your phone goes through
setup. Once this is complete, the register light on the front of your
phone will turn green, and it is ready for use.
Note: Simultaneous use of the computer and the Videophone will affect
the quality of the connection.
If you do not have a computer simply connect your ACN Videophone to
your modem or router as described in step 2.
Changing the Display Language
After connecting your ACN Videophone for the first time you may want to change the
language setting for the display. You can select your preferred display language by
following these easy steps:
3. Optional: Connecting existing/additional
phone(s) to your ACN Videophone
Connecting additional phones to your ACN Videophone
Connect one end of a phone cord to the phone port on your ACN Videophone. The
other end of the cord can connect to another phone. If you connect to a cordless
phone you can use your ACN Digital Phone Service anywhere in your home.
2.A. Installation with Router (requires Router with free port)
1. Connect the handset to the connection point located on the side of your
ACN Videophone.
2. Connect one end of the Ethernet cable (RJ-45) to the WAN por t of your
ACN Videophone. Connect the other end to an open Ethernet port on
your router.
3. Ensure that your computer is connected to another port on your router
or via an existing Wireless (WIFI) connection
4. Connect the Power Adapter to the Power port and then plug it into an
electrical outlet.
Note: Do not use Power Adapters from other devices.
5. Turn the Power Switch to ON on your ACN Videophone.
6. You will see a status line on your screen as your phone goes through
setup. Once this is complete, the register light on the front of your phone
will turn green, and it is ready for use.
Note: Simultaneous use of the computer and the Videophone will affect
the quality of the connection.
If you do not have a computer simply connect your ACN Videophone to
your modem or router as described in step 2.
3. Select ‘Display’ and scroll down to
‘Language’.
4. Select one of the language options.
1. Press MENU and select ‘Settings’.
2. Select ‘System Settings’.
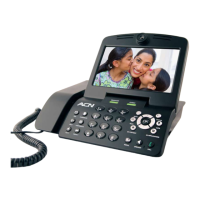
Videophone
Quick Installation Guide
Customer Services 0203 147 48 87 (Mon - Fri, 07:30-18:00) - uk.digital@myacn.eu - www.myacn.eu
UK-DPS-Refguide-003
1. Check for Required Items
You should already have these components:
Router/Cable or DSL Modem
High Speed Internet access
All of the following items should be included with your ACN Videophone.
If an item is missing, please contact ACN Digital Phone Service Technical Support.
Main Unit Handset
Power Adapter
(with country specific mains adapter,
where applicable)
Ethernet Cable
(RJ-45)
Telephone Cable
(RJ-11)
Set-Up Diagram
Phone
Socket
Cable or DSL
Modem
Computer
Video
Phone
1
2
3
Set-Up Diagram
Phone
Socket
Cable or DSL
Modem
Router
Computer
Video
Phone
1
2
3