© 2017 Adder Technology Limited • All trademarks are acknowledged.
Part No. MAN-QS-XDIP-ADDER_V1.1
Web: www.adder.com
Contact: www.adder.com/contact-details
Support: www.adder.com/support
Warranty
Adder Technology Ltd warrants that this product shall be free from defects in workmanship and materials for a period of two years from the date
of original purchase. If the product should fail to operate correctly in normal use during the warranty period, Adder will replace or repair it free
of charge. No liability can be accepted for damage due to misuse or circumstances outside Adder’s control. Also Adder will not be responsible for
any loss, damage or injury arising directly or indirectly from the use of this product. Adder’s total liability under the terms of this warranty shall in
all circumstances be limited to the replacement value of this product. If any difculty is experienced in the installation or use of this product that
you are unable to resolve, please contact your supplier.
RECEIVER
TRANSMITTER
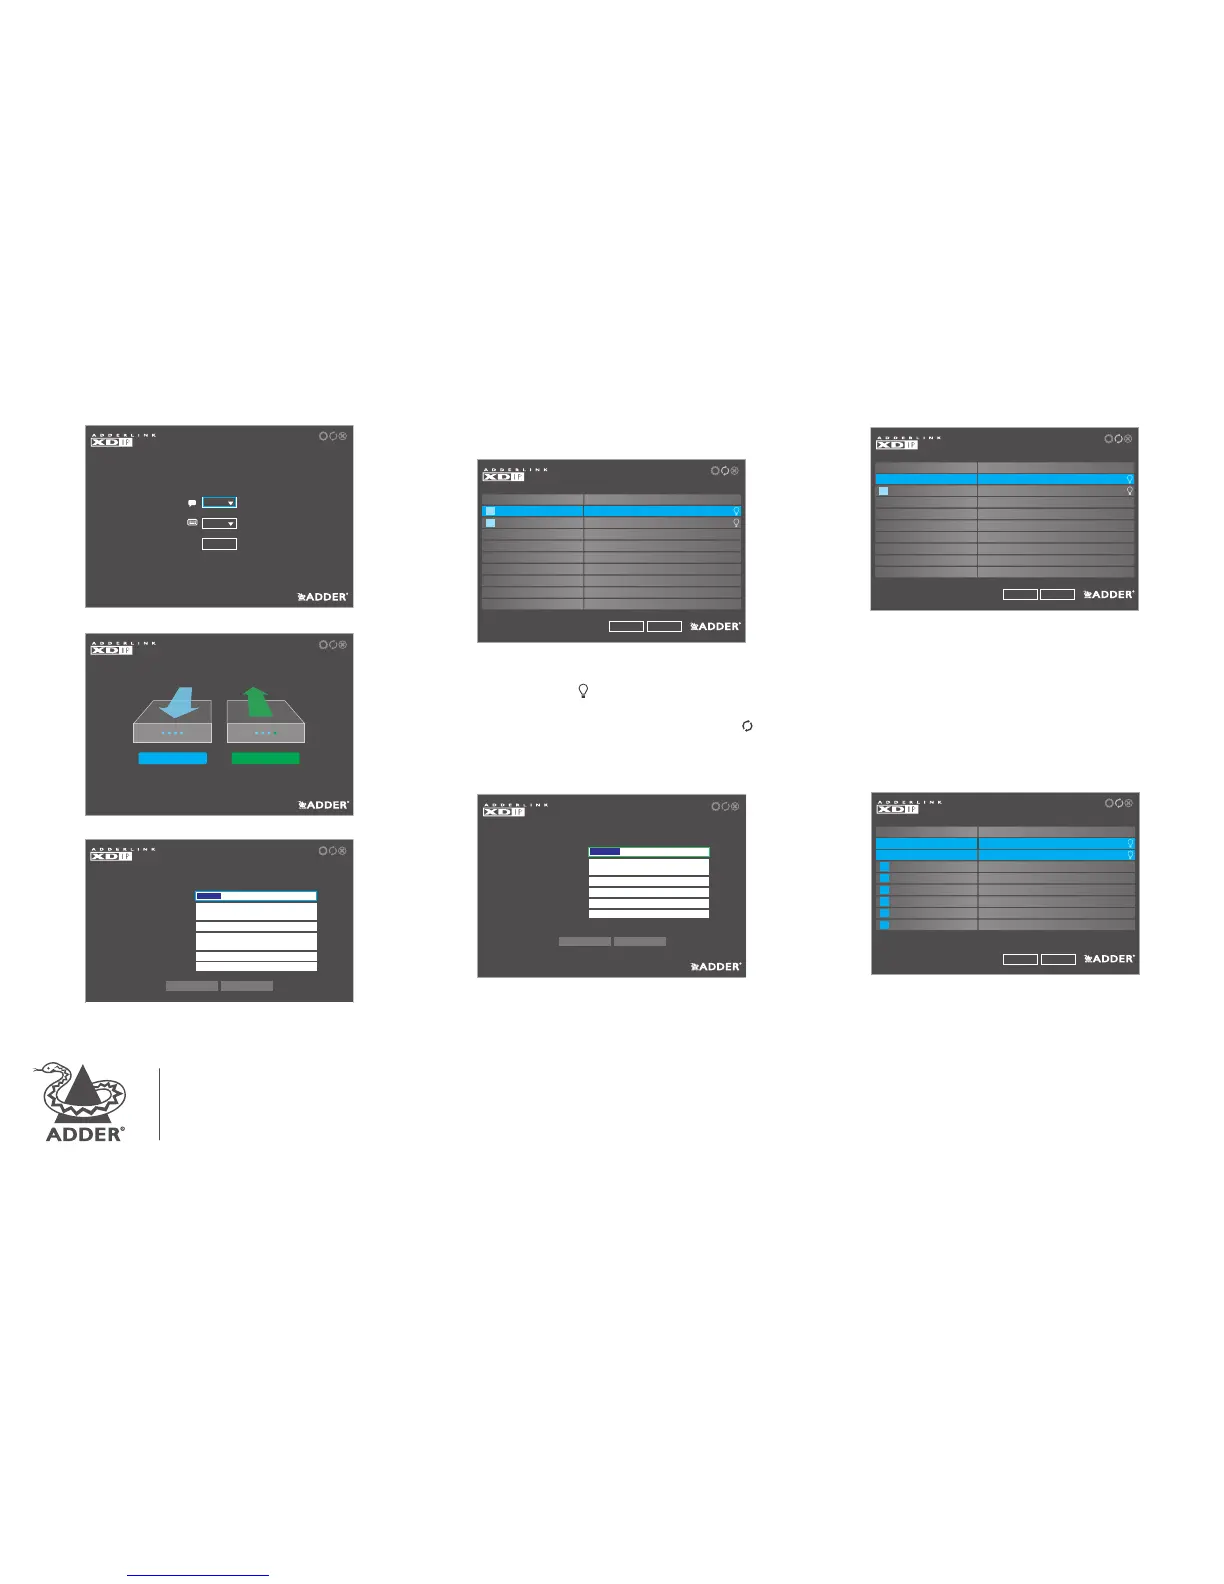
SETUP - Receiver or Tr ansmitter?
Is this node a receiver or transmitter? After restoring to defaults
you can change this in the future.
English
Welcome
Please choose your language and keyboard layout.
00:0F:58:02:DF:3B C1.00.00|
gb
OK
SETUP - Basic Information
Enter the names, descriptions and admin password for this
receiver.
Receiver Name
Receiver Description
Computer Name
Computer Description
NewAdmin Password
Confirm Admin Password
Description
Local Computer
Description
Password for Node Configuration
Password for Node Configuration
Receiver 1
Cancel OK
SETUP - Basic Information
Enter the name,description, and admin and access password for
this transmitter.
Transmitter Name
Transmitter Description
New Admin Password
NewAccess Password
Confirm Admin Password
Confirm Access Password
Description
Password for Node Configuration
Password for User Access
Password for Node Configuration
Password for User Access
Transmitter 2
Cancel OK
SETUP - Channel Selection
Select which nodes to add as channels.‘SoL’ marks nodes that are
yet to be configured and‘TX’ denotes available transmitters.
#Name
AdderLink XDIP 02DF3B
Description
Description
Description
NEXTBACK
SoL
Transmitter 1
TX
SETUP - Channel Selection
Select which nodes to add as channels.‘SoL’ marks nodes that are
yet to be configured and ‘TX’ denotes available transmitters.
#Name
Transmitter 1
Description
Description
NEXTBACK
1
Transmitter 2Description
TX
SETUP - Customise the Channel Order
Drag and drop the channels into your preferred order.
#Name
Transmitter 1
Description
Description
DONEBACK
1
3
4
5
6
7
8
Transmitter 2Description
2
START HERE: Using the screen, keyboard and mouse connected to
a node that will be a receiver, you should see the Welcome screen:
1 If necessary, change the language and keyboard layout. Click OK:
2 Click the RECEIVER option to make this node a receiver:
You will now see a list of all discovered XDIP nodes. If an entry
shows SoL (StartofLife) then it is uncongured (that node’s PWR
indicator will also show red). Otherwise, any congured XDIP
transmitter node will show TX:
Notes
• Ifyouareaddingseveralnodesatonceandneedtoidentifya
particularnode,clickthe icontoashthefrontpanelindicatorsof
thechosennodeinthelist.
• Ifnodeshavebeenaddedsincedisplayingthelist,clickthe iconto
refreshthelist.
• Passwordscanbeleftblank,butthisisnotrecommended.
4 Click an entry marked SoL to congure it as a transmitter:
The discovered nodes will be again listed, showing any changes you
have made to the name(s) and description(s):
6 Repeat steps 4 and 5 for each listed SoL node.
7 Ensure that all the transmitters (8 maximum), to which you wish
to connect from this receiver, show a number in the left hand
column. If an entry shows TX, it is yet to be connected. Click on
the entry to connect it with this receiver; if a password is set on
the transmitter, you will be asked to enter it. Once successfully
connected, the TX for the entry will change to a number.
8 When all transmitters have been connected, click NEXT.
9 You can now optionally change the order of transmitters in the
channel list. Click, hold and drag an entry to the required slot:
10 When all transmitters are in the required order, click DONE.
11 The receiver will now show the Channel List (seetherearpage).
From here you can choose between a local computer (if
connected to your receiver) or any of the associated transmitters.
5 Enter the details for this transmitter, including two separate
passwords: one for admin conguration purposes and the other to
restrict user access to this transmitter. Click OK.
3 Enter the details for this receiver, including the password (required
for admin access to the conguration details). Click OK.
 Loading...