EasyManua.ls Logo

Adrian Steel VP1 - User Manual

Adrian Steel VP1
8 pages
Print Icon
To Next Page IconTo Next Page
Loading...
1
ADRIAN STEEL COMPANY WWW.ADRIANSTEEL.COM 906 JAMES STREET ADRIAN, MI 49221 800-677-2726
Publication Number:
53566 Revision Level: A ECN Release: 19475
VP1 ASSEMBLY / INSTALL INSTRUCTIONS
Introduction / Comments:
VP1 PERIMIETER LADDER RACK FOR FULL SIZE VANS
Note:
It is advised that all fasteners used in this assembly and installation should be
checked for tightness at the following intervals: @ 2-weeks and again @ 6-
weeks of operation. This preventive maintenance step must be completed to en-
sure your Product gives you long service life.
VP1
PERIMETER LADDER RACK FSV
Question and Answer IconNeed help?

Do you have a question about the Adrian Steel VP1 and is the answer not in the manual?

Summary

Introduction and Notes

Safety Precautions

General Safety Warnings

Details crucial safety advice regarding air tools, sealing, and hazard inspection during installation.

Warranty and Installation Requirements

Important Warranty Requirements

Outlines fastener substitution, hole sealing, and torque specifications for warranty compliance.

Basic Tools for Installation

Lists fundamental tools required for most installation processes.

Overview

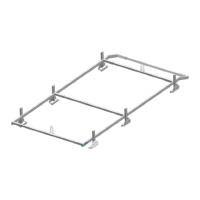
The Adrian Steel VP1 Perimeter Ladder Rack is a cargo management solution designed for full-size commercial vans, enabling the secure stowage and transport of ladders. This assembly and installation manual provides comprehensive instructions for setting up and maintaining the ladder rack, emphasizing safety, proper installation techniques, and long-term durability.

Function Description:

The VP1 Perimeter Ladder Rack provides a robust and secure platform on the roof of a commercial van for transporting ladders. It consists of a perimeter frame with multiple cross tubes and ladder stops, designed to hold ladders firmly in place during transit. The system is engineered to integrate with the vehicle's chassis drip rail, ensuring a stable and reliable attachment. The design allows for easy loading and unloading of ladders while maintaining a low profile on the vehicle.

Important Technical Specifications:

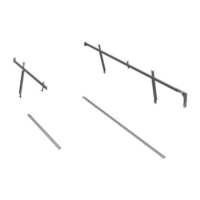
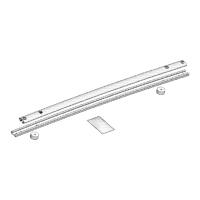
The VP1 Perimeter Ladder Rack assembly includes several key components and fasteners:

  • Main Assemblies:
    • BAG19455-0: FAS ASM/INSTL VP1 FSV (1 unit) - The primary assembly for the VP1 Perimeter Ladder Rack for full-size vans.
    • 19733-0: VPLR. OUTER FOOT (6 units) - Outer feet components that connect the rack to the vehicle's drip rail.
    • 19737-0: VP1,R.H. SIDE ASSY., FSVAN (1 unit) - Right-hand side assembly for the rack.
    • 19738-0: VP1,L.H. SIDE ASSY., FSVAN (1 unit) - Left-hand side assembly for the rack.
    • 19747-0: VPLR, CROSS TUBE 57" (4 units) - Cross tubes that span the width of the rack, providing support for ladders.
    • 19749-0: LADDER STOP POST, NO FAS (2 units) - Posts designed to prevent ladders from sliding off the rack.
    • 29118-0: FOOT CLAMP-VP1-FORD&DODGE (6 units) - Vehicle-specific foot clamps for Ford and Dodge vans.
    • 29119-0: FOOT CLAMP-VP1-CHEVY/GMC (6 units) - Vehicle-specific foot clamps for Chevy and GMC vans.
  • Fasteners and Hardware (BAG19455-0 kit):
    • BAG0507-A: 5" X 7" 3 MIL AUTOBAG (1 unit) - Packaging for smaller components.
    • FAS0124: WASHER, FLAT USS 1/4 ZN (8 units) - Flat washers for secure fastening.
    • FAS0125: NUT, HEX NLK 1/4-20 SS (32 units) - Hex nylock nuts for vibration resistance.
    • FAS0208: BOLT, CRG 1/4-20X.62 G5 NZ (12 units) - Carriage bolts for structural connections.
    • FAS0213: BOLT, CRG 1/4-20X1 G5 ZN (12 units) - Longer carriage bolts for specific connections.
    • FAS0327: U-BOLT 1/4-20X1.37X1.75SS (4 units) - U-bolts for securing ladder stops.
    • FAS0581: SCREW,SET 5/16-18X.37 ZN (8 units) - Set screws for securing cross tubes.
    • 26618-0: SILICONE, 1 OZ TUBE (1 unit) - Silicone sealant for weatherproofing joints.
  • Drill Bit and Plusnut Specifications:
    • 1/4-20UNC Plusnut (FAS0052) requires a 3/8" diameter drill with a stop.
    • 5/16-18UNC Plusnut (FAS0091) requires a 1/2" diameter drill with a stop.
    • Adrian Steel offers drill stops (P/N 31121-0) for 3/8" x 1/2" deep and 1/2" x 1/2" deep holes.
    • A Plusnut (Rivnut) Setting Tool (P/N 22200-0) is required for proper plusnut installation.

Usage Features:

  • Vehicle Integration: The rack is designed to be mounted on the vehicle's chassis drip rail, ensuring a secure and stable attachment point. Specific foot clamps are provided for Ford/Dodge and Chevy/GMC vans to ensure proper fitment.
  • Adjustability: The installation process allows for squaring and leveling the rack to the van, ensuring optimal alignment and functionality. Fasteners are initially left loose to facilitate adjustments before final tightening.
  • Ladder Stops: Dedicated ladder stop posts (19749-0) are attached to the crossbars using U-bolts, washers, and nylock nuts, providing a secure restraint for ladders during transport.
  • Floor Spacer Management: For vehicles with carpet or rubber floor mats, specific floor spacers (3927-1, 3927-2) are used to ensure proper mounting and prevent damage to the vehicle's interior. The recessed part of the floor spacer must be placed on top of the plusnut.
  • Drill Stop Requirement: To prevent damage to critical vehicle systems (fuel tank, lines, brake lines, electrical lines), drill stops are mandatory when drilling mounting holes. This ensures precise depth control and avoids accidental penetration.
  • Sealant Application: Silicone sealant (26618-0) is applied around cross tube joints to prevent water seepage into the rack tubes, enhancing the product's longevity and preventing corrosion.
  • Corrosion Prevention: All drilled holes in the vehicle's raw metal edges must be sealed with a self-etching primer to resist corrosion and potential fastener point failure. This is a critical step for maintaining the structural integrity of the vehicle and the rack.

Maintenance Features:

  • Fastener Tightness Checks: A crucial maintenance feature is the requirement to check all fasteners for tightness at specific intervals:
    • Initially after 2 weeks of operation.
    • Again after 6 weeks of operation. This preventive maintenance step is essential to ensure the product's long service life and prevent loosening due to vibration or stress.
  • Warranty Compliance: Substituting Adrian Steel specified fasteners for assembly and/or installation will void the product warranty. This emphasizes the importance of using the provided components for optimal performance and warranty coverage.
  • Documentation Retention: The installation instructions should be kept with the vehicle for future reference, aiding in any subsequent maintenance, adjustments, or troubleshooting.
  • Impact Tool Precaution: The use of air impact tools is cautioned against, as they can over-torque fasteners and lead to fastener failure. Manual tightening with appropriate wrenches and sockets is recommended to achieve specified torque values.
  • Hole Sealing: All installation holes must be sealed with silicone or butyl sealant to prevent exhaust fumes from entering the vehicle, contributing to both safety and the vehicle's interior integrity.

Adrian Steel VP1 Specifications

General IconGeneral
BrandAdrian Steel
ModelVP1
CategoryAutomobile Accessories
LanguageEnglish

Related product manuals